
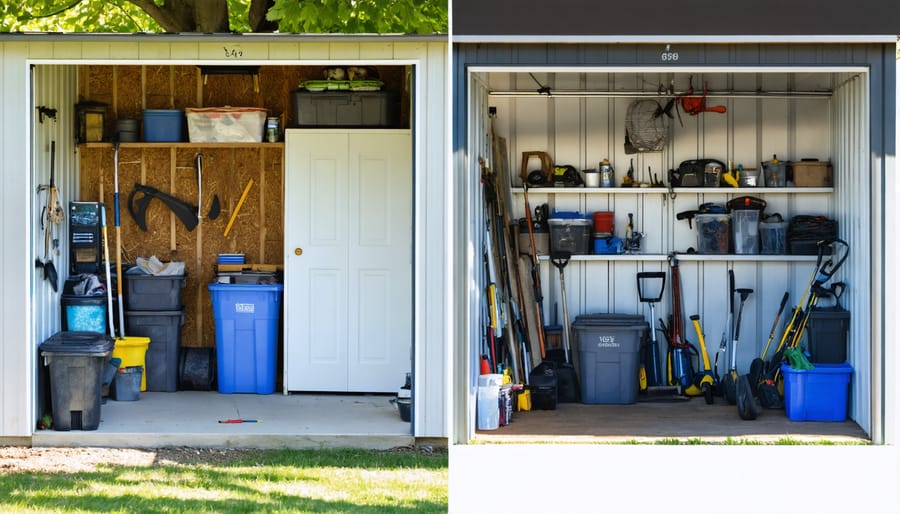
Transform Your Old Shed into a Storage Powerhouse
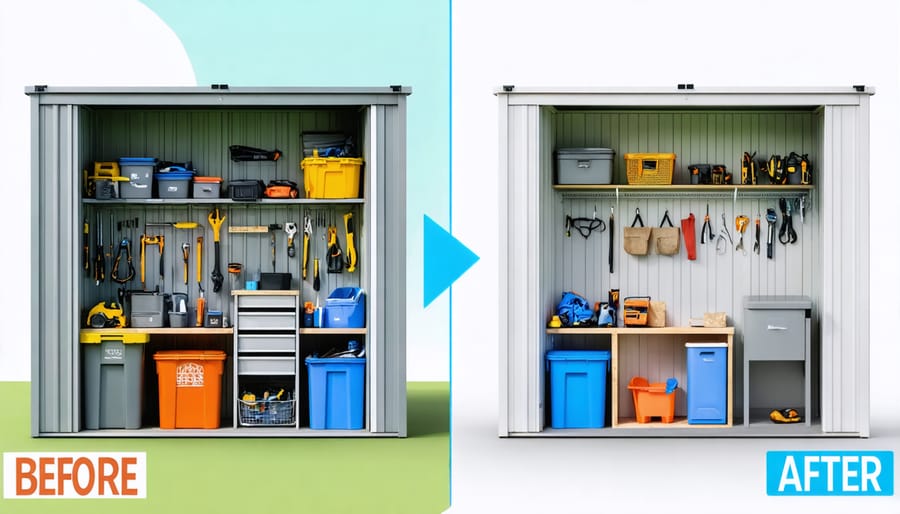
Transform your cluttered shed into an organized storage space by maximizing every square inch from floor to ceiling. Install adjustable shelving systems along walls to create flexible storage zones that adapt to changing needs. Implement a vertical storage strategy using pegboards, wall-mounted racks, and overhead ceiling tracks to utilize often-overlooked spaces. Group items by frequency of use, with seasonal equipment stored in harder-to-reach areas and everyday tools kept at arm’s length.\n\nThe key to efficient storage lies in thinking beyond traditional floor-based solutions. Weatherproof clear bins with detailed labels transform random clutter into systematic storage, while magnetic strips mounted at eye level keep metal tools instantly accessible. Consider installing a fold-down workbench that doubles as storage when not in use, maximizing functionality without sacrificing precious floor space. These smart solutions turn ordinary sheds into organized powerhouses that protect and preserve your belongings while keeping them readily accessible.\n\n\n
 \n
\n\n\n
Assessing Your Shed’s Potential
\n\n
Structure and Safety Check
\n\nBefore transforming your shed into a storage haven, evaluating structural integrity is crucial for long-term success. Start by checking the foundation for signs of shifting or cracking. Inspect walls and support beams for water damage, rot, or pest infestations. Pay special attention to corner joints and roof connections, as these are common weak points.\n\nEnsure your shed is properly weatherproofed by examining the roof for leaks and checking that all seals around windows and doors are intact. Install proper ventilation to prevent moisture buildup, which can damage both the structure and stored items. Consider adding a moisture barrier to the floor if one isn’t already present.\n\nTest the door hinges and tracks to confirm smooth operation, and verify that locks work properly for security. If your shed has windows, check for drafts and seal any gaps. Remember that a sturdy structure is essential not just for safety but also for protecting your valuable belongings. Make repairs promptly and consider professional assessment for major structural concerns.\n\n
Space Planning Basics
\n\nBefore diving into storage solutions, it’s essential to understand exactly what space you’re working with. Start by measuring your available area, including the width, length, and height of your space. Don’t forget to note down any obstacles like windows, doors, or electrical outlets that might affect your storage layout.\n\nCreate a simple floor plan on graph paper or use a free room planning app on your phone. Mark one square to represent one foot, making it easier to visualize your space. Remember to measure any odd angles or architectural features that could impact your storage options.\n\nConsider vertical space as well – many homeowners overlook the potential of wall and ceiling storage. Take measurements from floor to ceiling and note any varying heights. When mapping your space, think about traffic flow and accessibility. Leave enough room for walkways (typically 2-3 feet) and ensure frequently used items will be easy to reach.\n\nPro tip: Take photos of your space from different angles to reference later when shopping for storage solutions. This helps avoid purchasing items that won’t fit or work in your space.\n\n\n
Smart Storage Solutions
\n\n
Vertical Storage Systems
\n\nMaking the most of vertical space is a game-changer when it comes to maximizing storage capacity. Smart vertical storage solutions can transform your walls and ceiling into valuable storage real estate, effectively doubling or even tripling your available space.\n\nWall-mounted systems offer incredible versatility. Install adjustable track systems with hooks, brackets, and shelves to create customizable storage that grows with your needs. Heavy-duty pegboards are perfect for organizing tools and garden equipment, while floating shelves can display and store smaller items beautifully. Consider installing wall-mounted cabinets to keep items dust-free and create a cleaner look.\n\nDon’t forget about the often-overlooked ceiling space! Overhead storage racks can handle seasonal items, holiday decorations, or sporting equipment. Installing pulley systems makes it easy to access stored items without a ladder. For lighter items, try mesh storage hammocks that can be easily hung between rafters.\n\nQuick tip: Before mounting any storage system, always check your wall structure and use appropriate anchors. Most walls can support 50-80 pounds per mount point when properly installed. Label your storage zones clearly and keep frequently used items at eye level, with seasonal items higher up.\n\nRemember to leave some breathing room between storage zones for easy access and maintain good air circulation throughout your space.\n\n
 \n
\n\n\n
Modular Organization
\n\nModular storage systems are the ultimate game-changers when it comes to maximizing your space while maintaining flexibility. Think of these systems as life-sized building blocks that you can rearrange whenever your storage needs change. Stack them high when you need vertical storage, spread them out for easy access, or cluster them in corners to utilize awkward spaces.\n\nPopular modular options include cube organizers, adjustable shelving units, and stackable bins. The beauty of these systems lies in their adaptability – you can start small and expand as needed. For instance, a basic 2×2 cube organizer can grow into a 4×4 unit as your storage needs increase.\n\nConsider investing in matching bins and baskets that fit perfectly within your modular system. Clear containers make it easy to identify contents, while fabric boxes add a decorative touch. Many homeowners find success with a mix of open and closed storage solutions, using open cubes for frequently accessed items and closed bins for seasonal storage.\n\nTo maximize your modular system’s efficiency, try these practical tips:\n- Use shelf dividers to create smaller compartments\n- Install wheels on bottom units for easy movement\n- Label everything clearly to maintain organization\n- Keep frequently used items at eye level\n- Leave room for future expansion\n\nRemember that the key to successful modular storage is planning for change. Your storage needs will evolve, and your system should be ready to adapt alongside them.\n\n
Hidden Storage Tricks
\n\nEvery home has untapped storage potential hiding in plain sight. Look up, and you’ll find valuable space between ceiling joists perfect for sliding in long, flat items like holiday decorations or seasonal gear. Transform the dead space under stairs into pull-out drawers or install custom shelving for books and household supplies.\n\nDoor backs are often overlooked gold mines – install over-the-door organizers or hooks to hang cleaning supplies, accessories, or tools. The space above doorways can accommodate sleek floating shelves for displaying decorative items while providing extra storage. Consider installing toe-kick drawers beneath kitchen cabinets for rarely-used items like serving platters or baking sheets.\n\nWindow seats aren’t just charming additions; they’re perfect opportunities for hidden storage. Build bench seating with lift-up lids to store blankets, games, or seasonal items. In bathrooms, utilize the space between wall studs by installing recessed shelving or medicine cabinets.\n\nDon’t forget about vertical space – install floor-to-ceiling sliding panels in narrow spaces to create pantry-style storage that disappears when not in use. Under-bed storage can be maximized with custom-built drawers on wheels, perfect for storing out-of-season clothing or extra bedding. Even hollow core doors can be converted into storage spaces by carefully cutting access panels and installing narrow shelving inside.\n\nRemember, the key to successful hidden storage is ensuring easy accessibility while maintaining a clean, uncluttered appearance.\n\n\n
Making It Work
\n\n
Climate Control Basics
\n\nProtecting your stored items from the elements is crucial for maintaining their condition over time. The key to effective moisture control and ventilation starts with simple but effective measures. Begin by placing moisture-absorbing silica gel packets in storage containers and installing a basic hygrometer to monitor humidity levels.\n\nConsider using pallets or plastic platforms to elevate stored items off the floor, creating air circulation underneath and preventing direct contact with potentially damp surfaces. Weather stripping around doors and windows helps maintain consistent temperatures while keeping moisture at bay. For sensitive items like electronics or paper documents, airtight plastic containers with snap-on lids provide an extra barrier against humidity.\n\nDuring seasonal changes, a small dehumidifier can make a significant difference in maintaining optimal storage conditions. Place it in a central location and empty it regularly. For natural temperature regulation, consider installing a solar-powered vent fan in the roof or upper walls. This simple addition can help reduce heat buildup during summer months and prevent condensation in winter.\n\nDon’t forget to check stored items periodically and rotate their positions to ensure even air exposure. Adding thermal insulation to walls and ceiling can help moderate temperature swings, while strategically placed desiccant bags offer an affordable way to absorb excess moisture in enclosed spaces.\n\n
 \n
\n\n\n
Accessibility Planning
\n\nEfficient access to your stored items is just as important as having adequate storage space. Start by mapping out clear pathways through your storage area, ensuring items you need frequently are within easy reach. Consider creating zones based on usage frequency – daily-use items should be at waist height, while seasonal items can be stored higher up or in less accessible areas.\n\nImplementing a logical organization system is crucial. Use clear labels on boxes and containers, and consider creating an inventory list or diagram showing where everything is located. Color-coding can be particularly effective – assign different colors to different categories of items for quick visual identification.\n\nStrategic placement of shelving and storage units should account for door swing and natural movement patterns. Leave at least 36 inches of clearance for main pathways and 24 inches for secondary access routes. Installing motion-sensor lights can make it easier to navigate your storage space, especially in areas with limited natural light.\n\nFor vertical storage, ensure you have a sturdy step stool or ladder easily accessible. Consider installing sliding systems for heavy items stored up high, making them safer to retrieve. Remember to keep safety in mind – avoid storing heavy items above head height, and ensure all shelving units are properly anchored to walls.\n\nThink about seasonal accessibility too. Place summer items toward the front during warm months and rotate them with winter items when the seasons change. This simple rotation system can save you time and effort throughout the year.\n\n
Seasonal Maintenance Tips
\n\nTo maintain your converted storage space throughout the year, follow these essential seasonal tasks. In spring, inspect for any water damage or leaks that might have occurred during winter months. Clean gutters and check roof seals to prevent moisture issues. Give all surfaces a thorough cleaning and consider applying a fresh coat of protective sealant to wooden elements.\n\nDuring summer, focus on ventilation. Install or clean existing vents to prevent heat buildup, which can damage sensitive items. Check door hinges and tracks, lubricating as needed to prevent sticking in humid weather. Remove any vegetation growing too close to the structure to prevent moisture retention and pest issues.\n\nFall maintenance should include checking weather stripping and door seals to prepare for colder months. Clear away fallen leaves and debris from around the foundation. Inspect your storage organization systems, tightening any loose shelving or brackets that may have shifted during summer use.\n\nWinter requires attention to insulation and heating if you’ve installed climate control. Monitor for ice dams or snow accumulation on the roof, removing them promptly to prevent structural damage. Keep pathways to your storage space clear and safe.\n\nYear-round, maintain an inventory system and reorganize items quarterly to ensure everything remains accessible. Replace any worn organizational tools like bins or labels, and address minor repairs promptly before they become major issues.\n\n\nTransforming your shed into an organized storage haven is a rewarding project that can significantly improve your home’s functionality. By following the steps and solutions we’ve discussed, you can create a space that not only stores your belongings efficiently but also adds value to your property. Remember to start with a thorough assessment of your needs, implement appropriate storage systems, and maintain proper organization habits.\n\nWhether you choose vertical storage solutions, modular shelving, or a combination of different storage methods, the key is to create a system that works for your specific situation. Don’t be afraid to get creative with your space – even the smallest shed can become an organizational masterpiece with the right approach.\n\nNow that you have all the tools and knowledge needed, it’s time to take action. Start with a simple weekend project, like installing basic shelving or sorting through items, and gradually build up to more complex solutions. Your transformed shed awaits, ready to become the organized, functional space you’ve always wanted. Happy organizing!