
Transform Your Storage Shed Into a Life-Saving Emergency Shelter
Transform your basement, garage, or sturdy outbuilding into a lifesaving emergency shelter by reinforcing walls with steel plates, installing proper ventilation systems, and creating multiple exit points. Emergency shelters require three critical elements: structural integrity to withstand natural disasters, adequate supplies to sustain occupants for at least 72 hours, and reliable communication systems to maintain contact with emergency services.\n\nBuild a comprehensive shelter by first assessing your property’s vulnerabilities to specific threats – from tornadoes to civil unrest – then designing your space with essential features like water filtration systems, backup power sources, and secure storage for emergency supplies. Stock your shelter with non-perishable food, medical supplies, and critical documentation while maintaining an organized inventory system that tracks expiration dates and replacement needs.\n\nRemember: Every minute counts during an emergency. Establish clear family protocols for shelter activation, conduct regular drills, and maintain all systems through monthly inspections. A well-built emergency shelter isn’t just about physical construction – it’s about creating a sustainable safe haven that provides both protection and peace of mind when disaster strikes.\n\n\n
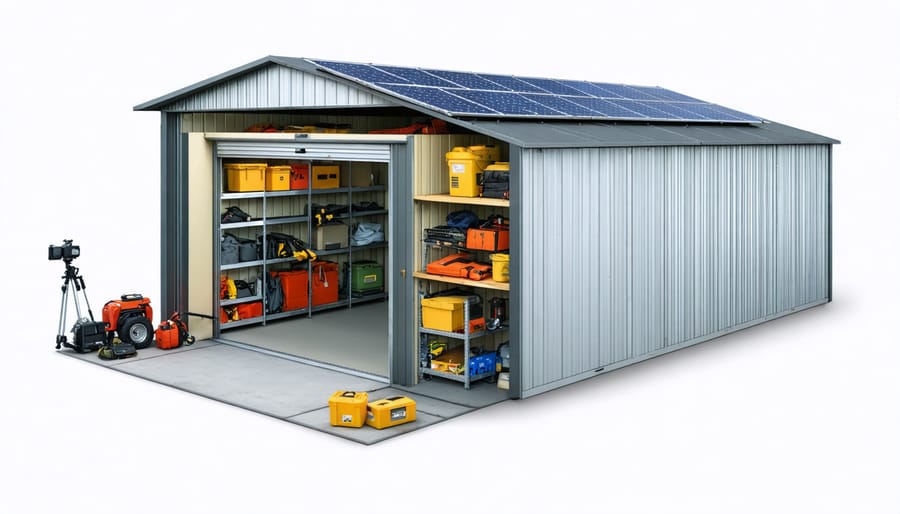
Essential Features of an Emergency Shelter Shed
\n\n
Structural Requirements
\n\nWhen building an emergency shelter, proper site preparation and structural integrity are crucial for ensuring safety during critical situations. Start with a level, well-draining foundation using concrete footings or a reinforced concrete slab that’s at least 4 inches thick. The walls should be constructed using weather-resistant materials like pressure-treated lumber or steel framing, with proper insulation to maintain comfortable temperatures.\n\nYour shelter’s roof must be capable of handling local weather conditions, including snow loads and high winds. Install hurricane straps or ties to secure the roof to the walls, and use waterproof underlayment beneath the roofing material. All joints and seams should be properly sealed to prevent water infiltration.\n\nInclude adequate ventilation through properly placed vents or windows that can be securely sealed when needed. The entrance should be reinforced with heavy-duty hinges and multiple locking points. Consider installing a secondary emergency exit that meets local building codes.\n\nFor protection against extreme weather, incorporate weather stripping around all openings and use impact-resistant materials for windows and doors. This creates a secure, weathertight space that can withstand various emergency situations while keeping occupants safe.\n\n
 \n
\n\n\n
Size and Layout Considerations
\n\nWhen planning your emergency shelter, size and layout are crucial factors that directly impact comfort and functionality during crisis situations. A good rule of thumb is to allocate 10 square feet per person for short-term shelter needs, though 20 square feet per person is ideal for extended stays. This space allows for both sleeping arrangements and essential supply storage.\n\nConsider creating distinct zones within your shelter: a sleeping area, a storage section for supplies, and a small living space. If possible, include a separate sanitation area. The entrance should be easily accessible but protected from the elements, ideally with a small mudroom or decontamination area.\n\nFor optimal air circulation, ceiling height should be at least 7 feet. Plan for adequate ventilation points, keeping them at different heights to manage air flow. Storage shelves should be secured to walls and positioned to maintain clear pathways to exits.\n\nRemember to incorporate space for emergency equipment like generators or filtration systems while ensuring they don’t block movement. If your shelter will house multiple people, consider privacy solutions like curtains or portable dividers.\n\n\n
Converting Your Existing Shed
\n\n
Insulation and Climate Control
\n\nProper insulation and climate control are crucial for maintaining a comfortable and safe environment in your emergency shelter. Start by sealing any gaps or cracks with weatherstripping and caulk to prevent drafts and moisture infiltration. Add insulation to walls and ceiling using materials like fiberglass batts, spray foam, or rigid foam boards, ensuring proper installation to maximize effectiveness.\n\nFor temperature regulation, consider installing windows for ventilation to allow fresh air circulation during warmer months. Portable fans can help distribute air effectively, while battery-powered heaters provide warmth during colder periods. Install reflective barriers or radiant barriers in the roof to minimize heat transfer and keep the shelter cooler in summer.\n\nCreate additional insulation layers using emergency blankets or thermal curtains over windows and doorways. Consider installing a small exhaust fan near the ceiling to remove excess humidity and maintain air quality. For floor insulation, use foam mats or carpet padding to provide both comfort and thermal protection.\n\nDuring extreme weather, use sandbags around the shelter’s exterior base to provide additional insulation and protection from elements. Keep several emergency blankets and sleeping bags stored inside for extra warmth when needed. Remember to regularly check and maintain your insulation systems to ensure they remain effective throughout the year.\n\n
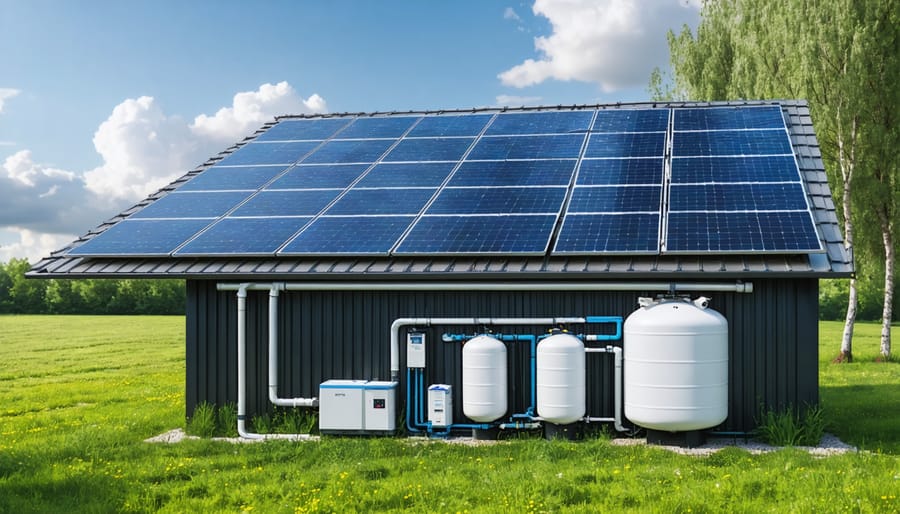
Water and Power Solutions
\n\nEnsuring reliable access to water and power is crucial for any emergency shelter. Start by installing a robust water collection and filtration system. Rain barrels connected to your shelter’s gutters can provide a sustainable water source, while multiple filtration methods (including both mechanical filters and purification tablets) ensure safe drinking water.\n\nFor power needs, consider implementing layered eco-friendly power solutions starting with solar panels and deep-cycle batteries. A 100-watt solar setup can power essential electronics and lighting. Back this up with a portable generator for cloudy days, but remember to store fuel safely and rotate it regularly.\n\nInstall a basic electrical system with LED lighting, USB charging ports, and at least two standard outlets. Consider adding a small inverter to convert DC power from batteries to AC power for essential appliances. For heating and cooling, portable options like battery-operated fans and propane heaters work well, but ensure proper ventilation.\n\nCreate a maintenance schedule for all utility systems. Check water filters monthly, test backup power quarterly, and inspect solar components bi-annually. Keep spare parts and repair tools readily available. Remember to document all installation details and operating procedures – this information becomes invaluable during actual emergencies when stress levels are high.\n\n
 \n
\n\n\n
Security Enhancements
\n\nSecurity is paramount when creating an emergency shelter, and there are several effective ways to reinforce your structure. Start by installing heavy-duty deadbolts on all doors, preferably with a minimum 1-inch throw length. Consider adding a door reinforcement kit that strengthens the frame and hinges, making it significantly harder to breach.\n\nFor windows, install impact-resistant glass or add security film to existing panes to prevent shattering. Window bars or security screens provide additional protection while still allowing quick escape during emergencies. Don’t forget to install sturdy locks on all windows, including any skylight or ventilation openings.\n\nCreate a buffer zone around your shelter by installing motion-sensor lighting and clearing vegetation that could provide cover for intruders. Consider adding security cameras with backup power systems to monitor your surroundings, especially if your shelter is separate from your main residence.\n\nInside the shelter, install a peephole or security viewport in the main door to safely identify visitors. Create a “safe room” within your shelter – a reinforced space with an additional layer of security where occupants can retreat if the main entrance is compromised. Store basic self-defense tools and communication devices in this area.\n\nRemember to regularly test all security features and maintain them properly. Even the best security measures are only effective when they’re functioning correctly and everyone in your household knows how to use them.\n\n\n
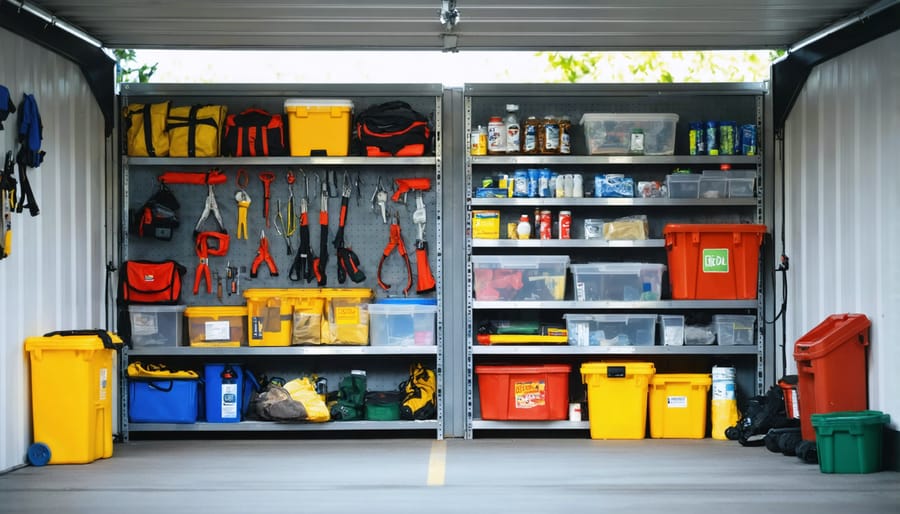
Essential Emergency Supplies and Storage
\n\n
Basic Survival Supplies
\n\nWhen it comes to organizing emergency supplies, having a systematic approach ensures you’re always prepared. Start with water storage, maintaining at least one gallon per person per day for a minimum of three days. Use food-grade water containers and rotate your supply every six months.\n\nFor food supplies, focus on non-perishable items with long shelf lives: canned goods, dried foods, and emergency ration bars. Create an inventory system with clear expiration dates, and store items in airtight containers to prevent pest infiltration. Consider including comfort foods that can boost morale during stressful situations.\n\nYour first aid supplies should be comprehensive yet organized. Store them in a clearly marked, waterproof container including:\n- Bandages and gauze\n- Antiseptic wipes\n- Over-the-counter medications\n- Prescription medications (rotate regularly)\n- Emergency blankets\n- Basic first aid manual\n\nKeep supplies elevated on shelving units to protect from potential flooding, and use clear storage bins for easy identification. Label everything clearly and maintain an inventory list on the inside of your shelter door. Remember to check and rotate supplies quarterly, replacing any expired items and updating your inventory accordingly.\n\nConsider creating “grab-and-go” bags for quick evacuation scenarios, containing essential supplies for 72 hours of survival. Store these in easily accessible locations within your shelter.\n\n
 \n
\n\n\n
Communication and Emergency Equipment
\n\nReliable communication and emergency equipment are crucial components of any emergency shelter. Start with a battery-powered or hand-crank emergency radio that receives NOAA weather broadcasts to stay informed about developing situations. Keep multiple flashlights and lanterns, along with plenty of spare batteries, stored in easily accessible locations throughout your shelter.\n\nA basic first aid kit is essential – make sure it includes bandages, antiseptic wipes, pain relievers, and any prescription medications your family needs. Consider adding a multi-tool, manual can opener, and basic tool kit for repairs. Store important documents in a waterproof container, including identification, insurance papers, and emergency contact information.\n\nCommunication devices are vital during emergencies. Keep a charged power bank and solar charger for mobile phones. Consider a satellite phone or two-way radio system as backup when traditional communication networks fail. Emergency signaling devices like whistles, flares, or signal mirrors can help attract attention if rescue becomes necessary.\n\nDon’t forget about sanitation supplies. Stock up on hand sanitizer, toilet paper, and basic hygiene items. Include heavy-duty trash bags, which can serve multiple purposes from waste management to emergency rain protection. Remember to check and rotate your equipment every six months, replacing expired items and testing battery-operated devices to ensure everything works when you need it most.\n\n\n
Maintenance and Regular Testing
\n\n
Monthly Checklist
\n\nKeep your emergency shelter ready for action with this essential monthly maintenance checklist. At the start of each month, inspect all door seals and weatherstripping, replacing any damaged components to maintain shelter integrity. Check ventilation systems and clean or replace filters as needed.\n\nRotate your water supply, replacing stored water every six months to ensure freshness. Inspect food supplies and remove items approaching their expiration date, replacing them with fresh stock. Test all battery-operated devices, including flashlights, radios, and emergency lighting, replacing batteries as needed.\n\nVerify that your first aid supplies are complete and unexpired. Check fire extinguishers for proper pressure levels and signs of damage. Review and update emergency contact information and important documents stored in your waterproof container.\n\nClean all surfaces with appropriate disinfectants and check for signs of moisture or pest intrusion. Ensure all tools and emergency equipment are in working order. Don’t forget to run any backup power systems briefly to maintain functionality and test communication devices if included in your setup.\n\nMake notes of any supplies that need replenishing and address repairs promptly to keep your shelter ready for unexpected situations.\n\n
Emergency Drills and Family Planning
\n\nRegular emergency drills are essential for ensuring your family knows exactly what to do when disaster strikes. Start by creating a detailed emergency plan that includes meeting points, evacuation routes, and individual responsibilities. Make sure every family member knows how to access the emergency shelter and operate essential equipment.\n\nSchedule monthly practice drills, varying the scenarios and timing to prepare for different emergencies. Include both daytime and nighttime drills, as visibility and access challenges can differ significantly. During these drills, time how long it takes your family to gather supplies and reach the shelter safely.\n\nCreate a simple checklist for each family member, including children, with their specific tasks and responsibilities. Post these lists in easily visible locations throughout your home. Consider making it engaging for younger family members by treating drills as important “missions” rather than scary scenarios.\n\nKeep an updated emergency contact list in multiple locations, including inside the shelter. Review and update your family plan quarterly, adjusting for any changes in family members’ needs or circumstances. Remember, the more you practice, the more automatic and efficient your response will become during an actual emergency.\n\n\nBeing prepared for emergencies isn’t just about having a plan – it’s about ensuring your family’s safety and peace of mind. Throughout this guide, we’ve explored the essential aspects of building and maintaining emergency shelters, from selecting the right location to stocking up on vital supplies. Remember that your emergency shelter should be easily accessible, structurally sound, and equipped with necessities like water, food, first-aid supplies, and communication devices.\n\nRegular maintenance and updates to your shelter are crucial. Schedule quarterly checks of your supplies, rotate perishable items, and test all equipment to ensure everything functions properly when needed. Don’t forget to involve your family in the planning and maintenance process – everyone should know how to access and use the shelter’s features.\n\nWhile we hope you’ll never need to use your emergency shelter, having one ready provides invaluable security. Think of it as an insurance policy for your family’s safety. Keep your shelter’s documentation, including build plans and supply lists, in a waterproof container both inside the shelter and in your home.\n\nStay informed about local emergency protocols and update your shelter’s features accordingly. Remember, the best emergency shelter is one that’s well-maintained, fully stocked, and ready to use at a moment’s notice. Your preparation today could make all the difference tomorrow.