
Build a Rock-Solid Security Fence That Actually Protects Your Shed

Transform your property’s security with a DIY fence that combines robust protection with professional-grade design. Building your own security fence not only saves thousands in contractor costs but also ensures complete control over materials and specifications for truly secure storage solutions. Install 8-foot posts in concrete-filled holes at least 24 inches deep, spacing them precisely 6-8 feet apart for maximum stability. Choose heavy-gauge welded wire mesh or reinforced privacy panels, securing them with tamper-resistant hardware and galvanized brackets for lasting durability. Add security features like anti-climb spikes, motion-sensor lights, and buried fence bottoms to prevent intrusion attempts. Top your fence with angled extensions or razor wire coils for enhanced perimeter defense, ensuring proper local code compliance while maintaining aesthetic appeal. This comprehensive barrier system, when properly constructed, rivals professional installations at a fraction of the cost while providing peace of mind for years to come.\n\n\n
Planning Your Security Fence
\n\n
Choosing the Right Materials
\n\nSelecting the right materials for your security fence is crucial for both protection and longevity. Metal fencing, particularly aluminum and steel, offers excellent security features while remaining relatively affordable. Aluminum is rust-resistant and lightweight, making it perfect for DIY installation, while steel provides maximum strength but requires more maintenance to prevent corrosion.\n\nWood fencing, though traditional and attractive, can be an effective security option when properly reinforced. Cedar and pressure-treated pine are popular choices, offering natural resistance to decay and insects. For enhanced security, opt for thick boards (at least 1-inch) and install them vertically to eliminate climbing footholds.\n\nChain-link fencing provides a cost-effective solution that can be upgraded with privacy slats or mesh. While not the most aesthetically pleasing, it’s incredibly durable and can be topped with security features like razor wire or anti-climb spikes for additional protection.\n\nConsider combining materials for optimal results. A sturdy metal frame with wood infill panels gives you both strength and visual appeal. Whatever material you choose, ensure all hardware, including posts, brackets, and fasteners, is rated for outdoor use and matches your fence’s durability level.\n\nRemember to factor in your climate when selecting materials. Areas with high humidity or frequent rain may require specially treated materials or corrosion-resistant options to maintain long-term security effectiveness.\n\n
Measuring and Layout Tips
\n\nAccurate measurements and proper layout are crucial for a secure fence installation around your shed. Start by measuring your shed’s perimeter, adding at least 3 feet of clearance on all sides for maintenance access and security monitoring. Mark your fence line using spray paint or string lines, ensuring perfect square corners with the 3-4-5 triangle method.\n\nBefore digging, contact your local utilities company to mark underground lines. Space your fence post locations every 6-8 feet, marking them with stakes. For optimal security, plan your gate location on the most visible side of your shed, typically facing your house. Consider the terrain slope – measure the grade changes to determine if you need stepped panels or extra-long posts.\n\nRemember to check local building codes for height restrictions and setback requirements. Most security fences work best at 6-8 feet tall. Take multiple measurements between your marked points to verify straight lines and parallel sides. Double-check your calculations, as the old saying goes: measure twice, cut once. This attention to detail during the planning phase will ensure your security fence serves its purpose effectively.\n\n\n
Security-First Construction Methods
\n\n
 \n
\n\n\n
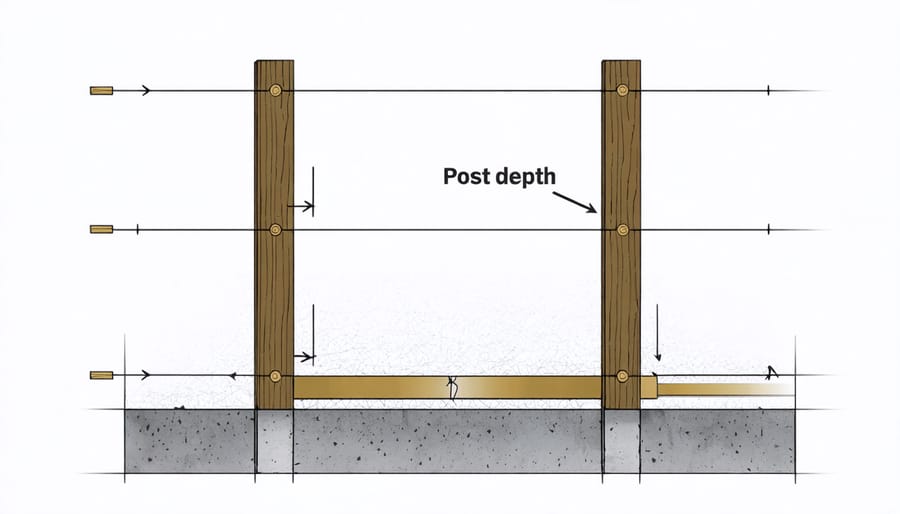
Setting Strong Post Foundations
\n\nA strong foundation is crucial for your security fence, and it all starts with properly installed posts. Begin by marking your post locations at 6-8 foot intervals using stakes and string lines to ensure perfect alignment. For maximum security, your posts should be buried at least 2 feet deep, with an additional 6 inches for areas with loose soil or frost concerns.\n\nDig your post holes using a post hole digger or power auger, making them three times wider than your post diameter. Before setting posts, add 6 inches of gravel at the bottom of each hole for drainage. This prevents water accumulation that could lead to post rot and instability.\n\nMix your concrete according to manufacturer specifications, and pour it around your post while checking for plumb with a level on two adjacent sides. Use temporary bracing to hold posts perfectly vertical while the concrete sets. For enhanced security, consider adding J-bolts or L-brackets into the wet concrete – these will provide additional anchoring points for your fence panels.\n\nPro tip: Create a slight slope away from the post when finishing the concrete at ground level. This prevents water pooling around your posts, extending their lifespan. Allow the concrete to cure for at least 24 hours before attaching any fence components, though waiting 48-72 hours is ideal for maximum strength.\n\nRemember to check local building codes regarding post depth requirements, as they may vary based on your location and fence height. Taking extra time during this foundation stage will ensure your security fence remains sturdy and tamper-resistant for years to come.\n\n
Anti-Climb Features
\n\nAdding anti-climb features to your security fence is essential for preventing unauthorized access while maintaining your property’s aesthetic appeal. One of the most effective deterrents is installing roller bars or rotating poles along the top of your fence. These cylindrical attachments spin when grabbed, making it nearly impossible for someone to get a firm grip.\n\nY-shaped or V-shaped extensions at the fence top provide another excellent climbing deterrent. You can create these using angled metal brackets, spacing them every few feet along the fence line. Consider adding non-aggressive but effective anti-climb spikes or curved toppings that point inward at a 45-degree angle.\n\nTrellis extensions are both decorative and security-minded additions. Install them at an angle pointing inward, and consider growing thorny vines like roses for added protection. The combination of unstable footing and thorny plants creates a natural deterrent that blends seamlessly with your landscaping.\n\nMesh extensions are another practical option. Choose small-aperture mesh panels that extend above your main fence, making it difficult for potential climbers to find finger or toeholds. For added security, consider installing these at an outward angle.\n\nRemember to maintain proper spacing between fence pickets or panels – gaps should be no wider than 4 inches to prevent footholds. Adding horizontal rails on the inside of the fence rather than the outside eliminates potential climbing aids while maintaining structural integrity.\n\nFor metal fences, consider incorporating curved or bent tops that make scaling difficult. If you’re working with wooden fencing, adding a cap rail with an outward-facing slope prevents would-be climbers from getting a solid grip on the fence top.\n\nThese anti-climb features work best when combined with other security measures like proper lighting and regular maintenance checks to ensure all components remain secure and effective.\n\n
 \n
\n\n\n
Gate Security Reinforcement
\n\nYour gate is the most frequently used part of your security fence and potentially its weakest point, so proper reinforcement is crucial. Start by selecting a heavy-duty gate frame made from galvanized steel or thick aluminum, which provides both durability and rust resistance. For optimal security, choose a gate width that’s appropriate for your needs while minimizing unnecessary access space.\n\nInstall heavy-duty hinges designed specifically for security gates, using at least three per gate to distribute weight evenly and prevent sagging. Reinforce the gate posts by setting them deeper than standard fence posts (at least 3 feet) and using concrete footings. Consider adding diagonal bracing across the gate frame to prevent warping and maintain structural integrity over time.\n\nFor the locking mechanism, invest in a high-quality padlock system combined with a magnetic gate lock. Install a drop rod or cane bolt that secures into the ground, providing additional stability when the gate is closed. Add an anti-lift mechanism at the bottom of the gate to prevent intruders from lifting it off its hinges.\n\nConsider incorporating these additional security features:\n- A self-closing mechanism to ensure the gate never stays accidentally open\n- Security caps on exposed bolts to prevent tampering\n- Metal strips along the bottom to eliminate gaps\n- Razor wire or anti-climb spikes along the top (where legally permitted)\n\nRemember to regularly maintain your gate hardware, lubricating hinges and checking for signs of wear or damage. This preventive maintenance helps ensure your gate remains both functional and secure throughout its lifetime.\n\n\n
Enhanced Security Features
\n\n
Lighting and Surveillance
\n\nEffective lighting and surveillance can transform your DIY security fence from a simple barrier into an advanced protective perimeter. By incorporating smart security features, you can create a comprehensive security system that deters potential intruders and provides peace of mind.\n\nStart by installing motion-sensing flood lights at key points along your fence line. Position them at corners and near gates for maximum coverage. Solar-powered options are perfect for areas without easy access to electricity, while hardwired outdoor lighting systems provide reliable, consistent illumination.\n\nFor surveillance, consider mounting weather-resistant security cameras on sturdy fence posts. WiFi-enabled cameras with smartphone connectivity allow you to monitor your property remotely. Place them strategically to cover entry points and blind spots. Many affordable options now include night vision and two-way audio features.\n\nHere’s a simple DIY approach to mounting lights and cameras:\n- Use galvanized mounting brackets to secure devices to fence posts\n- Run cables through protective conduit along the fence\n- Install weather-proof junction boxes for electrical connections\n- Position motion sensors at 7-8 feet height for optimal detection\n- Angle cameras slightly downward to reduce glare and maximize coverage\n\nRemember to weatherproof all connections and regularly test your security system. Consider adding warning signs about video surveillance to further deter potential intruders. With these additions, your DIY security fence becomes an active guardian of your property rather than just a passive barrier.\n\n
 \n
\n\n\n
Natural Barriers
\n\nNatural barriers can enhance your fence’s security while beautifying your property. When landscaping around your shed, consider incorporating thorny plants and bushes that act as natural deterrents. Hardy options like holly, barberry, and climbing roses not only create an attractive boundary but also discourage potential intruders.\n\nPlant these defensive species in front of or along your fence line, creating multiple layers of protection. Thorny vines like pyracantha can be trained to grow directly on your fence, adding both security and visual appeal. For maximum effectiveness, choose plants that maintain their defensive characteristics year-round and position them strategically around vulnerable areas such as corners and gate entrances.\n\nConsider adding dense hedges like boxwood or privet to block sight lines and create privacy. These natural barriers can grow quite tall, effectively extending your fence’s height without violating local ordinances. Remember to maintain your plantings regularly to prevent overgrowth that could provide hiding spots for intruders.\n\nFor added security, incorporate gravel or decorative rock beds around the perimeter. The crunching sound these materials make underfoot serves as a natural alarm system, alerting you to movement around your property while complementing your landscape design.\n\n\nBuilding a DIY security fence is a rewarding project that enhances both your property’s protection and its visual appeal. By following proper installation techniques and choosing the right materials, you’ve created a robust barrier that will serve you well for years to come. Remember that the effectiveness of your security fence relies not just on its initial construction but also on consistent maintenance and regular inspections.\n\nTo keep your fence in top condition, establish a quarterly maintenance routine. Check for loose posts, damaged panels, and signs of rust or wood rot. Tighten any loose hardware, and address small issues before they become major problems. For wooden fences, apply a fresh coat of weather-resistant sealant annually to prevent deterioration. Metal fences benefit from occasional rust treatment and touch-up painting to maintain their protective qualities.\n\nDon’t forget to maintain your gate mechanisms, keeping hinges well-oiled and locks in good working order. Trim any vegetation that could compromise the fence’s integrity or provide cover for potential intruders. Consider adding motion-sensor lighting or security cameras to further enhance your perimeter security.\n\nBy investing time in regular maintenance and staying proactive about repairs, your DIY security fence will continue to protect your property effectively while maintaining its appearance. Remember that a well-maintained fence not only provides security but also adds value to your home and creates peace of mind for years to come.
Looking for a storage sheds?
Browse our full range of storage sheds from authorized dealer brands. Free shipping to the continental US.