
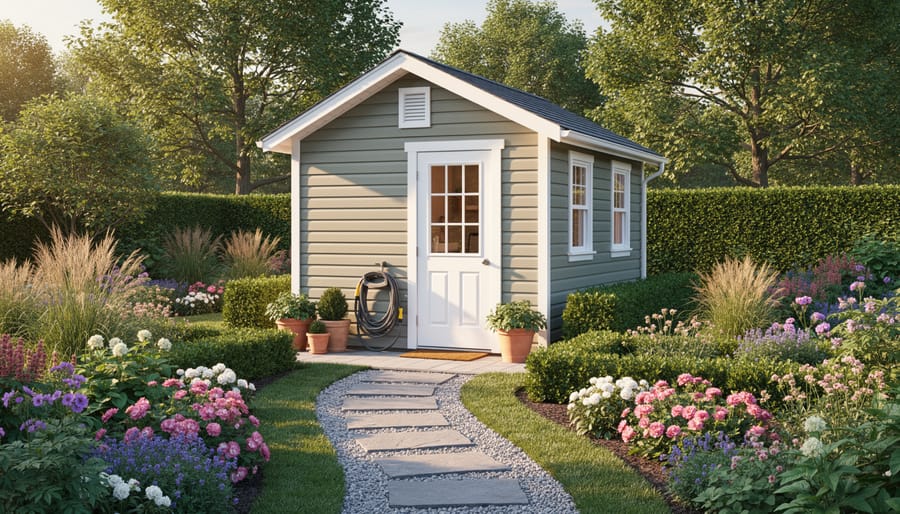
Make Your Garden Shed Look Like It Belongs There

Transform that awkward garden shed into a natural focal point by surrounding it with layered foundation plantings—place tall ornamental grasses or shrubs at the corners to soften hard edges, add medium-height perennials like coneflowers or daylilies along the sides, and finish with low groundcovers to create a seamless transition from structure to lawn. Create a defined pathway using gravel, stepping stones, or mulched trails leading to your shed door, which instantly makes the structure feel intentional rather than randomly placed. Anchor the shed within your landscape by establishing planting beds that extend at least three feet from the base, incorporating a mix of evergreens for year-round structure and flowering plants for seasonal interest that draws the eye naturally across your yard. Consider repeating plants from your main garden beds around the shed to create visual continuity throughout your space. Add practical yet beautiful elements like a small trellis with climbing vines on one side, decorative containers flanking the entrance, or solar lighting along the pathway to enhance both functionality and nighttime appeal. These shed transformation ideas work together to make your storage solution look like it was always meant to be part of your garden design rather than an afterthought.\n\n\n
Why Your Shed Sticks Out (And How to Fix It)
\n\nYou’ve probably noticed it yourself – your shed just doesn’t quite belong. It sits there like an afterthought, and there’s a good reason why. Most homeowners make a few predictable mistakes that instantly telegraph “I plunked this down and walked away.”\n\nThe biggest culprit? That exposed foundation or bare ground around the base. When you can see concrete blocks, pressure-treated skids, or just dirt underneath, your shed looks temporary and unfinished. It’s like wearing a nice outfit with muddy shoes – the whole effect falls apart.\n\nAnother common issue is the lack of transition between your shed and the rest of your yard. If there’s just flat grass running right up to the walls, there’s nothing to soften the hard edges or connect the structure to its surroundings. Your eye has nowhere to go, so the shed feels isolated and stark.\n\nColor choices matter more than you’d think, too. A bright white or electric blue shed might seem fun in the store, but if it clashes with your home’s exterior or garden palette, it’ll stick out like a sore thumb. The goal isn’t necessarily to match everything perfectly, but to create a sense of harmony.\n\nFinally, zero greenery around your shed is a dead giveaway that you haven’t thought about integration. Empty space surrounding the structure makes it look like it landed from outer space. Plants create visual interest, soften hard lines, and trick the eye into seeing the shed as part of the garden rather than an intruder.\n\nThe good news? Every single one of these problems has a straightforward fix that doesn’t require a landscaping degree or a massive budget.\n\n
 \n
\n\n\n\n
Planning Your Shed Landscape Integration
\n\n
Measuring Your Space and Setting a Budget
\n\nBefore diving into your landscaping project, take time to walk around your shed from all angles. A good rule of thumb is to plan your landscape design to extend at least 3-5 feet from each visible side of the shed. This creates enough visual impact without overwhelming your entire yard.\n\nMeasure the perimeter carefully and sketch a simple diagram showing which sides need the most attention. Most homeowners find the front and one side require the heaviest landscaping, while areas facing fences or hidden from view can be simpler.\n\nBudget-wise, DIY shed landscaping is surprisingly affordable. For a modest 8×10 shed, expect to spend between $200-$500 for a basic transformation including mulch, several perennials, and a few shrubs. If you’re adding features like gravel pathways or decorative borders, budget $500-$1,000. The beauty of DIY projects is you can phase spending over several months, tackling one section at a time.\n\nSarah from Ohio shared her experience: “I thought I’d need thousands to fix my awkward-looking shed, but I spent just $350 over two weekends. Shopping end-of-season sales and propagating plants from my existing garden made all the difference.”\n\nStart with priority areas and expand as your budget allows.\n\n
Choosing a Style That Works With Your Yard
\n\nThe key to creating a cohesive design around your shed is matching your landscaping style to both the shed’s architecture and your yard’s existing personality. If you have a charming wooden shed with traditional lines, a cottage garden style works beautifully. Think overflowing flower beds with cheerful perennials like black-eyed Susans, lavender, and climbing roses that soften the shed’s edges and create that storybook appeal.\n\nFor contemporary metal or resin sheds, a modern minimalist approach keeps things sleek and intentional. Use clean-lined hardscaping, ornamental grasses in repeating patterns, and a limited color palette of greens and grays. This style prevents your yard from feeling cluttered while highlighting the shed’s crisp structure.\n\nIf your property already has mature trees and a relaxed vibe, embrace a natural woodland style. Surround your shed with shade-loving hostas, ferns, and native groundcovers that blend seamlessly into the existing landscape. This approach makes your shed feel like it’s always belonged there, tucked naturally among the greenery rather than appearing as an afterthought.\n\n\n
Foundation and Ground-Level Solutions
\n\n
Gravel Borders and Mulch Beds
\n\nCreating a gravel or mulch border around your shed is one of the smartest moves you can make for long-term maintenance. This simple addition solves two common problems: it prevents weeds from creeping up against your shed walls and creates a drainage buffer that protects the foundation from moisture damage.\n\nStart by clearing a border area extending 12 to 18 inches from all sides of your shed. Remove any grass, weeds, and debris down to bare soil. For best results, dig down about 3 to 4 inches to create a shallow trench that will hold your materials securely.\n\nNext, lay down landscape fabric across the entire cleared area. This fabric acts as a weed barrier while still allowing water to drain through. Overlap sections by at least 6 inches and secure with landscape staples every few feet. Don’t skip this step—many homeowners who went straight to gravel without fabric found themselves pulling weeds within months.\n\nNow add your chosen material. Pea gravel offers excellent drainage and a clean look, while hardwood mulch provides a natural appearance that complements garden beds. Spread material 2 to 3 inches deep for gravel or 3 to 4 inches for mulch.\n\nOne homeowner shared that after installing a gravel border, she noticed her shed floor stayed noticeably drier during rainy seasons, and her annual maintenance time dropped significantly.\n\n
Building Simple Raised Beds
\n\nRaised beds offer one of the most straightforward ways to soften your shed’s presence while adding planting space. If you’ve been wondering how to make that utilitarian structure feel more intentional, this simple weekend project delivers impressive results without breaking the bank.\n\nStart by planning beds that are 12-18 inches wide along one or more shed walls. This width provides enough root space for most plants without overwhelming smaller yards. For materials, landscape timbers remain the most budget-friendly option at around $5-8 per timber. Stack two or three high for adequate soil depth. Cedar or pressure-treated wood will last 10-15 years, making them practical long-term investments.\n\nStone or concrete blocks offer an equally simple alternative. Many homeowners appreciate that stacked stone requires no cutting or fastening—just level the ground and stack. One satisfied DIYer shared that her stone-bordered bed along her shed took just three hours to complete and “completely transformed how the shed sits in our backyard.”\n\nPosition beds 6-8 inches away from the shed wall to allow air circulation and prevent moisture damage. Fill with quality garden soil mixed with compost, then plant shade-tolerant perennials or herbs. The raised design creates natural visual flow while solving that awkward gap between shed and lawn that so many of us struggle with.\n\n\n
Plant Selection for Shed Landscaping
\n\n
Climbing Plants and Vertical Interest
\n\nClimbing plants transform a plain shed wall into a living canvas while adding privacy and visual interest to your yard. For sunny shed walls, clematis and climbing roses offer stunning blooms with manageable growth. If your shed sits in partial shade, climbing hydrangea or Boston ivy work beautifully, though keep in mind that Boston ivy can be aggressive and requires regular trimming to prevent it from infiltrating roof shingles or siding gaps.\n\nInstalling a simple trellis system is easier than you might think. Attach wooden lattice panels or create a wire grid using eye hooks and galvanized wire, spacing them about 12 inches apart. Just remember to mount your support system at least 2 inches away from the shed wall to allow air circulation and prevent moisture damage, which can lead to rot over time.\n\nBe cautious with vigorous growers like English ivy or wisteria. While tempting for quick coverage, these can become maintenance nightmares, damaging shed exteriors and requiring constant pruning. One homeowner shared how her wisteria looked gorgeous for two years before prying apart her shed’s trim boards, costing hundreds in repairs.\n\nChoose lightweight annual vines like morning glories or sweet peas if you’re concerned about commitment or potential damage. They provide seasonal color without the long-term maintenance headaches.\n\n
Foundation Shrubs and Perennials
\n\nThe right foundation plants can transform your shed from an awkward standalone structure into a natural part of your landscape. Start with low-maintenance shrubs that provide year-round structure. Boxwood and dwarf spirea work beautifully at the shed’s corners, growing 2-3 feet tall and requiring minimal pruning. Space them 18-24 inches from the foundation to allow air circulation and prevent moisture issues.\n\nFor mid-height layers, consider hydrangeas or forsythia, which add seasonal color without overwhelming the space. Plant these 3-4 feet apart and about 2 feet from the shed wall. They’re forgiving for beginners and thrive with basic watering and annual trimming.\n\nPerennials like hostas, daylilies, and black-eyed Susans fill in beautifully between shrubs. These hardy plants return year after year, spreading naturally to create that cottage garden look. Space them 12-18 inches apart, and they’ll fill gaps within two growing seasons.\n\nOne homeowner shared how adding simple foundation plantings turned her storage shed into an eco-friendly garden sanctuary that now anchors her backyard design. The secret? Start small with just 5-7 plants, water consistently during the first season, and let them establish naturally.\n\n
Corner Plantings That Frame Your Shed
\n\nTransform awkward shed corners into design features by strategically placing taller plants that visually anchor your structure. This simple technique solves that “plunked down” look many homeowners struggle with.\n\nFor immediate impact, position ornamental grasses like fountain grass or maiden grass at each corner. These grow 3-5 feet tall and create gentle movement that softens hard shed edges beautifully. One DIY enthusiast shared how adding zebra grass at her shed corners completely changed her backyard’s feel, making the shed look intentional rather than intrusive.\n\nLayer your corner plantings for even better results. Start with a tall anchor plant, then add mid-height perennials like Russian sage or black-eyed Susans in front. This creates depth and draws the eye naturally around your shed.\n\nThe beauty of corner plantings is their flexibility. You can start with just two corners if budget is tight, then expand as plants mature. Choose varieties that thrive in your specific light conditions, whether your shed sits in full sun or partial shade, for best results.\n\n
 \n
\n\n\n\n
Creating Pathways and Access Points
\n\n
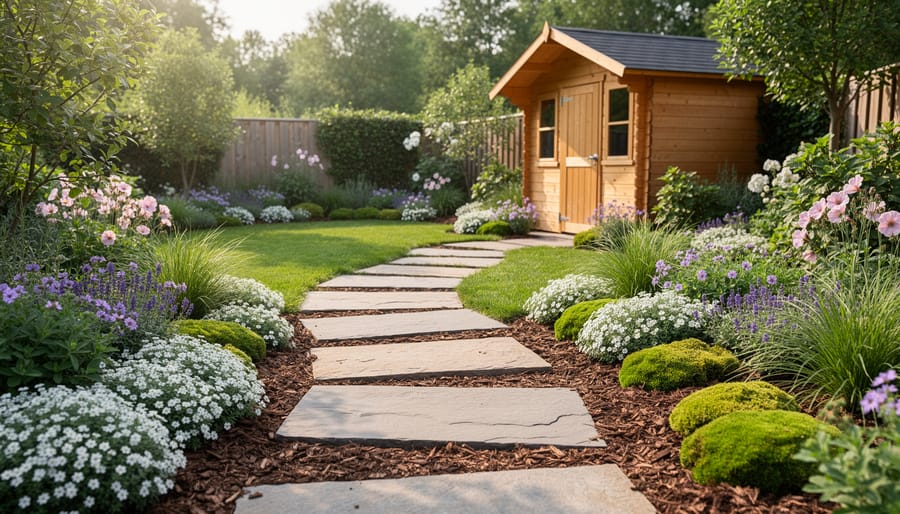
Stepping Stone Paths
\n\nStepping stone paths offer one of the simplest ways to create a polished look around your garden shed while keeping your feet clean and dry. The beauty of this approach is that anyone can install it over a weekend without special tools or expertise.\n\nStart by laying out your stones directly on the grass to visualize the path before digging. Space them 18 to 24 inches apart, which matches a comfortable adult stride. Here’s a helpful tip from experienced DIYers: walk the path naturally and adjust stone placement to match your actual footfall rather than measuring rigidly.\n\nFor ground preparation, trace around each stone with a spade, then remove the grass and dig down about 2 inches deeper than your stone’s thickness. Add a 2-inch layer of sand to each cavity, tamp it down firmly, and set your stone so it sits slightly below ground level. This prevents tripping hazards and makes mowing easier.\n\nChoose flat stones at least 16 inches wide for stability. Flagstone, slate, or concrete pavers all work wonderfully. The informal spacing creates that natural, established garden feel while the stable surface solves the muddy-path problem that frustrates so many shed owners during rainy seasons.\n\n
 \n
\n\n\n
Gravel and Paver Options
\n\nLooking for a more permanent pathway solution around your shed? Gravel and pavers offer durability with varying levels of investment and effort.\n\nGravel pathways are budget-friendly winners, typically costing $30-50 per cubic yard. A simple gravel path requires minimal DIY skills—just edge it with landscape timbers or metal edging, lay landscape fabric underneath, and spread 2-3 inches of pea gravel or crushed stone. Installation difficulty: Easy. One homeowner shared, “I created a gravel perimeter around my shed in just one weekend, and it’s still looking great three years later with almost zero maintenance.”\n\nPavers create a more polished look but require moderate effort and higher investment at $8-20 per square foot for materials. Concrete pavers offer affordability, while natural stone delivers premium aesthetics. You’ll need to excavate 6-8 inches, add a gravel base, layer sand, and carefully level each paver. Installation difficulty: Moderate.\n\nThe sweet spot? Combine both—use pavers for a primary walkway to your shed door and gravel to fill surrounding areas. This approach balances cost (approximately $200-400 for an average shed) with visual appeal while keeping installation manageable for weekend warriors.\n\n\n
Adding Hardscape Elements for Character
\n\nWhile plants soften the look of your garden shed, hardscape elements add character and practical function that truly complete the picture. Think of hardscaping as the framework that ties everything together and makes your shed feel intentionally placed rather than randomly plopped down.\n\nStart with decorative rocks or gravel to create defined pathways leading to your shed door. A simple gravel walkway not only looks tidy but prevents muddy tracks when you’re grabbing tools after rain. Many homeowners find that edging these paths with larger river rocks or brick creates a polished, professional appearance without requiring any special skills. One DIY enthusiast shared that she spent just one weekend creating a curved pea gravel path bordered with stacked flat stones, instantly transforming her shed from eyesore to focal point.\n\nWindow boxes bring instant charm, even if your shed doesn’t have actual windows. Mount decorative boxes directly to the shed walls and fill them with colorful annuals or trailing plants. This simple addition creates the cottage feel many homeowners love.\n\nDon’t overlook the power of a small decorative fence or border around your landscaped area. A low picket fence, rustic split-rail sections, or even repurposed pallets painted to match your shed establish clear boundaries and add visual interest at different heights.\n\nLighting transforms your shed from daytime storage to evening garden feature. Solar path lights require zero wiring, while a wall-mounted lantern beside the door adds both functionality and ambiance. Strategic uplighting on nearby plantings creates dramatic shadows after dark.\n\nThese hardscape elements work together to solve that awkward feeling of a standalone shed, creating instead a cohesive, intentional garden feature you’ll be proud to show visitors.\n\n\n
Seasonal Maintenance and Long-Term Care
\n\nMaintaining your shed landscaping doesn’t have to be overwhelming when you follow a simple seasonal schedule. In spring, refresh mulch around your shed foundation to a depth of 2-3 inches, pulling it slightly away from the base to prevent moisture damage. This is also the perfect time to prune back any overgrown shrubs or perennials that may have encroached during the previous growing season.\n\nSummer calls for regular watering and deadheading flowering plants to keep your shed area looking fresh. Watch for drainage problems after heavy rains – if you notice pooling water near your shed, consider adding a shallow swale or adjusting your plant beds to redirect water flow away from the structure.\n\nFall is your chance to divide overcrowded perennials and plant spring-blooming bulbs around your shed. Cut back dead foliage and apply a final layer of mulch before winter arrives. Many homeowners find this the best time to assess what worked well and plan any changes for next year.\n\nWinter maintenance is minimal, but important. Clear snow away from your shed base and check that gutters, if installed, are draining properly. Browse our seasonal maintenance tips for more detailed guidance throughout the year.\n\nCommon problems like aggressive vine growth or plants blocking shed doors are easily solved with quarterly inspections. Simply trim back growth before it becomes an issue, keeping pathways clear and maintaining at least 6 inches of clearance around your shed’s base for proper air circulation.\n\n\n
Real Transformations: Before and After Examples
\n\nLet me share some real-world shed transformations that show what’s actually achievable with realistic budgets and timeframes.\n\nSarah’s Cottage Garden Makeover took her plain gray shed from eyesore to focal point in just one weekend. She spent around $180 at her local nursery, choosing climbing roses for the shed sides, lavender along the foundation, and clusters of hostas for shaded corners. The key lesson? She initially planted too close to the shed walls, not accounting for mature plant size. After one season, she relocated a few plants 18 inches farther out. Three months in, the lavender was already softening the shed’s base, and by the second summer, the climbing roses created that charming cottage feel she’d envisioned. Her best tip: start with perennials rather than annuals to avoid replanting every year.\n\nMike’s Low-Maintenance Solution addressed his challenge of a shed in full sun with poor soil. Working with a $200 budget over two weekends, he installed a simple gravel border around the shed’s perimeter, added three ornamental grasses on one side, and planted drought-tolerant sedum groundcover. The gravel immediately improved drainage issues he’d been having, and the grasses required zero special care. What worked best was embracing his yard’s limitations rather than fighting them. Within six weeks, the transformation was complete, and he’s spent virtually no time on upkeep since.\n\nThe Rodriguez family tackled their backyard shed with kids in mind, spending $250 on a mix of flowering shrubs like butterfly bush, a small flagstone path, and mulch. Their biggest lesson was choosing thornless varieties after their daughter got scratched during the first week. They replaced one rose bush with smooth hydrangeas, creating a kid-friendly zone that still looks beautiful. The project took three weekends from start to finish, and now their shed actually enhances their outdoor living space rather than detracting from it.\n\n\nTransforming the landscape around your garden shed isn’t a one-and-done project. It’s an evolving journey that gets better with each season as plants mature, your vision becomes clearer, and you discover what works best for your space. The beauty of shed landscaping is that you don’t need to tackle everything at once. Start with one manageable area, perhaps adding a simple gravel path or planting a few foundation shrubs along one side. As those initial efforts take root and you gain confidence, you can gradually expand to additional zones around your shed.\n\nRemember, even small changes make a noticeable difference. That single climbing rose or cluster of ornamental grasses you plant this spring will reward you for years to come. Each improvement builds upon the last, creating a cohesive outdoor space that feels intentional rather than haphazard.\n\nBeyond the exterior aesthetics, don’t forget that a well-organized interior complements your landscaping efforts beautifully. When your shed is both attractive outside and functional inside, it becomes a true asset to your property. Explore Storage Sheds Outlet’s helpful resources on shed maintenance and organization tips to ensure your structure continues looking great and serving your needs efficiently for years ahead.