
Attaching a Pergola Kit to Your House Without Breaking the Bank (or the Siding)
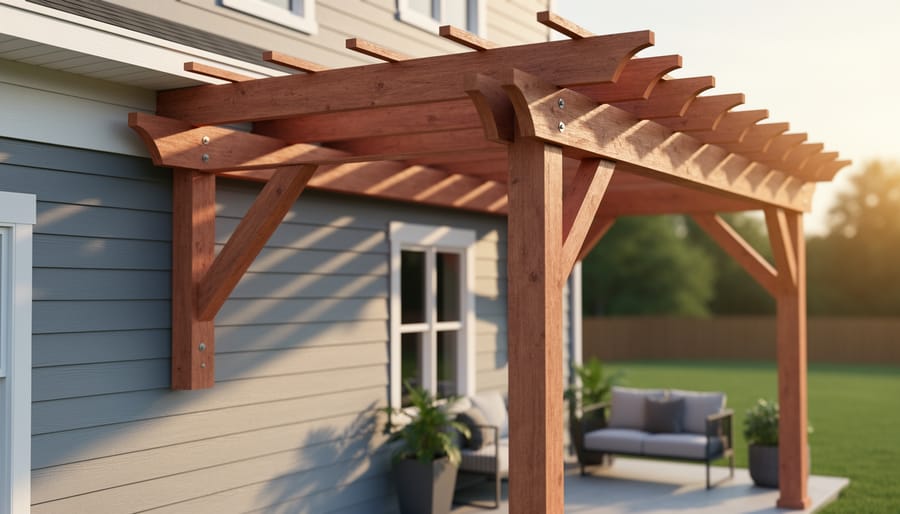
Picture your morning coffee on a shaded patio that extends your living space directly from your home’s exterior wall. An attached pergola kit transforms this vision into reality, offering homeowners a DIY-friendly solution that combines outdoor elegance with practical functionality. Unlike freestanding structures, attached pergolas anchor securely to your home’s ledger board, creating a seamless transition between indoor and outdoor living while providing crucial shade and architectural interest.
The appeal is clear: these kits arrive with pre-cut, pre-drilled components that eliminate guesswork and reduce installation time by half compared to building from scratch. You’re essentially connecting a professionally engineered outdoor room to your existing structure, but success hinges on understanding three critical factors. First, proper ledger board attachment ensures structural integrity and prevents water damage to your home’s exterior. Second, local building codes typically require permits for attached structures since they alter your home’s footprint and load-bearing requirements. Third, selecting the right mounting hardware for your specific siding material prevents costly mistakes.
Most homeowners with basic carpentry skills can complete installation in a weekend, though our comprehensive pergola installation guide walks you through each phase with clarity. Whether you’re seeking relief from harsh afternoon sun, creating an outdoor entertainment zone, or boosting property value, understanding how attachment mechanics work empowers confident decision-making. This guide demystifies the technical aspects while helping you determine if an attached pergola kit suits your home’s architecture and your DIY capabilities.
What Makes House-Attached Pergola Kits Different (And Why It Matters)
When you’re exploring pergola kit options, understanding what sets attached designs apart from freestanding pergolas helps you make the right choice for your space.
The key difference lies in how they’re supported. Attached pergolas connect directly to your home’s exterior wall using a ledger board, which means they only need posts on the outer edge instead of four corners. This creates a natural extension of your indoor living space, making your patio or deck feel like an outdoor room rather than a separate structure. Think of it as adding a covered porch without the full construction project.
This connection to your home delivers some compelling benefits. First, the shade coverage starts right at your back door, protecting sliding glass doors from harsh sun and reducing cooling costs during summer months. One homeowner in Arizona shared that her attached pergola cut her afternoon AC bills noticeably by blocking direct sun on her west-facing windows.
Attached designs also tend to add more perceived value to your property because they’re clearly part of your home’s footprint, creating a seamless indoor-outdoor flow that buyers love.
However, this house integration presents unique challenges you’ll need to address. The ledger board must be securely anchored into your home’s framing, not just surface siding. You’re essentially asking your house wall to support significant weight, especially during wind or snow loads. Proper flashing is critical too, since incorrect installation can allow water to seep behind the ledger, potentially causing serious damage over time. Understanding these considerations upfront helps you prepare for a successful, lasting installation that protects both your investment and your home.
Site Prep: Getting Your Space Ready Before the Kit Arrives
Measuring and Marking Your Attachment Points
Getting your measurements right from the start will save you headaches down the road. Begin by checking whether your ground is level where the pergola will stand. A simple carpenter’s level works perfectly here—place it at various points to identify any significant slopes. If you notice uneven ground, you’ll need to address this before installation, either by leveling the area or adjusting your post heights accordingly.
Next, locate where your ledger board will attach to the house wall. The ledger is the horizontal beam that connects your pergola to your home, so its placement is crucial. Measure up from the ground to ensure it sits at your desired height, typically 8-10 feet for comfortable clearance. Use a long level or chalk line to mark a perfectly horizontal line across the wall where the top of the ledger will sit.
Here’s a helpful tip from experienced DIYers: always measure twice and mark once. Double-check that your marks align with your home’s existing structure, avoiding windows, doors, or utility lines. Take photos of your measurements and marks—this simple step helps you stay organized throughout the project and gives you a reference if questions arise later.
Checking What’s Behind Your Siding
Before you drill a single hole, you’ll need to find the solid framing behind your siding. This step is absolutely essential—attaching your pergola to just the siding or sheathing won’t provide the strength needed to keep your structure secure. You’re looking for studs (the vertical supports in your wall) and the header or ledger board above your door or window openings.
The good news? Finding these supports is easier than you might think. A stud finder from your local hardware store is the most reliable tool, and electronic models are reasonably priced and user-friendly. Simply run it along your wall until it beeps or lights up, then mark those spots with painter’s tape.
Don’t have a stud finder handy? Try the old-fashioned tapping method. Knock along your wall with your knuckles—you’ll hear a hollow sound over empty cavities and a more solid “thunk” where there’s framing behind. Most homes have studs spaced 16 or 24 inches apart, so once you find one, measuring can help you locate the others.
Remember, your pergola’s weight and wind resistance depend entirely on these anchor points, so take your time with this step. It’s the foundation of a safe, long-lasting installation.
Clearing and Leveling the Ground
Before you can anchor your pergola kit to the house and set those posts, you’ll need a solid foundation to work with. Trust me, skipping this step is like building a sandcastle at high tide—things won’t end well!
Start by marking out where your pergola will sit, then clear away grass, plants, and any debris from the area. You want to expose bare soil or existing patio surface. If you’re working with soil, remove about 4-6 inches of topsoil to reach more stable ground beneath.
Here’s where drainage becomes your best friend. Water pooling around your pergola posts spells trouble down the road. Check how water flows during rain—does it run toward your house or away from it? The ground should slope gently away from your home at about a quarter-inch per foot. If it doesn’t, now’s the time to adjust the grade with additional soil or gravel.
For the footings themselves, you’ll want a level base. Use a long straight board and carpenter’s level to check the entire area. Small dips and bumps might seem harmless, but they’ll throw off your post measurements and create headaches during installation.
Many homeowners find that adding a 2-3 inch layer of compacted gravel creates excellent drainage while providing a stable base for concrete footings. One DIYer from Ohio shared that taking an extra afternoon to properly level and compact her base saved her from having to redo crooked posts—definitely worth the effort upfront!
Anchoring Your Pergola Safely to Your House
Installing the Ledger Board: Your Foundation for Success
The ledger board is your pergola’s critical connection point to your home, so getting this right is absolutely essential. Think of it as the foundation that everything else depends on—proper installation here prevents water damage, structural issues, and years of potential headaches.
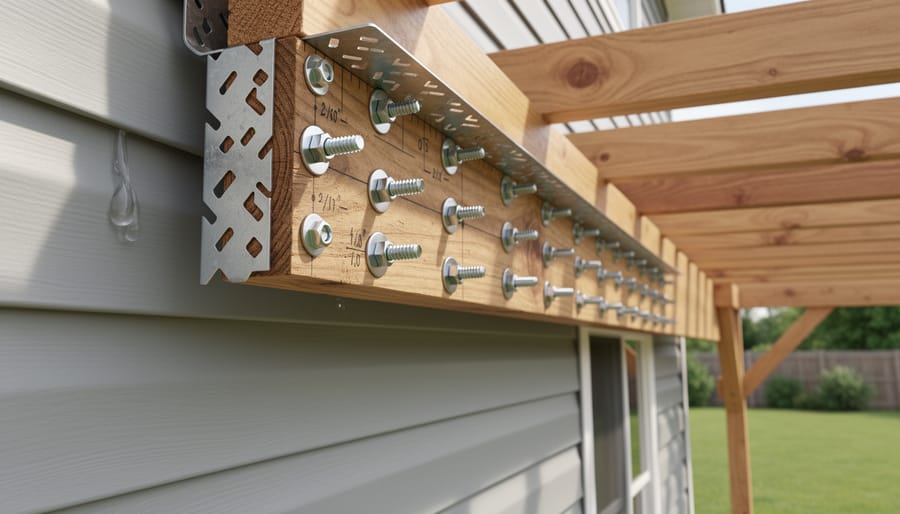
Start by locating the rim joist or solid framing on your house exterior. You’ll need to remove a section of siding where the ledger will attach, cutting carefully to expose the house wrap beneath. Here’s where many DIYers make their first mistake: never install directly over siding, as this creates pockets where moisture can hide and cause rot.
Before securing your ledger board, install proper flashing. Use aluminum or galvanized steel flashing tucked up under the existing house wrap and over the top edge of your ledger. This creates a waterproof barrier that directs rain away from the connection point. One homeowner I spoke with skipped this step to save time and ended up with water-damaged sheathing within two years—an expensive lesson learned.
For fasteners, lag screws are the most common choice for DIY installations. Use half-inch diameter hot-dipped galvanized or stainless steel lag screws, at least four inches long to penetrate through the ledger, house wrap, sheathing, and deep into the rim joist. Space them every sixteen inches along the board’s length. Some builders prefer through-bolts with washers and nuts on the interior side, which provide even stronger connections, though they require interior access.
After installation, seal the top edge where the ledger meets the house with exterior-grade caulk, creating an additional moisture barrier. This simple step provides insurance against water intrusion, protecting your investment for decades to come.
Securing the Outer Posts and Footings
While your pergola kit attaches to your house on one end, the outer posts need rock-solid anchoring to prevent sagging, shifting, or worse. This is where proper footings make all the difference between a structure that lasts decades and one that becomes a headache.
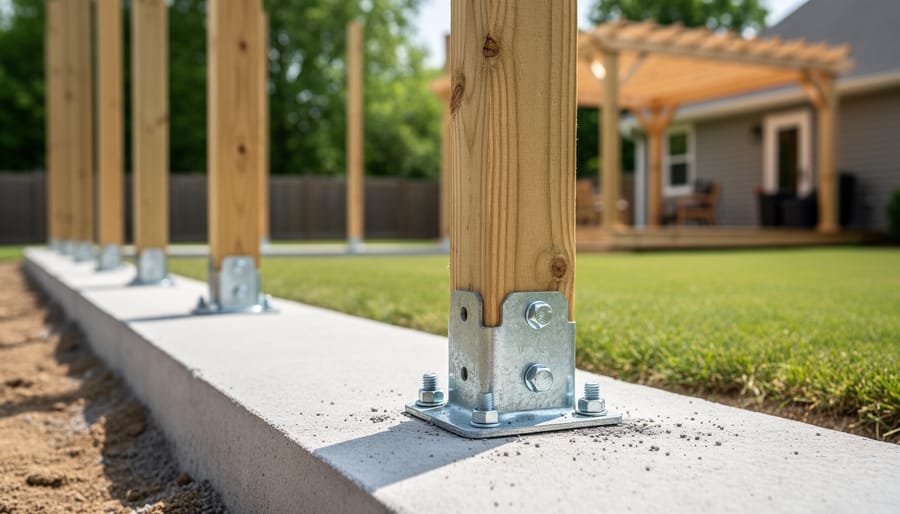
Start by determining your area’s frost line, the depth below ground where soil doesn’t freeze. This is crucial because frozen ground expands, pushing footings upward and creating structural problems. In northern regions, you might dig 42 inches or deeper, while southern areas may only require 12 to 18 inches. Your local building department can provide exact requirements for your zip code.
For each freestanding post, dig holes at least 12 inches in diameter, extending below the frost line. The general rule is to bury one-third of the post height, but concrete footings are far superior to simply burying treated lumber. Pour concrete into the holes, then install galvanized post bases or brackets before the concrete sets. These metal connectors keep wood posts elevated above ground moisture, dramatically extending their lifespan.
Post base hardware comes in several styles. Adjustable post bases allow for minor leveling corrections after concrete cures, which is helpful for DIY installers. Make sure all hardware is rated for outdoor use and matches your post dimensions exactly.
Give concrete at least 48 hours to cure in moderate weather, longer in cold conditions. Testing the stability before attaching your pergola beams prevents disappointing do-overs and ensures your outdoor retreat stays secure through every season.
Common Anchoring Mistakes That Cost Homeowners Thousands
Even experienced DIYers can make costly mistakes when attaching pergolas to their homes. One homeowner shared how attaching ledger boards directly to vinyl siding rather than the underlying wall studs caused their pergola to pull away during a storm, resulting in $3,500 in repairs. The solution? Always remove siding sections to access solid framing and use a stud finder to locate attachment points.
Another common error involves skipping proper flashing installation. Without it, water seeps behind the ledger board, causing hidden rot that one family discovered only after noticing interior wall damage—a $4,200 fix. Always install metal flashing above your ledger to direct water away from the connection point.
Shallow footings represent another expensive pitfall. Building codes typically require footings below the frost line (often 36-48 inches deep depending on location). One homeowner’s insufficient 18-inch footings resulted in shifting posts and a sagging structure within two seasons. Check local frost depth requirements before digging to avoid this preventable problem.
Permits and Building Codes: What You Actually Need to Know
Do You Need a Permit for Your Attached Pergola?
The short answer? Attached pergolas usually do require permits, while freestanding ones often don’t. Here’s why: when you’re bolting a structure directly to your home, building departments want to ensure it’s done safely and won’t compromise your house’s structural integrity.
Permits are typically required when your pergola attaches to your home’s structure, exceeds certain size thresholds (often 120-200 square feet, depending on location), or sits too close to property lines. Some municipalities also require permits based on height or if you’re adding electrical elements like lighting or fans.
Regional variations matter significantly. While a homeowner in rural Texas might build without permits, someone in suburban California likely needs approval before installing the first post. Your local building department can clarify specific requirements for your area.
Why the extra scrutiny for attached pergolas? They directly impact your home’s load-bearing capacity and weatherproofing. Improper attachment can lead to water infiltration, structural damage, or worse. Building inspectors want to verify that ledger board connections, flashing, and structural fasteners meet code requirements.
Before purchasing your pergola kit, call your local building department. This simple step prevents costly mistakes and ensures your beautiful new outdoor space is both safe and legal.
How to Navigate the Permit Process Without Losing Your Mind
Start by contacting your local building department at least 4-6 weeks before installation. Most municipalities require permits for structures attached to your home, and getting ahead of this process saves considerable headache later.
You’ll typically need to submit a site plan showing your property lines, house footprint, and proposed pergola location. Include the manufacturer’s specifications sheet from your kit, which shows dimensions, materials, and load ratings. Many building departments also want engineered drawings confirming the structure meets local wind and snow loads. The good news? Reputable pergola kit manufacturers often provide these documents specifically for permit applications.
Permit costs vary widely, ranging from $50 to $500 depending on your location and project size. Processing usually takes 2-4 weeks, though this extends during busy construction seasons.
Here’s a real-world tip from experienced DIYers: schedule your inspection before you complete the roofing or decorative elements. Inspectors need to see the attachment points and structural connections clearly. Being cooperative and prepared makes a world of difference. Have your approved plans on-site, keep the work area tidy, and don’t hesitate to ask questions. Building inspectors aren’t adversaries; they’re ensuring your pergola is safe for years of enjoyment. One homeowner shared that bringing coffee to an early morning inspection created a friendly rapport that led to helpful installation advice.
What Happens If You Skip the Permit?
Skipping the permit process might seem like a time-saver, but it can create headaches down the road that aren’t worth the risk. Many homeowners have faced fines ranging from a few hundred to several thousand dollars when inspectors discover unpermitted structures during routine property checks or neighbor complaints. Beyond immediate penalties, unpermitted pergolas can complicate your homeowner’s insurance coverage—if storm damage occurs, your claim might be denied because the structure wasn’t properly documented.
The resale impact is another practical concern. During home sales, title companies often require disclosure of all structures, and buyers may request permits be obtained retroactively or negotiate a lower price to account for the issue. Some have even walked away from otherwise perfect homes due to permit complications. The good news? Addressing permits upfront is typically straightforward and far less stressful than resolving these issues later. Think of it as protecting your investment and peace of mind from the start.
Choosing the Right Pergola Kit for House Attachment
Selecting the right pergola kit for house attachment starts with understanding your home’s exterior and your lifestyle needs. The material you choose will impact both installation ease and long-term maintenance, so it’s worth taking time to consider your options carefully.
For homeowners seeking low-maintenance solutions, vinyl pergola options offer excellent durability without the need for regular staining or sealing. Vinyl resists moisture damage, making it particularly suitable for attachment points where water could otherwise seep behind your home’s siding. These kits typically include pre-drilled mounting holes and weather-resistant fasteners that simplify the ledger board installation process.
If you prefer a traditional aesthetic, wood pergola kits provide natural beauty and flexibility for custom finishing. Cedar and pressure-treated pine remain popular choices because they naturally resist rot and insects. When selecting wood kits for house mounting, look for options that include treated ledger boards specifically designed for direct wall contact.
Aluminum pergolas present another practical choice, especially in coastal areas where salt air accelerates material degradation. They’re lightweight, which reduces stress on attachment points, yet strong enough to support climbing plants and occasional snow loads.
At Storage Sheds Outlet, our pergola kits address common installation challenges by including comprehensive hardware packages with rust-resistant fasteners, pre-cut components with precise measurements, and detailed instructions written for DIY enthusiasts. One customer from Pennsylvania shared that the pre-drilled pilot holes in their kit eliminated the guesswork around proper spacing, making their weekend installation surprisingly straightforward.
When reviewing options, prioritize kits that specify compatibility with various siding types and include flashing materials to protect against water intrusion. Quality kits should also provide adjustable post bases to accommodate slight variations in ground level near your foundation. These thoughtful design features transform a potentially complicated project into an achievable DIY accomplishment that enhances your outdoor living space for years to come.
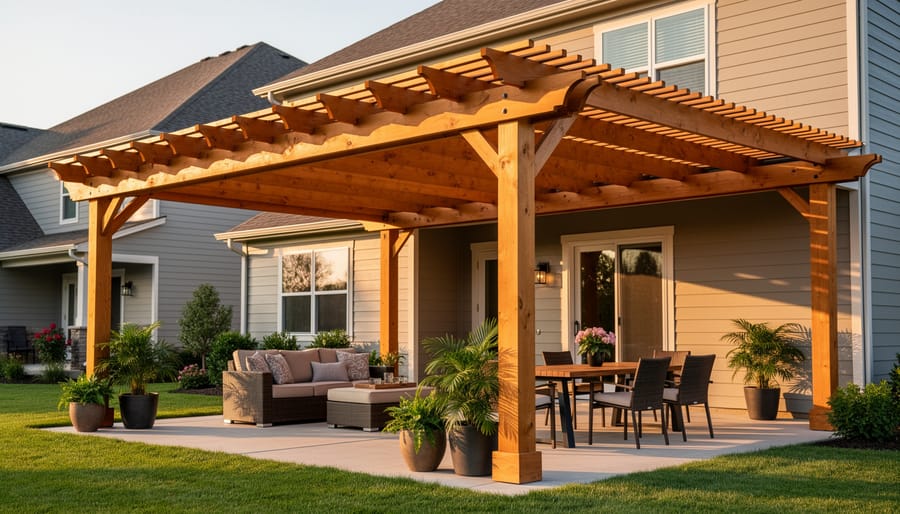
Installing a pergola kit attached to your house is absolutely within reach for DIY enthusiasts who take the time to prepare properly. While the process might seem intimidating at first, breaking it down into manageable steps—from evaluating your site and securing permits to choosing the right anchoring method and following manufacturer instructions—makes it surprisingly straightforward.
The key to success lies in those crucial preparation steps we’ve covered. Proper site assessment ensures you’re building on solid ground, permit compliance protects you from costly mistakes down the road, and correct anchoring techniques safeguard both your pergola and your home’s structural integrity. When you invest time in getting these fundamentals right, you’re setting yourself up for years of enjoyment rather than future headaches.
Remember, you don’t have to tackle this project alone. Many homeowners just like you have successfully installed attached pergolas and transformed their outdoor spaces into beautiful extensions of their homes. With the right kit, proper planning, and attention to detail during installation, you’ll create an outdoor living area that enhances your property value and provides countless memories for years to come. The effort you put into doing it correctly from the start will pay dividends in durability and satisfaction.
Looking for a gazebos and pergolas?
Browse our full range of gazebos and pergolas from authorized dealer brands. Free shipping to the continental US.