
Design Your Perfect Modular Storage Shed in Half the Time
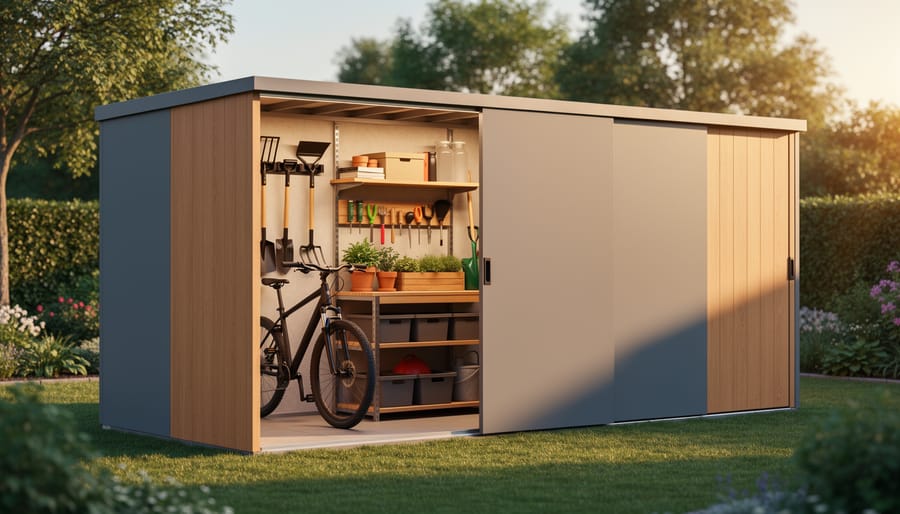
Choosing the right modular storage shed means understanding how individual components work together to create your ideal space. Unlike traditional sheds with fixed layouts, modular systems let you start small and expand as your needs change, whether you’re storing garden tools today and outdoor furniture next season.\n\nThe beauty of modular design lies in its flexibility. You can configure wall panels, door placements, shelving units, and window positions to match your specific storage challenges. A gardener might prioritize tool racks and potting benches along one wall, while someone storing sporting equipment needs vertical bike mounts and open floor space. The same base shed transforms completely based on how you arrange its components.\n\nMost homeowners discover their perfect configuration by mapping out what they’ll store before selecting modules. This approach prevents overspending on unnecessary features while ensuring you don’t miss critical elements like proper ventilation or adequate lighting. Understanding popular configurations gives you a starting point, but the real power comes from customizing those layouts to solve your unique storage problems.\n\nThis guide walks you through proven configurations, explains each modular component’s purpose, and helps you plan a shed that grows with your needs rather than becoming obsolete in two years.\n\n\n
What Makes a Storage Shed ‘Modular’ (And Why It Matters)
\n\nA modular storage shed is built from individual, pre-designed sections that connect together like building blocks. Unlike traditional sheds that come as one fixed structure, modular systems use interchangeable wall panels, roof sections, and floor pieces that you can arrange, expand, or reconfigure based on your changing needs.\n\nThink of it this way: a traditional shed is like a finished puzzle, while a modular shed is more like LEGO bricks. You start with a basic configuration, but if you need more space next year for garden equipment or want to add a workbench area, you simply purchase and attach additional panels. The components snap, bolt, or slide together using standardized connection points, making expansion straightforward without requiring demolition or complex reconstruction.\n\nThe key advantages are flexibility and future-proofing. Sarah, a homeowner in Oregon, started with an 8×10 modular shed for lawn equipment. Two years later, when she took up woodworking, she added a 4-foot extension section in just one weekend. With a traditional shed, she would have needed to buy an entirely new structure or settle for cramped quarters.\n\nModular designs also excel at customization beyond size. You can typically choose where to place doors, windows, and interior dividers during initial setup or modify them later. This adaptability is especially valuable for organizing your shed efficiently, as you can adjust the physical layout to match your storage strategy rather than working around fixed walls.\n\nThe components work together through engineered connection systems, usually involving interlocking grooves, reinforced corner brackets, or bolt-together frames. Quality modular sheds maintain structural integrity comparable to traditional builds while offering the freedom to evolve with your lifestyle.\n\n
 \n
\n\n\n\n
Popular Modular Configuration Layouts That Actually Work
\n\n
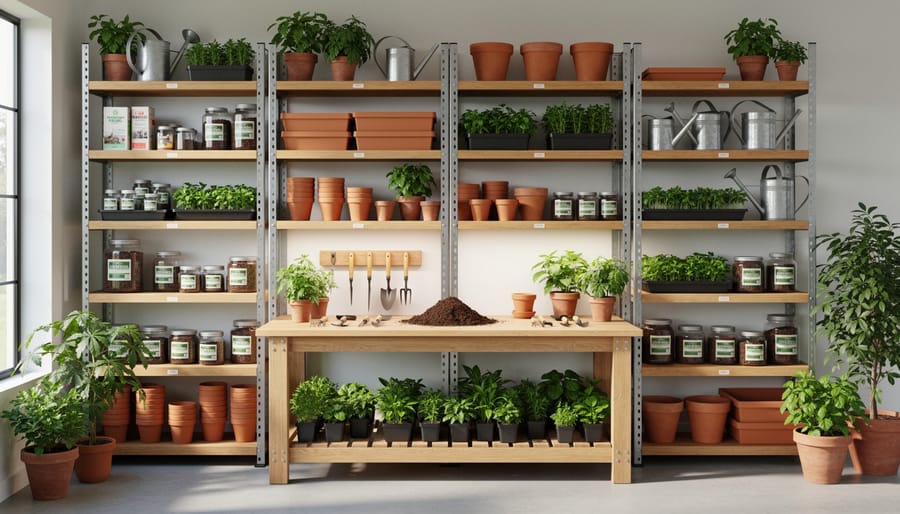
The Garden Zone Setup
\n\nFor garden enthusiasts, a dedicated zone transforms your modular shed into a true gardening hub. Start by positioning a sturdy workbench along one wall where you can pot plants, mix soil, and prepare seedlings year-round. Wall-mounted pegboards above the bench keep hand tools like trowels, pruners, and gloves within easy reach while maximizing floor space.\n\nInstall open shelving units on adjacent walls to organize pots, seed packets, and fertilizers at eye level. Heavy-duty lower shelves accommodate bags of potting mix and larger equipment like tillers or spreaders. Consider adding hooks near the entrance for hanging hoses, watering cans, and garden aprons.\n\nOne homeowner shared how her modular setup allowed her to add a small sink station later, making cleanup effortless. The beauty of modular garden storage solutions lies in this adaptability—you can start simple and expand as your gardening passion grows. Add a small stool under your workbench for comfortable seating during detailed tasks, and ensure adequate lighting for those early morning or evening gardening sessions.\n\n
 \n
\n\n\n
The Seasonal Storage Layout
\n\nFor homeowners juggling the chaos of seasonal transitions, this layout is a game-changer. The design centers around adjustable shelving that adapts as your storage needs shift throughout the year. Picture this: during summer, your Christmas decorations occupy upper shelves while beach toys and patio cushions stay accessible at eye level. Come fall, simply rearrange the shelves to prioritize holiday bins and winter sports gear.\n\nThe key to success lies in creating dedicated zones. One homeowner from Ohio shared how she designates the left side for sports equipment year-round, using bins labeled by season. The right side rotates between pool supplies, Halloween items, and holiday decorations. Adjustable hooks accommodate everything from wreaths to snow shovels.\n\nConsider investing in clear storage containers to quickly identify contents without rummaging. Install vertical dividers to prevent lawn chairs and sleds from toppling over. Many find success adding a pegboard wall section for smaller seasonal items like string lights or gardening tools. This flexible approach means you’re never digging through mountains of off-season clutter to find what you actually need right now.\n\n
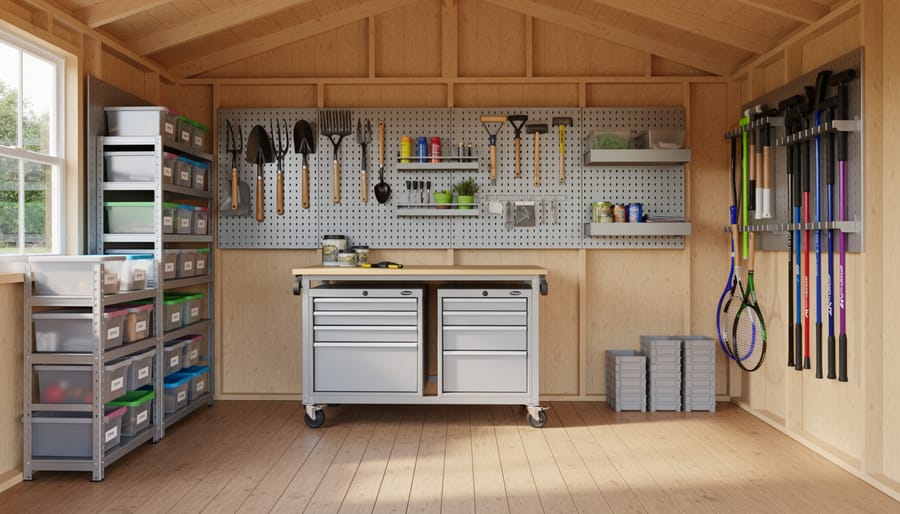
The Workshop Configuration
\n\nFor DIY enthusiasts, the workshop configuration transforms your modular shed into a highly functional creative space. Start by dedicating one wall to pegboard or slatwall panels that keep frequently used tools visible and within arm’s reach. Install a sturdy workbench along another wall, ensuring it’s positioned to take advantage of natural light from windows or skylights.\n\nIncorporate vertical storage cabinets for power tools and supplies, keeping items organized by project type. Drawer units beneath your workbench are perfect for storing smaller hardware, fasteners, and hand tools. Consider adding a mobile tool cart that can move around your workspace as needed.\n\nMount shelf brackets at varying heights to accommodate everything from paint cans to lumber offcuts. Climate control becomes especially important in a workshop setting to protect your tools from moisture damage.\n\nMany DIYers find success adding electrical outlets every few feet along the workbench wall, eliminating the need for extension cords. Overhead lighting fixtures positioned directly above work surfaces reduce eye strain during detailed projects. This configuration creates an efficient, inspiring space where every tool has its place and projects flow smoothly from start to finish.\n\n
The Multi-Purpose Flexible Design
\n\nLife doesn’t stand still, and neither should your storage solution. One of the greatest advantages of modular storage sheds is their ability to grow and change alongside your family’s needs. Unlike traditional fixed sheds, these systems let you reconfigure interior spaces without major construction headaches.\n\nThink about Sarah, a homeowner who started with her modular shed as a simple garden tool storage area. When she took up woodworking two years later, she simply rearranged the interior panels to create a dedicated workshop zone while maintaining her garden storage. No contractor needed, no expensive renovation required.\n\nThe secret lies in removable wall panels, adjustable shelving units, and movable partition systems. You can transform a single large space into multiple zones for seasonal items, sports equipment, and hobby supplies. As your needs shift, spending an afternoon reconfiguring beats buying an entirely new shed. Many homeowners appreciate this adaptability especially when hobbies change, families grow, or downsizing becomes necessary. Your shed investment continues delivering value year after year, adapting to whatever life brings next.\n\n\n
Essential Modular Components You Can Add or Remove
\n\n
Adjustable Shelving Systems
\n\nAdjustable shelving transforms your modular shed from basic storage into an organized powerhouse. Most systems come in three main types: wall-mounted brackets with adjustable slots, freestanding metal units, and heavy-duty wire shelving. Each offers different weight capacities, typically ranging from 50 pounds per shelf for lighter units up to 300 pounds for industrial-grade options.\n\nThe real magic happens when you maximize vertical space by stacking shelves at varying heights. Position frequently used items at eye level, seasonal gear up high, and heavier equipment on lower shelves for safety. One homeowner shared how installing three adjustable shelves instead of two fixed ones freed up 40 percent more usable space for camping equipment and holiday decorations.\n\nConsider your storage needs when selecting weight capacity. Garden tools and paint cans work fine on standard shelving, but power equipment and bulk materials require reinforced options. The beauty of adjustable systems is you can reconfigure them as your needs change, making them a smart long-term investment for any modular shed setup.\n\n
Wall-Mounted Storage Panels and Hooks
\n\nWhen it comes to flexible storage that adapts to your changing needs, wall-mounted systems are absolute game-changers. Pegboard panels offer that classic workshop feel with endless configuration possibilities—simply move hooks wherever you need them. Jennifer from Portland shares, “I reorganized my pegboard three times in the first month as I figured out what worked best. That flexibility is priceless!”\n\nSlatwall systems provide a more modern aesthetic with heavy-duty grooves that accommodate specialized accessories like bins, shelves, and tool holders. These panels handle heavier items than traditional pegboard, making them ideal for storing power tools and equipment.\n\nHook systems range from simple J-hooks for bicycles to multi-prong designs for garden tools. The key is choosing hooks rated for your items’ weight. Many homeowners start with a basic kit and expand over time, adding specialized hooks as their storage needs evolve. This approach keeps initial costs manageable while maintaining long-term flexibility.\n\n
Removable Workbenches and Folding Tables
\n\nFlexible work surfaces transform your modular shed from simple storage into a functional workspace when you need it. Removable workbenches attach securely to wall rails or mounting systems, giving you a sturdy surface for potting plants, organizing tools, or tackling weekend projects. When the job’s done, simply fold them down or detach completely to reclaim valuable floor space.\n\nSarah, a weekend woodworker, shares her experience: “I installed a folding bench along one wall of my 8×10 shed. During summer, it stays up for gardening projects. Come winter, I fold it down to make room for storing patio furniture. Game-changer!”\n\nLook for workbenches with adjustable heights to accommodate different tasks and users. Many fold-down models include locking mechanisms that ensure stability during use while allowing quick release when you need the space back. Some even feature integrated storage underneath, maximizing every square inch. This adaptability means your shed grows and changes with your needs rather than locking you into a single configuration.\n\n
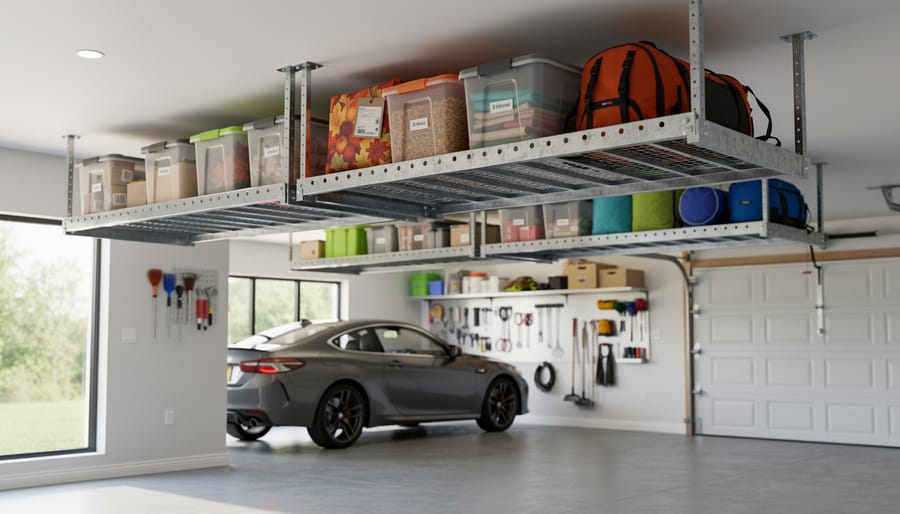
Overhead and Ceiling Storage Racks
\n\nDon’t let valuable overhead space go to waste in your modular shed! Installing ceiling storage racks is a game-changer for organizing seasonal decorations, camping gear, or those bulky items you only need occasionally. These racks keep your floor clear while maximizing vertical space you’d otherwise ignore. Many homeowners find that adding simple overhead shelving units practically doubles their usable storage capacity. Look for racks with weight ratings appropriate for your needs—typically 250 to 600 pounds depending on the system. Just remember to secure them properly to ceiling joists or rafters for safety. Pro tip: Store lighter items like sleeping bags and holiday decor up high, saving prime floor space for frequently accessed tools and equipment.\n\n
 \n
\n\n\n
Mobile Storage Bins and Cart Systems
\n\nMobile storage bins and carts bring flexibility to your modular shed that fixed shelving simply can’t match. Stackable plastic bins let you reorganize seasonally without heavy lifting, while rolling cart systems mean you can wheel items outdoors when needed. One homeowner shared how she uses labeled bins on wheels for her gardening supplies, simply rolling everything to her backyard in spring and back to the shed in fall. Consider clear bins for visibility or color-coded options to create zones. The real beauty? When your storage needs change, these portable solutions adapt instantly without requiring new installations or modifications to your shed’s structure.\n\n\n
How to Plan Your Configuration Before You Buy
\n\n
Inventory What You’re Actually Storing
\n\nBefore you can choose the right modular storage shed configuration, you need to understand what you’re actually storing. Start by walking through your garage, basement, or wherever items are currently piled up. Group everything into simple categories like seasonal decorations, lawn equipment, sports gear, tools, and gardening supplies. This isn’t about creating a detailed spreadsheet – just grab a notepad and jot down broad categories with rough quantities.\n\nNext, identify which items you’ll need to access regularly versus those you can tuck away for months at a time. Your lawnmower needs easy reach during summer, while holiday decorations can go higher or deeper. Consider bulky items that might need dedicated floor space and smaller items that work well on shelves. Many homeowners discover they’re storing things they haven’t used in years – this is your chance to declutter before investing in storage. This honest inventory helps you determine whether you need more shelving, floor space, or specialized hooks and racks in your modular setup.\n\n
Measure Your Space and Access Points
\n\nBefore ordering your modular shed, grab your measuring tape and spend a few minutes planning. Start by measuring your available space, noting both the footprint and overhead clearance if you’re placing it under trees or near structures. Don’t forget to leave breathing room on all sides for airflow and future maintenance.\n\nNext, think about access. Where will you need doors? Homeowner Lisa from Seattle shares her experience: “I placed my door facing away from my kitchen window, thinking it didn’t matter. Big mistake! Now I haul everything the long way around my yard.” Consider your most frequent routes and what you’ll be storing. If you’re housing a lawn mower, you’ll want wide double doors. For garden tools, a single side entrance might work perfectly.\n\nSketch your space on paper, marking obstacles like downspouts or garden beds. This simple step helps you visualize configurations and prevents costly ordering mistakes. Most manufacturers offer planning guides, so use them alongside your measurements for a setup that truly works for your lifestyle.\n\n
Sketch Your Ideal Layout
\n\nGrab some graph paper or use a simple online room planner to sketch out your modular shed’s interior before you start building or buying storage components. Start by drawing the shed’s footprint to scale, then mark the door location since this determines your primary traffic path.\n\nThink about how you’ll actually move through the space. Leave at least a 3-foot-wide main walkway from the door to the back wall. This prevents that frustrating shuffle-and-squeeze dance when you’re carrying awkward items like ladders or lawn equipment.\n\nNext, identify zones based on what you’ll store. One homeowner shared that dedicating her left wall to gardening supplies and the right to seasonal decorations made grabbing what she needed incredibly simple. Position frequently used items near the entrance and seasonal or rarely needed gear toward the back.\n\nConsider vertical space early in your planning. Mark where wall-mounted shelves, pegboards, or overhead storage could go without blocking natural light from windows. This approach to efficient storage planning ensures you maximize every square foot.\n\nDon’t worry about perfection. Your sketch is simply a guide to help you visualize the space and avoid costly mistakes when purchasing modular components.\n\n\n
Reconfiguring Your Shed as Your Needs Change
\n\nOne of the greatest advantages of modular storage sheds is how they grow and change with your lifestyle. Take Sarah from Portland, who initially set up her 10×12 shed as a straightforward garden tool storage space with simple wall-mounted hooks and open shelving. Three years later, when she started a home-based pottery business, she reconfigured the same shed by adding workbench modules along one wall, installing pegboard panels for tool organization, and incorporating vertical shelving units to store supplies and finished pieces. The transformation took just a weekend and cost a fraction of buying a new structure.\n\nThen there’s Mike in Ohio, whose modular shed began as a workshop for his woodworking hobby. When his family expanded and outdoor toys started taking over the garage, he simply removed two workbench sections and installed sports equipment racks and bike hooks instead. Half the shed now serves the kids while the other half remains his workspace, proving that modular systems can accommodate multiple purposes simultaneously.\n\nJessica’s story highlights seasonal flexibility. Her Colorado shed transforms throughout the year: spring brings gardening supplies to the forefront with accessible shelving, summer sees camping gear taking center stage, fall welcomes holiday decoration storage, and winter converts part of the space into ski equipment organization. She moves modular components around as needed, never feeling locked into one configuration.\n\nThese real-world examples demonstrate that your initial setup doesn’t have to be permanent. As hobbies change, families grow, or new storage needs arise, your modular shed adapts without requiring major renovations or additional structures. This flexibility protects your investment and ensures your storage solution remains valuable for years to come, making it a smart long-term choice for homeowners.\n\n\n
Common Mistakes to Avoid When Setting Up Modular Storage
\n\nSetting up your modular storage shed should be exciting, but a few common pitfalls can make your space less functional than it could be. Let’s walk through what to watch out for and how to avoid these issues.\n\nOvercrowding is probably the biggest mistake people make. When Sarah from Ohio first organized her garden shed, she crammed every shelf full, only to find she couldn’t actually reach anything. The solution? Follow the 70% rule—keep shelves and bins about 70% full. This leaves breathing room and makes everything accessible.\n\nPoor weight distribution is another sneaky problem. Placing heavy items on upper shelves or all on one side can make your modules unstable or even cause shelving units to tip. Always position heavier items on lower shelves and distribute weight evenly across your system. If you have particularly heavy equipment, secure taller units to the wall for extra stability.\n\nIgnoring vertical space means you’re leaving valuable storage potential untapped. Many people only use the bottom half of their shed. Look up! Install hooks, overhead bins, and tall shelving units to maximize every inch.\n\nFinally, not leaving room for growth is a classic oversight. Your storage needs will likely change over time. When planning your configuration, keep 15-20% of your space open for future additions. This flexibility is what makes modular storage so valuable—you can adapt as your collection of tools, seasonal items, or hobbies evolves.\n\n\nChoosing a modular storage shed gives you the freedom to create exactly the space you need today while keeping your options open for tomorrow. The beauty of these systems lies in their flexibility—you’re never locked into a single configuration. As your storage needs change, whether you’re picking up a new hobby, welcoming new family members, or simply accumulating more seasonal gear, your shed can adapt right along with you.\n\nIf you’re feeling overwhelmed by all the possibilities, start simple. Begin with a basic layout that addresses your most pressing storage challenges, then expand as you discover what works best for your lifestyle. Many homeowners find that a straightforward tool wall and a couple of shelving units solve 80% of their problems right away. You can always add specialty components like bike racks or potting benches down the road.\n\nReady to transform your cluttered garage or overflowing basement? Take some time to explore the modular shed options available in your area. Measure your space, make a list of what you need to store, and don’t hesitate to ask questions. Your perfect storage solution is closer than you think.