
Make Your Shed Last Decades: Weather-Resistant Paint Secrets Revealed
Choose weather-resistant exterior paint specifically formulated with acrylic or oil-based compounds to protect wooden sheds against moisture, UV damage, and temperature fluctuations. Prime bare wood surfaces with a high-quality exterior wood primer, ensuring complete coverage of knots and grain patterns for maximum protection. Apply multiple thin coats rather than one thick layer, allowing proper drying time between applications to create a durable moisture barrier that prevents rot and extends the life of wooden structures by up to 10 years. Select paints with mold-inhibiting properties and high-solid content percentages above 40% for superior coverage and lasting weather resistance in challenging outdoor conditions. These professional-grade coatings form an essential shield against rain, snow, and harsh sunlight while maintaining the wood’s natural beauty and structural integrity.
Why Regular Paint Won’t Cut It for Your Shed
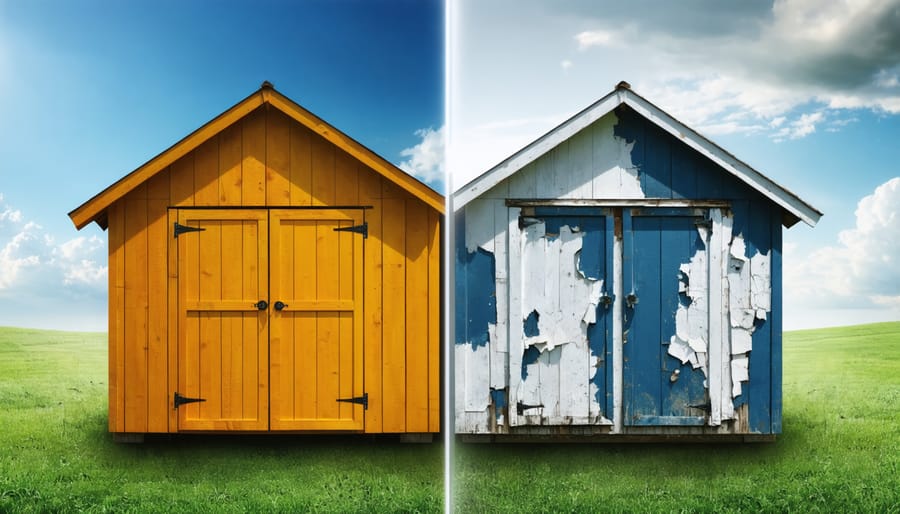
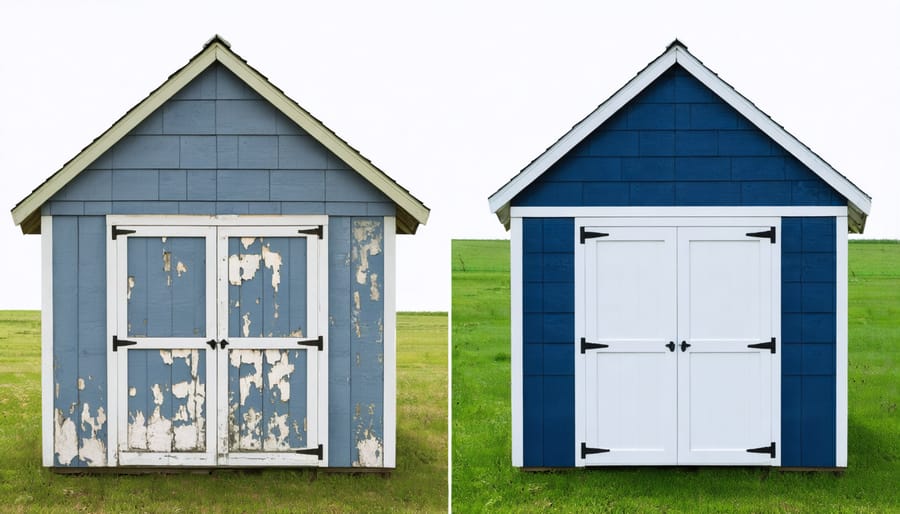
While it might be tempting to use leftover house paint on your shed, standard exterior paint simply isn’t designed to handle the unique challenges that storage structures face. Unlike your home’s walls, sheds are constantly exposed to harsh conditions from all angles, including ground moisture that can seep up through the foundation.
Think of your shed as being on the frontline of weather defense. It faces direct sunlight, driving rain, snow accumulation, and temperature swings that can cause wood to expand and contract dramatically. Regular paint lacks the specialized additives needed to combat these intense environmental stressors, leading to faster deterioration and more frequent maintenance.
Standard paint also struggles with the practical aspects of shed use. Every time you move equipment in and out, you risk scratching or scuffing the surface. Garden tools, lawnmowers, and other items can leave marks that compromise the paint’s protective barrier, allowing moisture to penetrate the wood underneath.
Additionally, sheds often experience condensation issues due to the storage of damp items like recently used garden tools or pool equipment. Regular paint doesn’t offer the mold and mildew resistance necessary to prevent growth in these humid conditions. Without proper protection, you might find yourself dealing with wood rot, warping, and structural issues that could have been prevented with the right coating.
Best Weather-Resistant Paint Options for Wood Sheds
Oil-Based vs. Water-Based Solutions
When it comes to protecting your wooden shed, you’ll typically choose between oil-based and water-based paints, each offering distinct advantages. Oil-based paints provide exceptional durability and create a hard, weather-resistant shell that’s particularly effective against moisture. They penetrate deeper into the wood fibers, offering superior protection against the elements and typically lasting 7-10 years before needing a refresh.
Water-based paints, on the other hand, have come a long way in recent years. They’re easier to work with, dry faster, and produce fewer VOCs (volatile organic compounds), making them more environmentally friendly. Modern water-based formulations offer excellent UV protection and maintain their color better than oil-based alternatives, though they may need reapplication every 4-6 years.
For high-moisture areas or regions with extreme weather conditions, oil-based paints generally perform better. However, they take longer to dry and require mineral spirits for cleanup. Water-based paints are ideal for moderate climates and are perfect for DIY projects due to their easy application and quick cleanup with just soap and water.
Consider your local climate when choosing between the two. If you live in an area with heavy rainfall or intense sun exposure, an oil-based paint might be your best bet. For milder conditions, a quality water-based paint will provide adequate protection while being more user-friendly.
Advanced Weather-Fighting Ingredients
Modern weather-resistant paints contain several powerful ingredients that work together to create a protective shield for your wooden shed. Acrylic resins form the backbone of these formulations, creating a flexible yet durable coating that moves with the wood as it expands and contracts through temperature changes.
UV inhibitors are crucial components that prevent sunlight from breaking down the paint and damaging the wood underneath. These specialized molecules act like tiny sunscreen particles, reflecting harmful rays away from your shed’s surface. Most quality outdoor paints also include zinc oxide or titanium dioxide, which provide additional UV protection while contributing to the paint’s opacity.
Mold and mildew inhibitors are another essential ingredient, typically containing compounds like zinc pyrithione or other fungicides that prevent the growth of unsightly and damaging organisms. Advanced formulations also incorporate water-repelling agents that create a hydrophobic surface, causing water to bead up and roll off rather than soaking into the wood.
Many modern paints feature ceramic microspheres, which not only enhance durability but also help regulate surface temperature. These tiny particles reflect heat and provide better insulation properties. Additionally, binding agents like alkyd resins ensure excellent adhesion to wooden surfaces, while elastomeric compounds allow the paint to stretch and recover without cracking or peeling.
Preparing Your Shed for Weather-Resistant Paint
Surface Cleaning and Repair
Before applying weather-resistant paint, it’s crucial to prepare the wood surface properly to ensure maximum protection and paint adhesion. Start by thoroughly cleaning the wood with a stiff brush to remove dirt, debris, and loose paint. For previously painted surfaces, sand down any peeling or flaking areas until smooth. Pay special attention to rough spots and splinters, as these can affect the final finish.
If you notice any signs of mold or mildew, clean the affected areas with a mixture of one part bleach to three parts water. Allow the surface to dry completely before moving forward. Fill any holes, cracks, or imperfections with exterior-grade wood filler and sand smooth once dried.
For new wood, lightly sand the entire surface to open up the grain for better paint absorption. Remember to wipe away all dust with a tack cloth after sanding. If your wood shows signs of water damage or rot, address these issues first by replacing damaged sections or treating them with a wood hardener before painting.
Primer Selection and Application
Selecting the right primer is crucial for ensuring your weather-resistant paint adheres properly and provides lasting protection. For bare wood, opt for an oil-based exterior primer that penetrates deeply into the wood fibers. If you’re working with previously painted surfaces, a high-quality latex primer will suffice, provided the old paint is in good condition.
Before applying primer, ensure the wood surface is completely dry and clean. Use a brush or roller specifically designed for your chosen primer type – natural bristle brushes work best for oil-based primers, while synthetic brushes are ideal for latex. Apply the primer in thin, even coats, working in the direction of the wood grain to ensure optimal coverage and adhesion.
Pay special attention to end grains and joints, as these areas are particularly vulnerable to moisture. Apply an extra coat of primer to these spots. Allow the primer to dry completely according to the manufacturer’s instructions – typically 24 hours in good weather conditions. For best results, lightly sand the primed surface with fine-grit sandpaper once dry, then wipe away any dust before applying your weather-resistant paint.
Application Tips for Maximum Weather Protection
Optimal Weather Conditions
For the best results with weather-resistant paint, aim to work on days when the temperature is between 50-85°F (10-29°C) with relative humidity below 85%. Avoid painting in direct sunlight, as this can cause the paint to dry too quickly and affect its durability. The ideal painting window is typically during mid-morning or early afternoon when morning dew has evaporated but before evening moisture sets in.
Check the weather forecast before starting your project – you’ll want at least 24-48 hours of dry conditions after painting. If rain is expected within this window, postpone your painting project. Wind can also impact your painting success; choose a day with minimal breeze to prevent debris from sticking to wet paint and ensure even application.
The wood’s moisture content should be below 15% for optimal paint adhesion. Use a moisture meter if you’re unsure, especially when painting new wood or after rainy weather. Cool, overcast days with stable temperatures often provide the best conditions for paint application and proper curing.
Multiple Coat Strategy
Achieving optimal weather protection for your wooden shed requires a strategic approach to paint application. Start with a quality primer coat, which creates a strong foundation by sealing the wood and promoting better paint adhesion. Once the primer is completely dry, apply your first coat of weather-resistant paint using even, overlapping strokes.
For maximum durability, plan on applying at least two coats of paint, with three being ideal for areas that face harsh weather conditions. Wait 24-48 hours between coats to ensure proper drying, even if the paint feels dry to the touch. Each subsequent coat strengthens the protective barrier and fills any tiny gaps or imperfections from previous applications.
When applying multiple coats, alternate your brush strokes between horizontal and vertical directions. This technique ensures complete coverage and helps identify any missed spots. Pay extra attention to edges, corners, and joints, as these areas are most vulnerable to water penetration. The final coat should be applied generously but not so thick that it runs or creates drips. Remember, patience between coats leads to a longer-lasting finish that better protects your shed.
Investing in weather-resistant paint for your wooden structures is more than just a maintenance task – it’s a smart, long-term investment in protecting your valuable outdoor assets. By choosing the right weather-resistant paint and applying it correctly, you’re not only enhancing the appearance of your wooden surfaces but also significantly extending their lifespan. The initial effort of proper surface preparation, selecting quality primers, and applying multiple coats pays off through reduced maintenance needs and fewer repairs over time.
Remember that weather-resistant paint serves as your wood’s first line of defense against rain, snow, UV rays, and temperature fluctuations. While the upfront cost might be higher than standard paint, the extended protection and reduced need for frequent repainting make it a cost-effective choice in the long run. By following the preparation and application guidelines we’ve discussed, you can achieve professional-looking results that will protect your wooden structures for years to come.
For the best results, always choose high-quality products and take your time with each step of the process. Your future self will thank you for the effort invested today in properly protecting your wooden surfaces.