
Make Your Shed Weather-Tight: Smart Protection That Actually Works
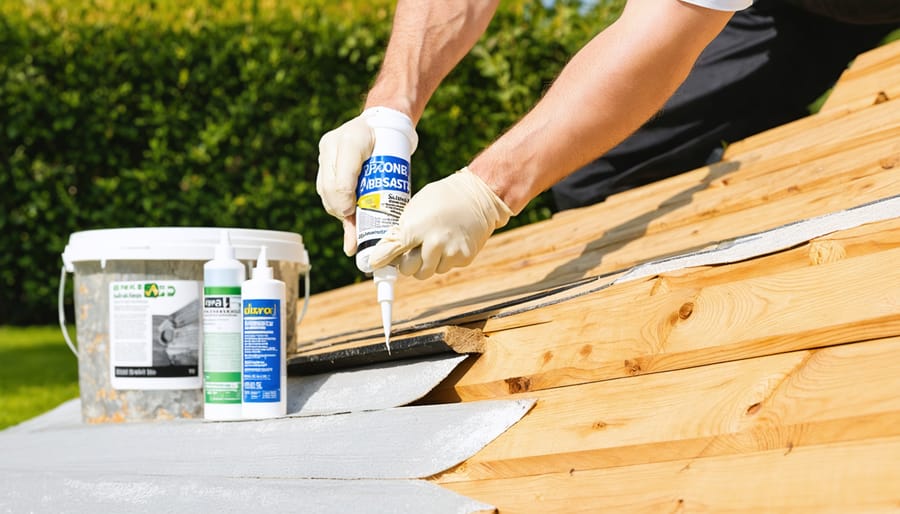
Transform your outdoor shed into a temperature-controlled environment built to withstand nature’s harshest elements. Start by inspecting and sealing all roof joints with high-grade silicone caulk, applying weather stripping around doors and windows, and installing proper drainage systems to direct water away from the foundation. Weather-resistant paint or sealant creates a protective barrier against moisture, while strategic ventilation prevents condensation buildup that leads to mold and rust. Proper weatherproofing not only extends your shed’s lifespan but also protects valuable tools and equipment stored inside, potentially saving thousands in replacement costs.\n\nEvery hour invested in weatherproofing prevents days of future repairs. Whether facing scorching summers or freezing winters, a properly sealed shed maintains its structural integrity while keeping stored items safe and dry. Focus on critical areas where water typically penetrates – roof edges, window frames, and door thresholds – as these points require the most attention during the weatherproofing process.\n\n\n
Assessing Your Shed’s Vulnerabilities
\n\n
 \n
\n\n\n
Common Problem Areas
\n\nWhen it comes to protecting your stored items, understanding your shed’s vulnerable areas is crucial. The roof typically presents the biggest challenge, with common issues including loose or damaged shingles, gaps around vents, and worn flashing. Pay special attention to the corners and edges where different roofing materials meet, as these are prime spots for water infiltration.\n\nWall joints and seams are another critical area, particularly where walls meet the roof or foundation. Look for gaps in siding panels, cracks around windows or doors, and areas where utilities enter the shed. These spots often allow moisture to seep in, potentially damaging both the structure and its contents.\n\nThe foundation and floor system deserve careful inspection too. Poor drainage around the base can lead to water pooling, while gaps between the foundation and walls create entry points for moisture and pests. Check for signs of rot or warping in floor joists, especially in older sheds, and ensure proper ventilation exists to prevent moisture buildup underneath the structure.\n\n
Signs of Weather Damage
\n\nRegular inspection of your shed can reveal early signs of weather damage that need attention. Look for water stains or discoloration on the ceiling and walls, which often indicate a leaky roof or poor waterproofing. Pay special attention to corners and joints, where moisture tends to accumulate first.\n\nCheck for warped or rotting wood, particularly around the base of the shed and near windows or doors. Soft, spongy areas in wooden components suggest advanced water damage that requires immediate attention. Rusted hardware, loose hinges, or difficulty opening and closing doors can also point to moisture-related issues.\n\nExamine the exterior for peeling paint, cracked caulking, or gaps in the siding. These seemingly minor issues can quickly escalate into major problems if left unaddressed. Keep an eye out for mold or mildew growth, both inside and outside the shed, as these are clear indicators of excess moisture.\n\nFoundation issues often manifest as uneven floors or gaps between the ground and shed base. After heavy rains, check for pooling water around the foundation, which may require improved drainage solutions.\n\n\n
Essential Weatherproofing Materials
\n\n
 \n
\n\n\n
Sealants and Barriers
\n\nProper sealing is your shed’s first line of defense against moisture and weather damage. Start by applying a high-quality waterproof sealant to all exterior joints, seams, and corners. Look for silicone-based or polyurethane sealants specifically designed for outdoor use, as these offer superior durability and flexibility in varying temperatures.\n\nDon’t forget about weatherstripping around doors and windows – it’s a simple yet effective way to prevent drafts and water infiltration. Self-adhesive foam tape works well for most applications, while rubber gaskets provide excellent protection for frequently used doors. Install door sweeps at the bottom of entrance ways to keep out rain and debris.\n\nA vapor barrier is essential for preventing ground moisture from seeping up into your shed. Install a heavy-duty plastic sheeting or specialized vapor barrier material under your flooring, extending it several inches up the walls. This creates a moisture-proof barrier between the ground and your shed’s interior.\n\nFor added protection, consider applying waterproof tape to joints in metal or plastic siding, and use rubber washers with any exterior fasteners. Remember to inspect your sealants annually and reapply as needed – even the best products will eventually need maintenance to maintain their effectiveness.\n\n
Protective Coatings
\n\nProtecting your shed with the right coating is essential for long-term weather resistance. Start with a high-quality exterior primer to create a strong foundation and ensure better paint adhesion. For wooden sheds, opt for an oil-based or latex exterior paint specifically formulated for outdoor use. These paints create a protective barrier against moisture while offering UV protection to prevent wood deterioration and color fading.\n\nConsider using specialized wood preservatives before painting to guard against rot, mold, and insect infestations. For metal sheds, rust-resistant paint or coating is crucial – look for products containing zinc or other corrosion-inhibiting compounds. Many homeowners have found success with multi-layer systems, applying a preservative, followed by primer and two coats of paint.\n\nClear wood sealers and water-repellent preservatives are excellent alternatives if you prefer to maintain the natural look of wooden sheds. These treatments penetrate the wood deeply, providing protection without changing its appearance. For added durability, apply a new coat of protective finish every 2-3 years, or sooner if you notice the coating starting to wear or peel.\n\nRemember to choose products rated for your climate zone – areas with high rainfall or intense sun exposure may require more robust protection.\n\n\n
Step-by-Step Weatherproofing Process
\n\n
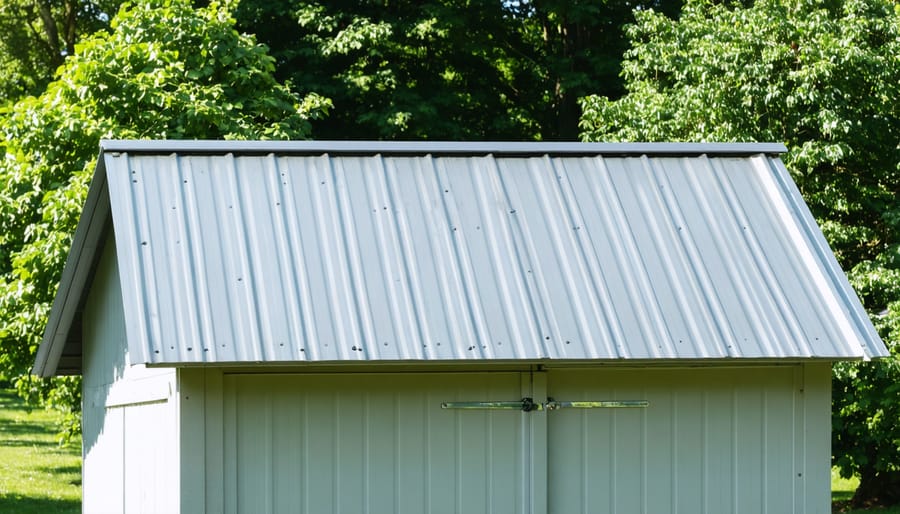
Roof Protection
\n\nA well-protected roof is your shed’s first line of defense against the elements. Start by inspecting your roof for any existing damage, paying special attention to loose or missing shingles, gaps around vents, and signs of water stains on the interior ceiling. These issues need immediate attention to prevent more serious problems.\n\nFor optimal protection, apply a high-quality roofing felt underlayment beneath your shingles or metal roofing. This creates an additional waterproof barrier that helps prevent leaks even if the outer roofing material becomes damaged. Make sure to overlap each layer properly, working from the bottom edge up to ensure water runs off effectively.\n\nConsider installing drip edges along your roof’s perimeter. These metal strips direct water away from the fascia and into your gutters, preventing water from seeping under the roofing material. Speaking of gutters, they’re essential for proper drainage. Install gutters along the roof’s edge and ensure they’re angled correctly to channel water away from your shed’s foundation.\n\nFor extra protection, especially in areas with harsh weather, apply a roof sealant to all joints, seams, and around any roof penetrations like vents or skylights. Choose a sealant specifically designed for your roofing material type, whether it’s asphalt, metal, or rubber.\n\nRegular maintenance is crucial. Clear your gutters of debris seasonally, check for damaged shingles after storms, and reapply sealant as needed. During winter, use a roof rake to prevent snow accumulation, which can lead to ice dams and excessive weight on your shed’s structure.\n\nRemember to ventilate your shed properly to prevent moisture buildup under the roof, which can lead to rot and mold growth over time.\n\n
 \n
\n\n\n
Wall and Joint Security
\n\nEnsuring your walls and joints are properly sealed is crucial to secure your shed structure against weather damage. Start by inspecting all corners, seams, and joints where water might penetrate. Pay special attention to areas where different materials meet, such as where the walls join the roof or foundation.\n\nApply a high-quality exterior caulk to seal any visible gaps or cracks. Silicon-based caulk works best for most applications as it remains flexible and won’t crack during temperature changes. For larger gaps, consider using expanding foam sealant, but be careful not to over-apply as it can expand significantly.\n\nDon’t forget to check around windows and door frames, as these are common entry points for moisture. Install weather stripping around doors and windows, and ensure the trim is properly sealed with caulk. For metal sheds, apply rust-resistant silicone sealant at all seams and bolt holes.\n\nIf your shed has wood siding, inspect for any warped or damaged boards that might allow water infiltration. Replace damaged pieces promptly and ensure all nail holes are filled with exterior wood filler. For vinyl or metal siding, check that all panels are properly overlapped and secured.\n\nConsider applying a waterproof membrane or vapor barrier behind the siding if you’re rebuilding or renovating. This extra layer of protection helps prevent moisture from seeping through to the interior. Remember to check and maintain these seals annually, preferably before the wet season begins, to ensure continued protection against the elements.\n\n
Floor and Foundation Care
\n\nA solid foundation is your shed’s first line of defense against weather damage. Start by ensuring your shed sits on a level surface, ideally elevated 4-6 inches above the surrounding ground. This elevation prevents water pooling and reduces the risk of wood rot and rust.\n\nFor existing sheds, inspect the foundation regularly for signs of settling or damage. If you notice any gaps between the ground and foundation, fill them with weatherproof sealant or expanding foam to prevent moisture infiltration. Consider installing a moisture barrier between the ground and your shed’s base – heavy-duty plastic sheeting or specialized foundation membrane works well for this purpose.\n\nThe floor itself needs special attention, particularly if it’s wooden. Apply a waterproof sealant or marine-grade varnish to protect against moisture seeping up from below. For added protection, install rubber or plastic floor mats in high-traffic areas. These not only provide additional moisture protection but also make cleaning easier.\n\nCreate proper drainage around your shed by grading the surrounding soil to slope away from the structure. A slope of about one inch per foot for at least six feet around the shed will effectively channel water away from the foundation. Installing a French drain or gravel border around the perimeter can further improve drainage and prevent water accumulation.\n\nIf your shed has a concrete foundation, seal any cracks promptly with concrete repair compound to prevent water penetration. For wooden foundations, replace any rotted boards immediately and treat the new wood with preservative before installation. Consider adding adjustable foundation piers or blocks under your shed to allow for periodic leveling and improved air circulation.\n\nRemember to check the floor-to-wall joints regularly and seal any gaps with appropriate weather stripping or caulk. This prevents drafts and moisture from entering through these vulnerable areas while also helping to keep pests out.\n\n\n
Maintenance Tips
\n\nRegular maintenance is crucial for keeping your weatherproofed shed in top condition. Following these essential maintenance guidelines will help extend the life of your weather protection measures and prevent costly repairs down the line.\n\nPerform monthly visual inspections of your shed’s exterior, paying special attention to the roof, siding, and foundation. Look for signs of water damage, peeling paint, or developing gaps. Clear any debris from gutters and downspouts to ensure proper water drainage, and trim back any overhanging branches that could damage your shed during storms.\n\nCheck your weather stripping and door seals every three months, replacing them if they show signs of wear or deterioration. This simple step can prevent unwanted moisture from seeping in through gaps around doors and windows. Similarly, inspect caulking around windows and joints annually, reapplying as needed to maintain a watertight seal.\n\nReapply water-repellent treatments to wooden surfaces every two to three years, depending on your climate and the product used. For metal sheds, watch for any signs of rust and address them promptly with appropriate rust-preventive treatments. Keep the area around your shed well-ventilated by maintaining proper air circulation and removing any vegetation that grows too close to the walls.\n\nDuring seasonal changes, pay extra attention to your shed’s condition. Spring and fall are ideal times for thorough inspections and necessary repairs. Remember to test door hinges and locks, lubricating them as needed to prevent rust and ensure smooth operation. A well-maintained shed not only protects your belongings better but also maintains its appearance and value over time.\n\n\nWeatherproofing your shed is an investment that pays off in multiple ways, protecting both your storage space and the valuable items inside. By following the steps outlined in this guide, you’ll create a weather-resistant structure that stands up to rain, snow, heat, and humidity. Remember to start with a thorough inspection, seal all potential entry points, and maintain proper ventilation. Regular maintenance checks, especially before extreme weather seasons, will help identify and address issues before they become major problems. With the right materials and attention to detail, your shed can remain a dry, secure, and functional space for years to come. Don’t forget that prevention is always easier and more cost-effective than repairs, so take the time to properly weatherproof your shed today.