
Stop Moisture From Destroying Your Shed’s Insulation (Simple Solutions)

Moisture in your shed isn’t just an inconvenience – it’s a silent destroyer that can compromise your valuable tools, cause structural damage, and create unhealthy mold growth within weeks. From rusted power tools to warped wooden shelves, excess moisture wreaks havoc on both the contents and structure of your garden shed, potentially leading to thousands in replacement costs.
Yet this common problem affects nearly 70% of shed owners, particularly in humid climates or areas with poor drainage. The good news? With proper understanding and a few strategic improvements, you can effectively protect your shed from moisture damage and create a dry, secure storage space that stands the test of time.
Whether you’re dealing with existing moisture issues or wanting to prevent future problems, this guide will walk you through proven solutions for identifying moisture sources, implementing effective ventilation, choosing the right insulation materials, and creating proper barriers against ground moisture. We’ll focus on practical, cost-effective methods that any homeowner can implement, helping you preserve both your shed and its contents for years to come.
Let’s dive into the essential steps for tackling moisture problems and creating a dry, functional storage space that truly protects your investments.
Why Moisture is Your Shed’s Hidden Enemy
Common Sources of Shed Moisture
Understanding where moisture comes from is the first step in keeping your shed dry and your belongings protected. Ground seepage is often the primary culprit, especially in sheds built directly on soil or concrete slabs. When rain falls or snow melts, water can easily migrate upward through the ground and into your shed’s floor and walls.
Air leaks around windows, doors, and roof joints are another common source of unwanted moisture. Even tiny gaps can allow damp air to infiltrate your shed, particularly during rainy or humid weather. These leaks not only let moisture in but can also create drafts that contribute to condensation problems.
Condensation occurs when warm, humid air meets cooler surfaces inside your shed. This is especially common in uninsulated sheds during temperature changes. You might notice water droplets forming on windows, metal tools, or the underside of the roof – a clear sign of condensation at work. Daily activities like storing wet garden tools or running power equipment can also add moisture to the air, making the problem worse.
Warning Signs of Moisture Problems
Catching moisture problems early can save you from costly repairs and protect your stored items. Keep an eye out for dark or discolored spots on walls and ceilings, which often indicate water seepage. A musty smell is another telltale sign that moisture has become trapped inside your shed. Check for condensation on windows, especially during early mornings or after temperature changes.
Pay attention to peeling paint or wallpaper, as these can signal moisture working its way through the walls. Touch your insulation periodically – if it feels damp or compressed, you likely have a moisture issue. Watch for rust on metal items or tools, which suggests high humidity levels inside your shed.
Other warning signs include warped wooden surfaces, visible mold growth, or door frames that stick due to swelling. Listen for dripping sounds during rain and look for water stains around windows, doors, and corners. If you notice any of these signs, it’s important to address them promptly to prevent further damage to your shed and its contents.
Essential Moisture Prevention Techniques
Proper Ventilation Solutions
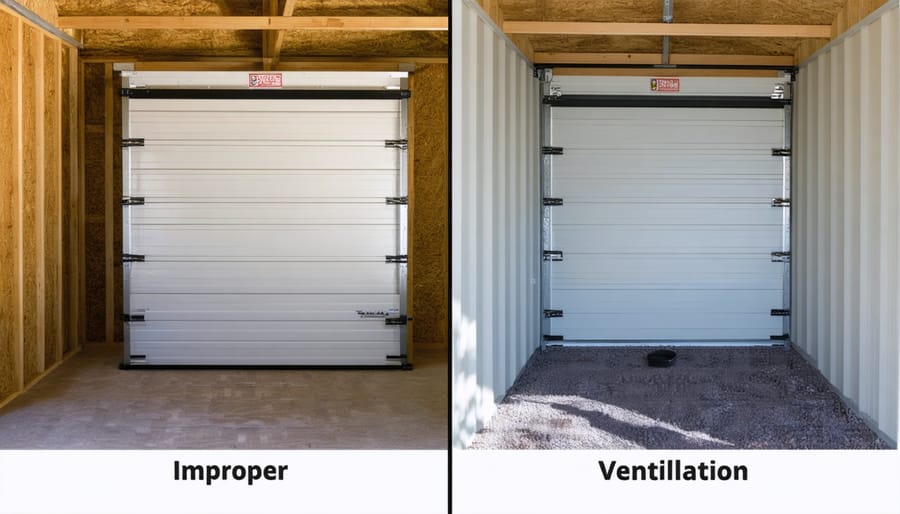
Ensuring your shed has proper ventilation systems is crucial for controlling moisture levels and protecting your stored items. Start with installing roof vents near the peak of your shed, as this allows warm, moist air to escape naturally. For optimal airflow, place one vent on each end of the roof ridge.
Wall vents are another essential component, ideally positioned on opposite walls to create cross-ventilation. Install these vents about 12 inches from the ground to promote air circulation throughout the entire space. For larger sheds, consider adding a solar-powered vent fan to boost air movement on still days.
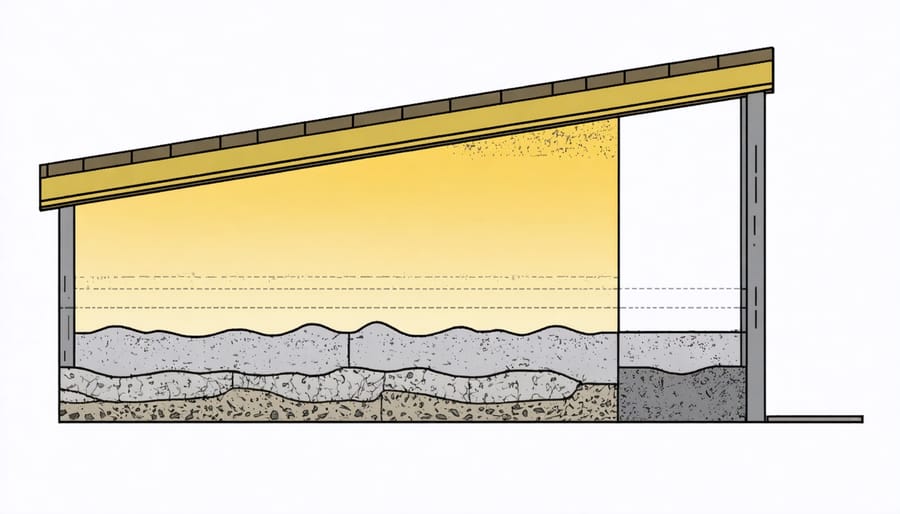
Don’t overlook the importance of foundation vents. These small openings at the base of your shed prevent ground moisture from becoming trapped underneath and seeping into the structure. Installing a vapor barrier between the ground and your shed’s floor provides an additional layer of protection.
For those in particularly humid climates, combining passive ventilation with a small dehumidifier can make a significant difference. Remember to keep stored items slightly away from walls to allow air to circulate freely. Regular maintenance of your ventilation system, including cleaning vents and checking for blockages, ensures optimal performance year-round.
Vapor Barriers Done Right
Installing a vapor barrier correctly is crucial for protecting your shed from moisture damage. The key to effective moisture barrier solutions lies in both material selection and proper installation techniques.
For optimal protection, choose a 6-mil polyethylene sheeting or similar vapor-resistant material. This thickness provides durability while remaining manageable during installation. When installing, ensure the barrier covers the entire floor area and extends up the walls by at least 6 inches. Overlap seams by a minimum of 12 inches and seal them with moisture-resistant tape.
Remember to place the vapor barrier directly on the ground before laying your shed’s foundation or floor. For walls, install the barrier on the warm side of your insulation – typically the interior side in most climates. This prevents warm, moist air from condensing when it meets cooler surfaces.
Pay special attention to corners and edges, using appropriate sealants or tape to create continuous protection. Don’t forget to properly seal around any penetrations, such as electrical conduits or plumbing pipes. Small gaps can lead to significant moisture issues over time.
For added protection, consider using a dimpled membrane beneath your vapor barrier, which creates an air gap and additional drainage layer. This combination provides superior moisture control and helps maintain a dry environment in your shed.
Ground Moisture Control
Ground moisture can silently wreak havoc on your shed’s insulation, but there are several effective ways to keep it at bay. Start by creating a proper moisture barrier beneath your shed during installation. A 6-mil polyethylene vapor barrier laid directly on leveled ground before adding gravel provides excellent protection against rising damp.
Installing a gravel bed is crucial – use clean, crushed stone or gravel at least 4 inches deep under your entire shed footprint. This creates a drainage layer that prevents water from pooling beneath the structure. For added protection, ensure the gravel extends about 6 inches beyond your shed’s perimeter.
Proper drainage around your shed is equally important. Grade the surrounding soil to slope away from the building at a rate of about 1 inch per foot for at least 6 feet. Install gutters and downspouts to direct rainwater away from the foundation, preventing water from seeping underneath.
Consider raising your shed slightly off the ground using concrete blocks or a proper foundation. This creates airflow underneath and reduces direct contact with soil moisture. Regular inspection of the ground around your shed, especially after heavy rains, helps identify and address drainage issues before they become serious problems.
For existing sheds with moisture issues, installing a dehumidifier and ensuring proper ventilation can help manage ground moisture that’s already present.
Best Insulation Materials for Moisture-Prone Sheds
Moisture-Resistant Insulation Options
When it comes to protecting your shed from moisture damage, choosing the right insulation material is crucial. While shed insulation costs vary, investing in moisture-resistant options can save you money in the long run by preventing damage and replacement needs.
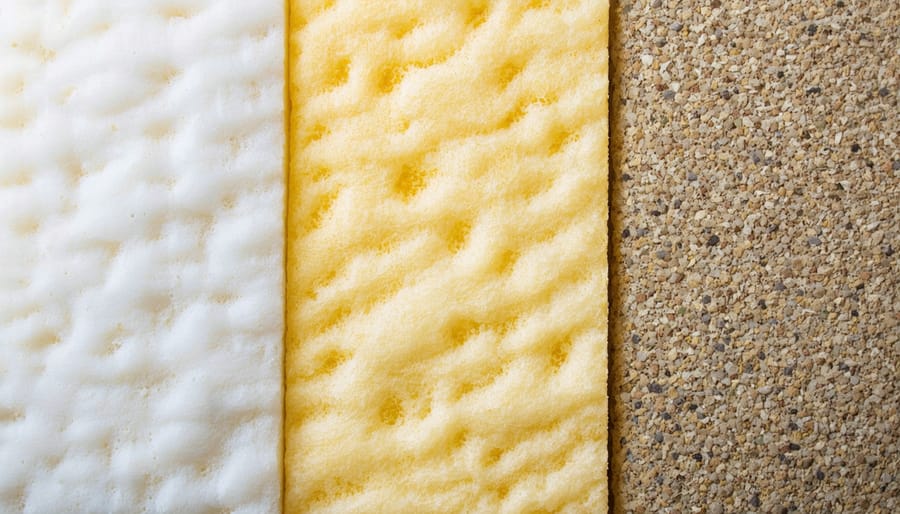
Closed-cell spray foam insulation stands out as a top performer in humid environments. This material creates an effective vapor barrier while providing excellent thermal protection. It’s particularly effective for sheds because it expands to fill gaps and cracks, creating a seamless moisture barrier.
Rigid foam boards, such as extruded polystyrene (XPS) or polyisocyanurate, offer another reliable solution. These boards resist water absorption and maintain their insulating properties even in damp conditions. They’re also easy to install and can be cut to fit any space perfectly.
For those preferring eco-friendly options, sheep’s wool insulation naturally manages moisture by absorbing and releasing it without compromising its insulating properties. It’s also naturally resistant to mold and mildew, making it ideal for shed environments.
Fiberglass batts with kraft paper facing can work well too, but only when properly installed with a vapor barrier. The key is ensuring the facing is positioned toward the warm side of the wall to prevent moisture accumulation within the insulation.
Remember to pair your chosen insulation with proper ventilation for optimal performance and longevity.
Installation Best Practices
Proper installation is your first line of defense against moisture problems in your shed. Start by choosing an elevated location with good drainage, and create a solid foundation at least 4 inches above ground level using concrete blocks or a concrete pad. This elevation prevents ground moisture from seeping upward into your structure.
When setting up your shed, ensure there’s a minimum 2-foot clearance from any surrounding vegetation or structures. This spacing promotes proper airflow and reduces moisture accumulation. Install a high-quality vapor barrier beneath your shed’s floor to create an effective moisture block from the ground up.
To insulate your shed correctly, use moisture-resistant materials and leave a small air gap between the insulation and outer walls. Install vents at both the floor and roof level to create natural air circulation, with at least one vent per 150 square feet of floor space.
Pay special attention to your roof installation, ensuring proper overlap of roofing materials and secure flashing around any joints or penetrations. Use silicone caulk to seal any gaps around windows, doors, and utility entrances. Finally, apply a water-resistant coating to exterior walls and install gutters to direct rainwater away from your shed’s foundation. These installation steps will significantly reduce moisture-related issues in the long run.
Maintenance and Monitoring Tips
Regular maintenance is your best defense against moisture problems in your shed. Start by establishing a monthly inspection routine – mark it on your calendar like any other important home maintenance task. During these checks, pay special attention to corners, joints, and areas around windows and doors where moisture tends to accumulate.
Keep a watchful eye on your shed’s gutters and downspouts, ensuring they’re free from leaves and debris. Clean them at least twice a year, more frequently if you have trees nearby. Make sure downspouts direct water at least three feet away from your shed’s foundation to prevent water from seeping in.
Consider installing a simple humidity monitor inside your shed – they’re inexpensive and can alert you to moisture problems before they become serious. Aim to maintain relative humidity levels below 60% to prevent mold growth. If you notice consistently high readings, that’s your cue to take action.
Ventilation is crucial year-round. Make it a habit to open windows and doors on dry, breezy days to promote air circulation. If your shed has vents, check them monthly to ensure they’re not blocked by stored items or debris. During your inspections, look for signs of condensation on windows or walls, especially during temperature changes.
Create a maintenance checklist that includes:
– Checking seals around windows and doors
– Inspecting the roof for leaks or damaged shingles
– Looking for gaps in siding or foundation
– Testing door and window operations
– Examining stored items for signs of moisture damage
Remember to maintain adequate spacing between stored items and walls to allow air circulation. Consider using moisture-absorbing products like silica gel packets or dehumidifiers in problem areas, but check and replace them according to manufacturer recommendations.
Quick response to any signs of moisture is essential. The sooner you address issues like leaks or poor drainage, the less likely you are to face serious damage or costly repairs down the line.
Maintaining a dry, moisture-free shed is essential for protecting your valuable tools, equipment, and stored items. By implementing the preventive measures we’ve discussed, such as proper ventilation, effective insulation, and regular maintenance, you can significantly reduce the risk of moisture damage in your shed.
Remember that addressing moisture issues early is key to preventing more serious problems down the line. Start by checking your shed’s foundation and ensuring proper drainage around the structure. Install adequate ventilation systems, consider using a dehumidifier during particularly humid periods, and regularly inspect for signs of water ingress or condensation.
Don’t forget the importance of choosing the right materials for your shed’s construction and maintenance. Weather-resistant sealants, appropriate insulation, and moisture barriers can make a substantial difference in keeping your shed dry and protected.
Take action today by conducting a thorough inspection of your shed and implementing these moisture-control strategies. Regular maintenance checks, especially during seasonal changes, will help you stay ahead of potential moisture problems. With these measures in place, you can enjoy a dry, functional storage space that protects your belongings for years to come.
If you’re experiencing persistent moisture issues, don’t hesitate to consult with a professional who can provide targeted solutions for your specific situation. Your shed is an investment worth protecting, and taking steps to control moisture is one of the best ways to preserve its value and functionality.