
Stop Water From Pooling Around Your Shed With These Simple DIY Drainage Fixes

Grade your yard away from the shed foundation at a 2% slope (roughly 2 inches per 10 feet) to redirect water naturally before it pools. Install a French drain by digging a sloped trench 18 inches deep, lining it with landscape fabric, filling it with gravel, and embedding a perforated pipe to channel water away from problem areas. Create a rain garden 10-15 feet from your shed using native plants that thrive in wet conditions—this beautiful solution absorbs excess runoff while adding curb appeal to your property.
Standing water around your shed doesn’t just create muddy eyesores—it threatens your structure’s foundation, promotes wood rot, and invites pests that compromise everything you’re storing inside. The good news? You don’t need to hire expensive contractors or invest in complex drainage systems. Most yard drainage problems respond beautifully to straightforward DIY solutions using basic tools and materials from your local hardware store.
The key is matching the right drainage method to your specific situation. A slight grade adjustment might solve minor water accumulation, while persistent flooding may require combining multiple approaches like gutters, French drains, and strategic landscaping. Protecting your shed from water damage starts with understanding where water enters your property and how it flows during heavy rain—then you can implement targeted solutions that keep your storage space dry year-round.
Why Your Shed Has Water Problems (And Why It Matters)
Standing water around your shed isn’t just an eyesore—it’s a threat to your investment and everything you’ve stored inside. Let’s look at what’s really causing those puddles and why you need to address them now.
The most common culprit is improper grading. When your yard slopes toward your shed instead of away from it, water naturally flows straight to your foundation. Many homeowners discover this problem after their shed has been installed, when the ground has settled or landscaping changes have altered the natural drainage pattern.
Compacted soil around your shed creates another challenge. Heavy foot traffic, construction equipment, or even years of settling can pack the earth so tightly that water can’t absorb properly. Instead, it pools on the surface, looking for the path of least resistance—often right under your shed floor.
Your shed’s roof is actually working against you too. Without proper shed roof maintenance and gutters, hundreds of gallons of rainwater cascade directly onto the ground beside your structure, overwhelming the soil’s natural drainage capacity.
Natural low spots in your yard act like magnets for water, and unfortunately, sheds are often placed in these areas simply because they seem out of the way.
Why does this matter? Water problems lead to wood rot that weakens your shed’s structure, foundation settling that causes doors to stick and floors to sag, mold growth that affects air quality, and ruined belongings. Protecting stored items becomes nearly impossible when moisture creeps in consistently. The good news? These problems are fixable with the right DIY drainage solutions.

Assessing Your Shed’s Drainage Situation
Before diving into solutions, you’ll need to play detective and understand exactly what’s happening with water around your shed. This assessment will save you time and money by pointing you toward the right fix.
Start by observing your shed during and immediately after a good rainstorm. Grab your rain boots and take notes! Watch where water naturally flows—does it pool against your shed’s foundation? Does it stream from your roof and puddle in specific spots? Take photos from multiple angles to reference later.
Look for telltale signs of drainage problems even on dry days. Discolored siding, rotting wood near the base, moss or algae growth, and muddy patches that never seem to dry are all red flags. Check inside your shed too—dampness, musty odors, or water stains indicate serious issues that need addressing.
Here’s a simple test: After heavy rain, push a screwdriver into the ground around your shed’s perimeter. If it slides in easily and water seeps into the hole, you’ve got saturated soil that’s not draining properly. The depth and location of these soggy spots will help determine your best solution.
Consider your yard’s slope by placing a long board on the ground with a level on top. Water should flow away from your shed, not toward it. If your shed sits in a low spot or water flows toward it from higher ground, you’ll need a more robust drainage solution than if you’re just dealing with roof runoff.
5 DIY Yard Drainage Solutions That Actually Work
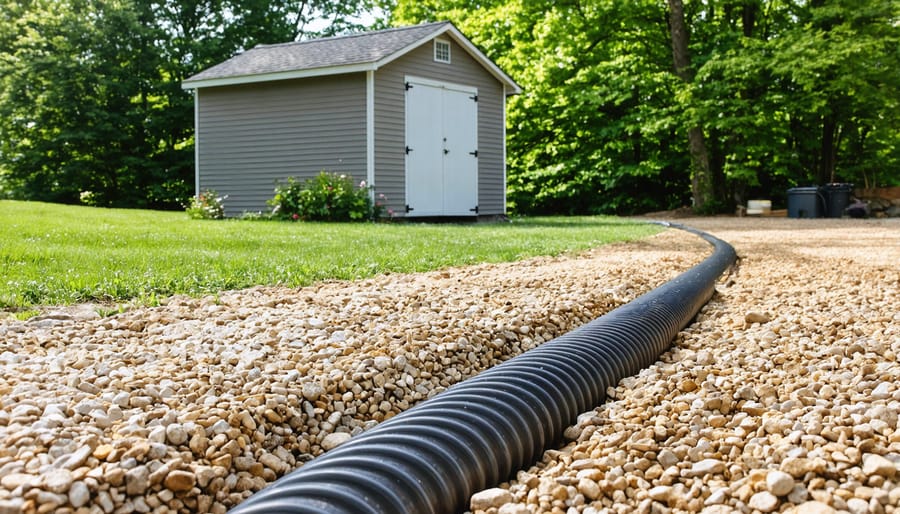
French Drains: The Go-To Solution for Serious Water Issues
When you’re dealing with persistent standing water, soggy spots that won’t dry, or water pooling near your shed’s foundation, a French drain might be your best friend. Think of it as an underground highway that redirects water away from problem areas—and yes, despite the fancy name, it’s totally doable as a weekend DIY project!
**What Makes French Drains So Effective**
A French drain is simply a gravel-filled trench with a perforated pipe that collects and channels water away from trouble spots. Water naturally flows into the trench, filters through the gravel, enters the pipe, and gets directed to a safer drainage area. It’s gravity-powered, requires no electricity, and works 24/7 without maintenance headaches.
**When to Choose This Solution**
French drains shine when you’re facing serious water issues: consistent pooling around your shed, water seeping into the foundation, or a yard that stays muddy for days after rain. If simpler solutions like regrading haven’t solved your problem, this is your heavy-hitter option.
**What You’ll Need**
For a typical 20-foot French drain, budget around $200-400 for materials: perforated drain pipe (4-inch diameter), landscape fabric, gravel (¾-inch crushed stone), and basic digging tools. Renting a trencher ($75-100/day) saves significant elbow grease.
**Installation Steps**
Start by marking your drain path with spray paint, sloping away from your shed at 1 inch per 8 feet. Dig your trench 18-24 inches deep and 6 inches wide. Line it with landscape fabric, add 2 inches of gravel, lay your pipe (holes facing down—yes, that seems counterintuitive but works!), cover with more gravel, wrap the fabric over, and top with soil.
**Common Pitfalls to Avoid**
Don’t skip the landscape fabric—it prevents soil from clogging your system. Ensure proper slope throughout; even slight uphill sections create standing water. And always call 811 before digging to locate underground utilities!
Grading and Sloping: The Foundation Fix
Sometimes the simplest solution is right beneath your feet—literally! Before you invest in elaborate drainage systems, consider regrading the soil around your shed. This straightforward approach can solve many water problems by directing runoff away from your foundation.
**Understanding Proper Slope**
Your goal is creating a gentle slope that carries water away from your shed. Aim for a drop of at least 6 inches over the first 10 feet from your foundation—that’s roughly a 5% grade. You don’t need dramatic hills; even a subtle slope makes a significant difference in keeping water moving in the right direction.
**Tools You’ll Need**
Gather these basics before starting: a garden rake, shovel, wheelbarrow, tamper or hand compactor, and a long level (or attach your standard level to a straight 2×4 board). A string line and stakes help visualize your slope. Most homeowners already have these tools, making this an accessible first step.
**The Regrading Process**
Start by removing grass and marking your work area about 4-6 feet from your shed’s perimeter. Add quality topsoil or clay-based fill, building up against your foundation and sloping away. Work in 2-inch layers, compacting each thoroughly to prevent settling. Check your slope frequently with the level—consistency matters more than perfection.
One homeowner shared, “I spent a Saturday afternoon regrading around my storage shed, and it completely eliminated the pooling problem I’d struggled with for two years!”
This method works beautifully for minor drainage issues without breaking your back or budget.
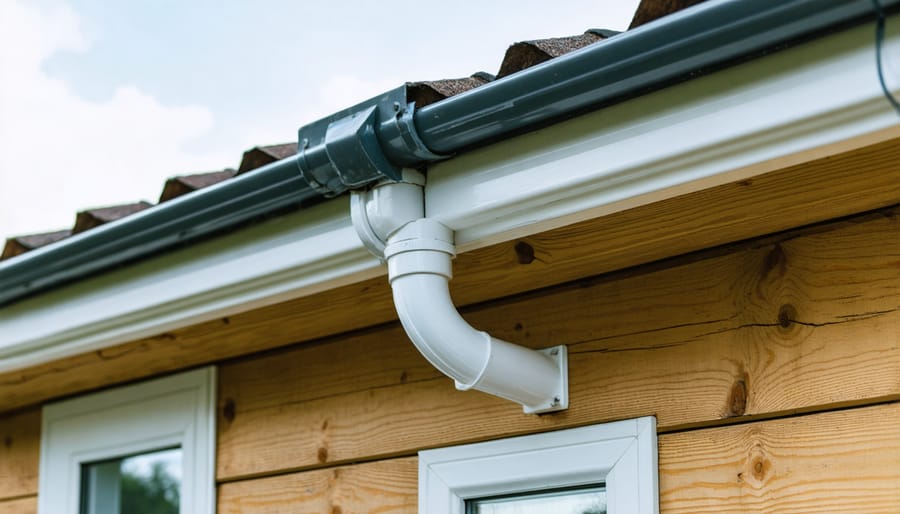
Rain Gutters and Downspout Extensions
One of the most effective ways to manage water around your shed is to capture it right at the source—your roof. If your shed doesn’t already have gutters, installing them is a game-changer that prevents thousands of gallons of water from pooling around your foundation each year.
Start by measuring your shed’s roofline and choosing aluminum or vinyl gutters, which are lightweight and DIY-friendly. Most home improvement stores offer sectional gutters that snap together easily, perfect for smaller structures. Make sure to pitch the gutters slightly (about ¼ inch per 10 feet) toward the downspouts so water flows efficiently. While you’re at it, consider other shed roof improvements that can enhance water management.
Downspout placement matters more than you might think. Position them at corners where water naturally accumulates, and always direct flow away from your shed’s foundation and any low spots in your yard. Here’s where extensions become your best friend—attach flexible or rigid extensions to carry water at least 6-10 feet away from the structure.
Don’t forget splash blocks or downspout trays at the end of extensions. These simple devices spread the water out gently, preventing erosion and creating a gradual dispersion pattern. Sarah from Ohio shared that after adding 8-foot extensions to her shed downspouts, the muddy mess around her foundation disappeared completely within one season. The best part? This entire project typically costs under $100 and takes just a weekend to complete.
Dry Creek Beds and Swales
Dry creek beds and swales offer a beautiful way to solve drainage problems while enhancing your yard’s natural appeal. These features work by mimicking nature’s own drainage systems, guiding water away from your shed and other structures during heavy rainfall while creating an attractive landscape element year-round.
A dry creek bed uses strategically placed rocks and stones to create a decorative channel that directs water flow. Start by mapping where water naturally travels across your property, then dig a shallow trench along this path, typically 6-12 inches deep and 2-4 feet wide. Line the bed with landscape fabric to prevent weed growth, then fill it with river rocks of varying sizes—larger stones along the edges for stability and smaller gravel in the center for water flow.
Swales are similar but feature gentle, sloping depressions that slow water movement and allow gradual absorption. They’re perfect for redirecting runoff from your shed’s downspouts toward flower beds or away from foundations. Create a swale by excavating a shallow channel with gently sloping sides, maintaining a slight grade to encourage water movement.
For materials, choose rounded river rocks in earth tones that complement your existing landscape. Consider incorporating these features into your eco-friendly landscaping solutions by planting moisture-loving native grasses or perennials along the edges.
One homeowner shared: “I installed a dry creek bed last spring, and it completely transformed my soggy yard into a charming focal point. No more standing water by the shed!”
These solutions typically cost $200-$500 for DIY installation, making them both practical and budget-friendly.
Drainage Mats and Gravel Borders
If you’re dealing with minor pooling around your shed and want a solution you can tackle in a weekend, drainage mats combined with gravel borders might be your perfect match. This approach works beautifully for sheds on relatively level ground where water tends to collect but doesn’t rush toward the structure.
Start by clearing a 12 to 18-inch perimeter around your shed’s base. Remove any grass, weeds, or debris down to bare soil. Lay down a quality landscape fabric to prevent weed growth—this step saves you maintenance headaches down the road. Next, install rubber or plastic drainage mats directly against the shed foundation. These corrugated mats create air pockets that allow water to flow away from the structure rather than seeping underneath.
Top everything with 2-3 inches of pea gravel or crushed stone. The gravel provides a permeable surface that lets water drain through while giving you a clean, finished look. Many homeowners love this solution because it doubles as an attractive border that complements their landscaping.
**When This Solution Works Best**
This method shines for sheds experiencing light to moderate water accumulation, particularly on flat or gently sloping yards. It’s less effective if you’re dealing with heavy runoff from slopes or if water consistently flows toward your shed from multiple directions—in those cases, you’ll need more robust drainage systems.
**Keeping It Maintained**
The beauty of this solution? Minimal upkeep required. Simply rake the gravel occasionally to keep it level, remove any leaves or debris that accumulate, and check that the landscape fabric hasn’t shifted. Most homeowners find spending fifteen minutes twice yearly keeps everything functioning perfectly.
Choosing the Right Solution for Your Shed
Selecting the perfect drainage solution depends on your specific situation. Let’s break down which method works best for you:
**For Budget-Conscious Homeowners:** If you’re working with under $100, a French drain or gravel trench offers excellent value. Sarah from Ohio solved her 8×10 shed’s pooling problem with just $75 in gravel and perforated pipe, completing the project in one weekend.
**Severe Water Issues:** When dealing with significant flooding or clay-heavy soil, combine multiple approaches. A dry creek bed paired with a French drain provides robust protection. Mike’s 12×16 shed sat in standing water after every storm until he installed both systems for around $300—problem completely solved.
**Small Sheds on Moderate Budgets:** For sheds under 10×10 feet with minor drainage concerns, extending downspouts and creating a simple gravel border typically does the trick. This costs $50-$150 and takes just a few hours.
**Sandy Soil Advantage:** Lucky enough to have sandy soil? You’ll find almost any solution works beautifully since water drains naturally. Focus on directing water away from the foundation with basic gutters and splash blocks.
**Quick Reference:**
– French drain: Best for clay soil, moderate-severe problems ($150-$400)
– Dry creek bed: Excellent for aesthetics, slopes ($200-$500)
– Gravel trench: Budget-friendly, works everywhere ($50-$150)
– Swale: Large yards, redirecting flow ($100-$300)
Consider your soil type, budget, and problem severity—then choose accordingly. Most homeowners see results immediately after installation.
Common Mistakes That Make Drainage Worse
Even well-intentioned drainage projects can backfire if you’re not careful. One of the most critical errors is accidentally sloping your yard toward your shed or house instead of away from it. Always double-check your grades with a level—water should flow away from structures, not toward them.
Another common mistake? Using solid pipes when you need perforated ones, or vice versa. Remember: perforated pipes collect water from surrounding soil, while solid pipes transport it away. Mixing these up defeats your entire system.
Many DIYers also forget about maintenance. French drains and catch basins need regular cleaning to prevent clogging from leaves, sediment, and debris. Set a calendar reminder to inspect your drainage solutions twice yearly.
Before digging, check local regulations and call 811 to locate underground utilities. Some municipalities have specific requirements about where you can discharge water—directing it onto a neighbor’s property or into storm drains may actually be illegal in your area.
If your drainage solution isn’t working after installation, reassess your slope and check for clogs. Sometimes the fix is as simple as adjusting the grade or clearing accumulated debris from grates and pipes.
Protecting your shed investment starts with proper drainage—and the good news is, most of these solutions are totally doable over a weekend! Whether you’re dealing with pooling water or planning ahead, take time to assess your specific situation before diving in. Walk around your shed after a good rain, identify problem spots, and choose the approach that fits your needs and budget.
Remember, effective drainage isn’t a one-and-done project. Regular maintenance keeps everything flowing smoothly and extends your shed’s lifespan. Clear those gutters seasonally, check your grading annually, and inspect drainage systems after heavy storms. Your future self will thank you when your shed stays dry and damage-free for years to come!