
Transform Your Old Shed Into Something Amazing (Without Breaking the Bank)
Transform that weathered backyard shed into a stunning, functional space through strategic renovation. Begin by thoroughly assessing the structure’s foundation, roofing, and frame integrity – addressing any water damage or pest issues before proceeding. Strip the interior down to its bones, replace rotted wood, and reinforce weak spots to create a solid foundation for your creative shed upcycling projects. Maximize natural light by installing windows or skylights, while proper insulation and ventilation transform the space into a comfortable year-round retreat. Consider repurposing the shed into a home office, artist studio, or garden retreat – the possibilities extend far beyond simple storage. With careful planning and the right tools, that neglected shed can become your property’s most valuable asset, often at a fraction of the cost of building new.\n\n\n
Assessing Your Old Shed’s Potential
\n\n
Safety First: Structural Inspection
\n\nBefore diving into your renovation project, a thorough structural inspection is crucial for both safety and success. Start by examining the shed’s foundation – look for signs of sinking, cracking, or unevenness that could compromise stability. Check if the floor joists are solid by pressing firmly with a screwdriver; any soft spots indicate potential rot that needs immediate attention.\n\nMove your inspection upward, examining wall studs and support beams. Pay special attention to areas where wood meets the ground or where water might collect. Dark spots, fuzzy patches, or a musty smell are telltale signs of moisture damage or mold. Test the roof’s integrity by looking for sagging areas, missing shingles, or daylight peeking through.\n\nDon’t forget to check the door frame and windows for proper alignment and operation. If the door sticks or windows don’t close properly, this could indicate structural shifting. Make note of any rusted hardware or loose connections – these are usually simple fixes but important for overall stability.\n\nIf you discover significant structural issues or aren’t confident in your assessment, consider consulting a professional before proceeding with your renovation plans.\n\n
Measuring Space and Planning
\n\nBefore diving into your renovation project, take time to carefully measure and assess your shed’s space. Start by clearing out the shed completely to get an accurate view of its dimensions. Measure the interior length, width, and height, making sure to note any unique features like windows, doors, or existing shelving you plan to keep.\n\nCreate a simple sketch or floor plan of your shed, marking potential problem areas like water damage or structural issues that need addressing. Don’t forget to measure doorway clearances – you’ll need adequate space to move items in and out easily.\n\nConsider how you’ll use the space and plan accordingly. If you’re creating a workshop, allow room for a workbench and tool storage. For garden storage, think about incorporating vertical storage solutions to maximize space. Remember to factor in ventilation and natural light sources when planning your layout.\n\nTake photos from multiple angles and make detailed notes about repairs needed. This documentation will help you create a realistic renovation timeline and budget. It’s also helpful to mark out zones for different purposes using masking tape on the floor – this gives you a better sense of how the space will flow once renovated.\n\n\n
 \n
\n\n\n
Popular Shed Transformation Ideas
\n\n
Home Office Haven
\n\nTransform your old shed into a serene and productive home office space perfect for remote work or creative pursuits. Start by ensuring proper insulation and weatherproofing to maintain a comfortable temperature year-round. Install adequate electrical outlets and reliable internet connectivity – these are non-negotiable for a functional workspace.\n\nConsider incorporating large windows or skylights to maximize natural light, which can boost productivity and reduce energy costs. Built-in desks and shelving units maximize available space while keeping your work area organized. Choose light, neutral colors for the walls to create an open feel, and add warm LED lighting fixtures for those early morning or late evening work sessions.\n\nDon’t forget about comfort – invest in proper office furniture and consider adding a small seating area for breaks. Install proper ventilation and perhaps a compact HVAC unit to maintain air quality. Add personal touches like potted plants, artwork, or a bulletin board to make the space feel welcoming and inspiring.\n\nRemember to include storage solutions for office supplies and equipment, keeping everything within arm’s reach but neatly tucked away when not in use.\n\n
 \n
\n\n\n
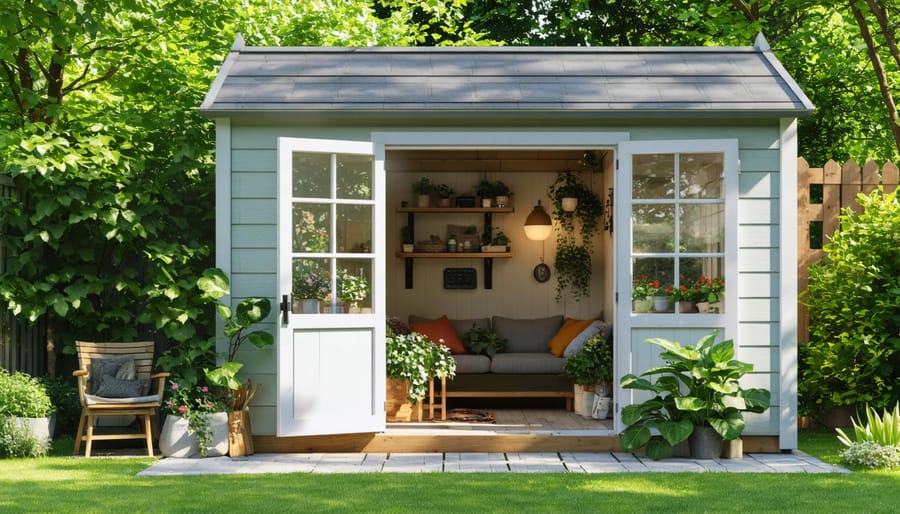
Garden Room Retreat
\n\nTransform your old shed into a serene garden room retreat where you can escape the daily hustle and surround yourself with lush greenery. Start by maximizing natural light with additional windows or a skylight, creating the perfect environment for both you and your plants. Install sturdy shelving at varying heights to display your favorite potted plants, hanging baskets, and trailing vines.\n\nConsider adding a comfortable seating area with weather-resistant cushions and perhaps a small table for your morning coffee or afternoon tea. Enhance the ambiance with solar-powered string lights or battery-operated LED candles for evening relaxation. Paint the walls in light, nature-inspired colors to create an airy feel and complement your growing collection of plants.\n\nTo maintain a comfortable temperature year-round, install proper ventilation and consider adding a small space heater for colder months. Create a potting station in one corner where you can tend to your plants and store essential gardening supplies. Add personal touches like botanical prints on the walls, a small water feature, or wind chimes to complete your peaceful garden sanctuary.\n\nRemember to choose plants that thrive in your local climate and the specific light conditions of your converted shed. This thoughtful transformation will give you a dedicated space to connect with nature and unwind.\n\n
Workshop Wonder
\n\nTransform your old shed into the ultimate DIY workspace by starting with a clean slate. Clear everything out and assess your available space. Install adequate lighting with a combination of overhead LED fixtures and task lighting at workbenches. Consider adding windows or skylights to maximize natural light and improve ventilation.\n\nCreate designated zones for different activities: a main workbench area, tool storage, and material storage. Mount pegboards or slatwall panels for frequently used tools, keeping them visible and easily accessible. Install sturdy shelving units along the walls for power tools and supplies. A mobile workbench with locking casters offers flexibility when you need extra space for larger projects.\n\nDon’t forget electrical considerations – install enough outlets for your power tools and consider a dedicated circuit if you’ll be using heavy machinery. Add insulation to walls and ceiling to make the space comfortable year-round and reduce noise. Finally, lay down anti-fatigue mats in areas where you’ll stand for long periods, and consider installing a small fan or heater for climate control.\n\nRemember to leave enough open floor space for maneuverability and future additions to your workshop setup.\n\n
Kids’ Playhouse Paradise
\n\nTransform your old shed into a magical playhouse that will create lasting memories for your children. Start by ensuring the structure is completely safe by reinforcing walls, securing flooring, and removing any hazardous materials. Add proper insulation and ventilation to make it comfortable year-round.\n\nPaint the exterior in bright, cheerful colors and consider adding child-friendly features like window boxes filled with flowers or a small front porch. Inside, create designated areas for different activities – perhaps a reading nook with soft cushions, an art corner with an easy-to-clean surface, or a pretend kitchen for imaginative play.\n\nSafety should be your top priority. Install rounded door handles, ensure windows can’t slam shut, and add soft flooring material to prevent injuries. Good lighting is essential; consider both natural light through windows and battery-operated LED fixtures for cloudy days.\n\nMake the space magical with themed decorations, removable wall decals, and storage solutions at kid-height. Don’t forget to include a parent-sized chair – you’ll want to spend time in this special space too!\n\n\n
Essential Renovation Steps
\n\n
Weatherproofing and Insulation
\n\nProtecting your renovated shed from the elements is crucial for its longevity and usability. Start by thoroughly inspecting the roof and walls for any gaps, cracks, or holes where moisture might seep in. Apply quality weather stripping around doors and windows, and use silicone caulk to seal any visible gaps. For added protection, consider installing rubber gaskets beneath door thresholds to prevent water from seeping underneath.\n\nWhen it comes to insulation costs and considerations, there are several effective options for your shed. Roll insulation or foam boards work well for walls and ceilings, while reflective foil insulation can help manage temperature extremes. Don’t forget to insulate the floor if you plan to use the shed year-round – a vapor barrier underneath plywood flooring can make a significant difference.\n\nFor ventilation, install soffit vents or small passive vents near the roof peak to prevent moisture buildup and regulate temperature. If your budget allows, a small solar-powered vent fan can provide additional airflow during warmer months. Remember to treat any exposed wood with weather-resistant sealant or paint, paying special attention to corners and joints where moisture tends to collect. These weatherproofing steps will not only protect your investment but also create a more comfortable space for whatever purpose you’ve planned for your renovated shed.\n\n
 \n
\n\n\n
Windows and Lighting
\n\nTransforming your old shed’s lighting can dramatically improve its functionality and atmosphere. Start by maximizing natural light through windows and skylights. If your shed lacks windows, consider installing a few strategically placed ones to brighten the space during daylight hours. Solar tubes are another excellent option, especially for smaller sheds where traditional windows might compromise wall storage space.\n\nFor artificial lighting, explore energy-efficient lighting solutions like LED fixtures or battery-operated motion sensor lights. Position task lighting above workbenches or storage areas where you’ll need focused illumination. Installing translucent roof panels can provide gentle, diffused lighting throughout the day while protecting your belongings from direct sunlight.\n\nDon’t forget about ventilation when adding windows. Choose models that can open to promote air circulation, which helps prevent moisture buildup and protects your stored items. For added security, consider installing window locks and frosted glass for privacy while still allowing natural light to filter through.\n\nIf running electricity to your shed isn’t feasible, solar-powered lights offer a sustainable alternative. These can be installed both inside and outside the shed, providing illumination when you need it without increasing your energy bills. Remember to clean windows and lighting fixtures regularly to maintain optimal brightness and extend their lifespan.\n\n
Flooring and Interior Finishing
\n\nWhen it comes to flooring, durability and moisture resistance are key considerations for your renovated shed. A popular and practical choice is vinyl plank flooring, which offers excellent water resistance and is easy to install over a level subfloor. For a more rustic look, treated plywood sealed with marine-grade varnish provides a cost-effective solution that stands up well to heavy foot traffic.\n\nTo protect against ground moisture, consider installing a vapor barrier beneath your chosen flooring. This extra step will significantly extend the life of your floor and help prevent warping or mold growth. If your budget allows, installing rigid foam insulation beneath the flooring can also improve temperature regulation.\n\nFor interior walls, painted plywood or beadboard can create a clean, finished look while maintaining the shed’s casual charm. Consider using a light color palette to maximize the feeling of space and brightness. Adding trim work around windows and doors can elevate the overall appearance without breaking the bank.\n\nStorage solutions should be integrated thoughtfully into your design. Wall-mounted shelving, pegboards, and built-in cabinets can maximize vertical space while maintaining floor area for larger items. For a professional touch, install baseboards to cover the gap between flooring and walls, and consider adding crown molding for a polished finish.\n\nRemember to seal all joints and edges where flooring meets the walls to prevent moisture infiltration and ensure your renovation stands the test of time.\n\n\n
Budget-Friendly Tips and Tricks
\n\nRenovating an old shed doesn’t have to break the bank. Start by sourcing materials from salvage yards, online marketplaces, and local renovation projects – you’d be surprised how many quality sustainable building materials are available at fraction of retail prices. Consider upcycling materials like pallets for wall cladding or repurposing old windows for natural lighting.\n\nFor flooring solutions, look for remnant pieces at flooring stores or home improvement centers, which often sell at significant discounts. Paint stores frequently have “mistake” batches available at reduced prices – perfect for both interior and exterior walls. Don’t overlook the value of community swap meets and construction site surplus sales.\n\nGet creative with storage solutions using repurposed items. Old kitchen cabinets make excellent workbenches, while metal filing cabinets can become durable tool storage. For lighting, consider installing clear roof panels instead of windows – they’re cheaper and provide excellent natural light distribution.\n\nSave on labor costs by tackling manageable tasks yourself. Simple jobs like cleaning, painting, and basic repairs are perfect DIY projects. Form a weekend work group with neighbors or friends who have renovation experience – they might help in exchange for future assistance with their projects.\n\nRemember to prioritize essential repairs first. Focus on weatherproofing and structural integrity before aesthetic improvements. This approach prevents costly damage down the line and helps spread renovation costs over time. When purchasing new materials, buy during off-season sales and always compare prices across multiple suppliers.\n\n\nTransforming an old shed into a functional and beautiful space is a rewarding project that can add significant value to your property. Not only does renovation cost less than buying new, but it also allows you to customize every aspect to match your specific needs. By following proper assessment techniques, making thoughtful material choices, and taking the time to plan your renovation carefully, you can create a storage solution that works perfectly for your lifestyle. Whether you’re looking to create a garden workshop, a tidy storage area, or a multi-purpose space, the satisfaction of breathing new life into an old structure is unmatched. Don’t let that weathered shed go to waste – with some effort and creativity, you can transform it into a practical and attractive addition to your property. Start your renovation journey today and watch as your old shed becomes a valuable asset to your home.