
Transform Your Shed Into a Year-Round Hydroponic Powerhouse
Assess your existing shed or greenhouse space by measuring the square footage, ceiling height, and access to electricity and water sources—most successful large hydroponic setups require at least 100 square feet, 8-foot ceilings for vertical growing systems, and proximity to a 15-20 amp dedicated circuit. Calculate your production goals realistically: a 200-square-foot system can yield 50-75 pounds of leafy greens monthly or 20-30 pounds of tomatoes weekly, helping you determine if hydroponics matches your household’s needs and time commitment.\n\nReinforce your structure’s flooring before installation, as water-filled systems add 30-50 pounds per square foot of weight. Concrete pads work best, but existing wooden shed floors need marine-grade plywood overlays and waterproof membranes to prevent rot and structural damage. Install proper ventilation by adding exhaust fans that exchange air every 1-3 minutes, preventing humidity buildup that damages both crops and buildings.\n\nStart with deep water culture or nutrient film technique systems for beginners, which cost $500-2,000 for complete setups and require less monitoring than advanced methods. These systems integrate easily into most outdoor structures without expensive modifications. Sarah from Oregon transformed her 12×16 storage shed into a productive hydroponic garden that supplies vegetables year-round, proving that homeowners don’t need expensive commercial greenhouses to grow food at scale.\n\nYour outdoor structure already provides the foundation—adding hydroponics simply maximizes its potential while creating a controlled growing environment that outperforms traditional gardening in yield per square foot.\n\n\n
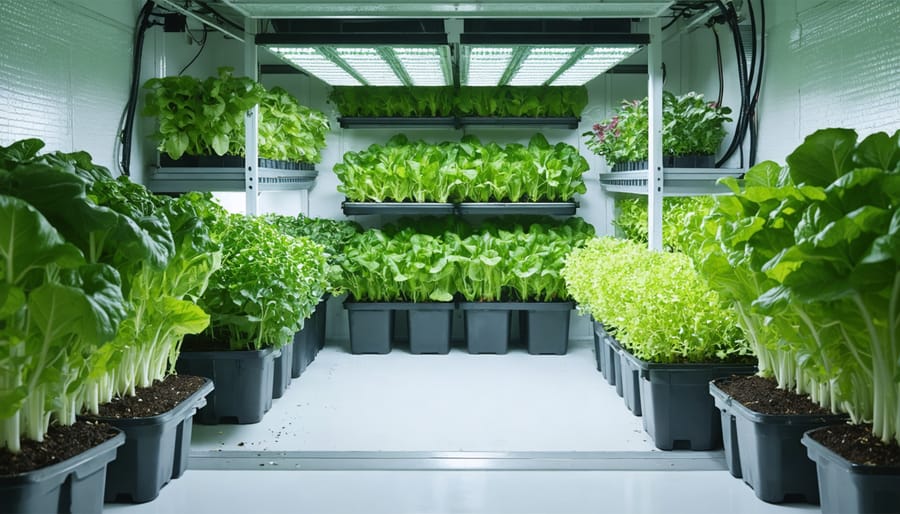
Why Your Storage Shed Is Perfect for Large-Scale Hydroponics
\n\n
 \n
\n\n\n
Space Requirements for Large Hydroponic Systems
\n\nBefore diving into hydroponic gardening, understanding your space requirements is essential to avoid frustration and ensure your plants thrive. Let’s break down what you really need to get growing.\n\nFor NFT (Nutrient Film Technique) systems, plan for at least 8 feet in length and 4 feet in width to accommodate standard channels. You’ll need 6-7 feet of vertical clearance for most leafy greens and herbs. A medium-sized shed starting around 8×10 feet works beautifully for beginners wanting to grow lettuce, basil, and other compact crops.\n\nDWC (Deep Water Culture) setups require similar footprints but demand deeper reservoirs, typically 12-18 inches. The good news? These systems sit lower, making them perfect for sheds with slightly reduced headroom. A 10×12 shed can comfortably house 20-30 plant sites while leaving you walkway space for maintenance.\n\nVertical tower systems are game-changers for space-conscious growers. While they need 7-8 feet of height, their small floor footprint (just 2-3 square feet per tower) means you can fit multiple towers in a compact area. Sarah from Portland transformed her 8×8 shed into a productive vertical farm with four towers, growing strawberries and herbs year-round.\n\nDon’t forget circulation space! Always leave 2-3 feet around your system for comfortable access. You’ll be checking nutrient levels, harvesting, and performing maintenance regularly. Factor in room for pumps, reservoirs, and storage for supplies. A slightly larger shed always beats cramming everything in and regretting it later.\n\n
Built-In Advantages of Storage Structures
\n\nHere’s the great news: if you already have a shed or greenhouse, you’re halfway to creating the perfect home for a large hydroponic system. These structures come with built-in advantages that make them ideal candidates for growing food year-round.\n\nFirst, let’s talk about flooring. Most quality sheds feature sturdy, level floors that can easily support the weight of water reservoirs, nutrient solutions, and mature plants. This solid foundation eliminates concerns about uneven ground or water pooling that you’d face with outdoor setups.\n\nProtection from the elements is another huge plus. Weatherproofing your structure keeps your plants safe from unpredictable weather, frost, and pests that would devastate an outdoor garden. Your investment in equipment and plants stays protected from rain, wind, and temperature swings.\n\nSecurity matters too, especially when you’re investing in pumps, lighting, and months of plant growth. Lockable doors keep equipment safe and give you peace of mind.\n\nPerhaps best of all, sheds and greenhouses offer incredible customization potential. You can add shelving for vertical growing, install electrical outlets for pumps and grow lights, and modify ventilation systems without worrying about municipal restrictions that might apply to permanent structures. Your space becomes exactly what your hydroponic garden needs.\n\n\n
Essential Components of Hydroponic-Integrated Storage Systems
\n\n
 \n
\n\n\n
Water Storage and Circulation Infrastructure
\n\nSetting up water infrastructure for your large hydroponic system might sound daunting, but with a bit of planning, it integrates smoothly into your shed or greenhouse setup. Let’s break down the essentials.\n\nYour reservoir tank is the heart of the operation—think of it as a large water battery that feeds your plants. Most growers start with 50-100 gallon food-grade containers, positioned on a stable, level surface to prevent tipping. If you’re working with an existing shed, place the reservoir in a corner where the floor joists are strongest, ideally near an exterior wall for easy water access.\n\nPump systems circulate nutrient-rich water to your plants and back to the reservoir. Submersible pumps work well for most home setups, and you’ll want one rated for continuous operation. A simple timer automates the watering cycles, so you’re not tied to a schedule.\n\nWater filtration prevents clogs and keeps your system running smoothly. A basic sediment filter on your water source catches debris before it enters the reservoir, while inline filters on pump outputs provide extra protection.\n\nWhen integrating plumbing through your shed foundation, drill access holes above the moisture barrier and use flexible PVC or food-grade tubing that can handle temperature changes. Seal all penetrations with waterproof caulking to maintain your shed’s integrity. One homeowner we spoke with ran all plumbing through a single 4-inch sleeve, making future modifications much easier.\n\n
Power and Lighting Solutions
\n\nPowering a large hydroponic system starts with understanding your electrical needs. Most setups require 15-20 amp circuits to handle water pumps, timers, and grow lights simultaneously. Before you begin, consider running power to your shed safely with proper outdoor-rated wiring and GFCI protection to prevent electrical hazards in damp environments.\n\nLED grow lights are game-changers for year-round hydroponic growing. They consume 50-70% less energy than traditional HID lights while producing less heat, which means lower cooling costs and happier plants. Look for full-spectrum LEDs with adjustable intensity settings to match different growth stages. Many growers report their energy bills staying reasonable even during winter months when systems run longer hours.\n\nFor energy efficiency, invest in programmable timers that cycle lights based on your crops’ needs—typically 14-16 hours for leafy greens and 10-12 hours for fruiting plants. Consider adding insulation to your structure to maintain stable temperatures, reducing the workload on heating or cooling systems. One homeowner shared how upgrading to quality LEDs and adding basic insulation cut their monthly energy costs in half while doubling their harvest output.\n\n
Climate Control and Ventilation
\n\nGrowing healthy plants in your shed-based hydroponic system depends heavily on maintaining the right environmental conditions. Think of your shed as a controlled ecosystem where temperature, humidity, and air circulation work together to support plant growth.\n\nTemperature control starts with understanding your climate. In warmer regions, consider passive cooling through reflective roof coatings and strategic shade placement. For active cooling, small exhaust fans paired with intake vents create airflow that naturally reduces heat. In colder climates, insulated walls and supplemental heaters maintain consistent temperatures year-round. Many growers find success with programmable thermostats that automatically adjust heating or cooling based on plant needs.\n\nHumidity management prevents common issues like mold and mildew. Dehumidifiers work wonders in enclosed spaces, especially during plant flowering stages. Conversely, humidifiers help in dry climates or winter months when heating systems reduce moisture levels.\n\nProper ventilation systems are essential for any hydroponic setup, circulating fresh air while removing excess heat and moisture. Even simple solutions like ridge vents combined with screened windows can dramatically improve growing conditions. One homeowner shared that adding basic circulation fans reduced their plant disease problems by 80 percent, transforming their struggling garden into a thriving food production system.\n\n\n
Choosing the Right Storage Structure for Your Hydroponic Goals
\n\n
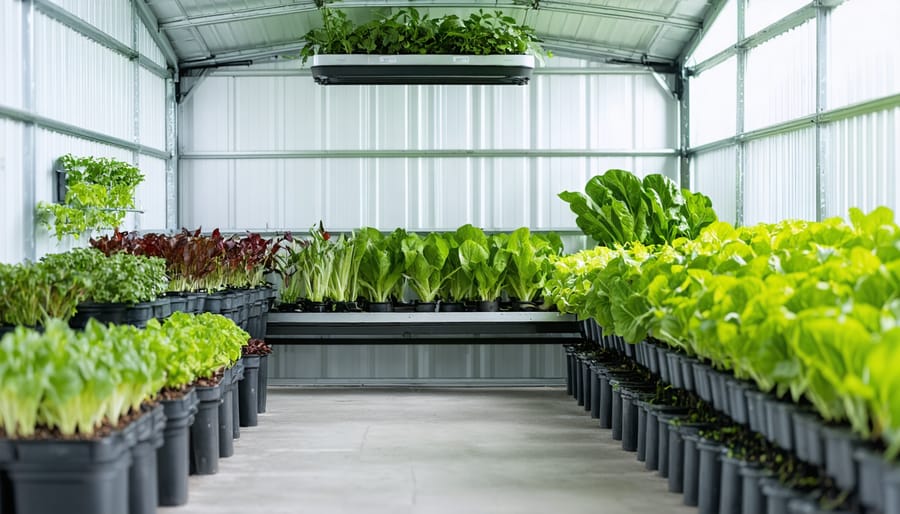
Greenhouse vs. Modified Shed: Which Works Better?
\n\nChoosing between a greenhouse and a modified shed for your large hydroponic system depends on your priorities and budget. Greenhouses excel at light transmission, capturing natural sunlight throughout the day. This means lower electricity costs since your plants get free energy from the sun. The downside? Temperature swings can be dramatic. You’ll likely need shade cloth in summer and supplemental heating in winter, which adds to your operating expenses.\n\nModified sheds offer something greenhouses struggle with: temperature stability. That insulation becomes your best friend during extreme weather, keeping conditions predictable year-round. Many homeowners report spending less on climate control with insulated structures. However, you’ll need robust grow lights since natural light penetration is minimal, which increases your initial setup cost and monthly electric bill.\n\nCost-wise, basic greenhouse kits start around $500 for smaller models, while converting an existing shed might only require $200-300 in insulation and ventilation upgrades. Building a new insulated structure runs significantly higher.\n\nThe real-world winner? It depends on your climate. Sarah from Minnesota swears by her insulated shed conversion, saying it saved her crops during brutal winter cold snaps. Meanwhile, Jake in California loves his greenhouse’s passive solar heating that keeps costs low year-round. Consider your local weather patterns when deciding which structure suits your hydroponic ambitions best.\n\n
Material Considerations for Hydroponic Environments
\n\nChoosing the right materials for your hydroponic setup makes all the difference when dealing with constant moisture and humidity levels that can reach 70-80%. Let’s explore how different building materials hold up in these conditions.\n\nMetal structures offer excellent durability but require proper treatment. Galvanized steel and aluminum resist rust naturally, making them popular choices for large systems. However, untreated metal will corrode quickly, so look for powder-coated finishes or apply rust-inhibiting sealants regularly. One homeowner shared that after treating his metal greenhouse frame with marine-grade sealant, he hasn’t seen any rust issues in three years of operation.\n\nWood brings a warm aesthetic but needs serious waterproofing. Pressure-treated lumber designed for ground contact works best, though you’ll want to seal it with water-resistant stain or paint. Cedar and redwood naturally resist moisture damage better than pine, making them worth the investment if longevity matters to you.\n\nVinyl and PVC structures shine in hydroponic environments since they’re naturally waterproof and won’t deteriorate from moisture exposure. They require minimal maintenance beyond occasional cleaning, though they may not support heavy equipment loads as well as metal or reinforced wood.\n\nPlastic resin structures provide another low-maintenance option, resisting both moisture and UV damage. They’re lighter weight and easier to modify for ventilation or additional access points as your system grows.\n\n\n
Setting Up Your First Large Hydroponic System
\n\n
Foundation and Waterproofing Preparation
\n\nBefore installing your large hydroponic system, protecting your shed floor is essential. Water and nutrient solution spills are inevitable, and without proper preparation, you’ll face wood rot, mold growth, and structural damage that can cost hundreds to repair.\n\nStart by thoroughly sealing your shed floor with a waterproof epoxy coating or marine-grade sealant. This creates a protective barrier against moisture penetration. For wooden floors, consider adding a layer of pond liner or heavy-duty vinyl sheeting, secured with waterproof tape at the seams. This simple step has saved countless DIY growers from costly floor replacements.\n\nNext, create a drainage plan. Install a slight slope toward one corner where you can place a collection bucket or drain pan. Some homeowners successfully use shallow plastic boot trays under each growing station to catch drips and overflow. One experienced grower shared that installing a small sump pump in her shed’s corner eliminated standing water issues completely, running overflow directly to her outdoor garden.\n\nFinally, protect walls near your system by applying waterproof paint or installing plastic sheeting up to waist height. Add weatherproof electrical outlets with GFCI protection to prevent moisture-related hazards. These preventive measures ensure your shed remains structurally sound while supporting your hydroponic growing ambitions for years to come.\n\n
System Installation Sequence
\n\nInstalling your large hydroponic system works best when you follow a logical sequence that prevents backtracking and frustration. Start with electrical setup first, positioning outlets and running weatherproof wiring where your lighting and pumps will live. This foundation step means you won’t be crawling under installed equipment later.\n\nNext, tackle your water system by connecting your reservoir, pump, and main distribution lines. Test everything for leaks before moving forward. One homeowner shared how discovering a drip after installing growing channels meant disassembling half her system, so patience here pays off.\n\nNow install your growing channels or towers, ensuring they’re level and properly secured. Uneven channels create water pooling problems that can harm plant roots. With channels in place, mount your lighting systems at the manufacturer’s recommended height, remembering that adjustability helps as plants grow.\n\nFinally, set up monitoring equipment like pH meters, timers, and temperature sensors. Position these where you can easily check readings without disturbing plants. Run your complete system empty for 24 hours to catch any issues before adding nutrients and plants. This methodical approach transforms what seems overwhelming into manageable steps that build confidence as you progress.\n\n
Common First-Timer Mistakes to Avoid
\n\nStarting your hydroponic journey is exciting, but a few common oversights can dampen your success. Many first-timers underestimate drainage requirements, leading to water pooling that damages floors and creates safety hazards. Plan for proper runoff collection from day one. Ventilation is another frequent stumbling block—without adequate airflow, humidity builds quickly, encouraging mold and plant diseases. Install fans and vents before you start growing, not after problems appear. Electrical safety often gets overlooked too. Hydroponics means water and electricity in close quarters, so always use GFIP outlets and keep cords organized and protected. Finally, think about accessibility. One homeowner shared how her initially perfect setup became frustrating when she couldn’t reach plants at the back for maintenance. Leave walking space between rows and ensure you can comfortably access pumps and reservoirs. These simple considerations save enormous headaches later.\n\n\n
Real-Life Success Stories: Homeowners Growing Big in Small Spaces
\n\nWhen Sarah from Portland converted her 10×12 backyard shed into a hydroponic haven, she wasn’t sure what to expect. “I started with just one vertical tower system, but once I saw the results, I expanded to three towers and added a nutrient film technique setup along the back wall,” she shares. Within six months, Sarah was harvesting 30 pounds of lettuce, tomatoes, and herbs monthly. Her biggest lesson? “Don’t skimp on ventilation. I had to add two additional vents and a small exhaust fan after my first month, but that solved all my humidity issues.”\n\nThe Martinez family in Arizona took a different approach, transforming their existing greenhouse into a dual-purpose space. They installed a large deep water culture system that produces leafy greens year-round while keeping their gardening tools organized on custom shelving above the growing channels. “We’re saving about 150 dollars monthly on groceries,” Miguel Martinez reports. “The key was planning the layout carefully so we could still access everything we stored there. We sketched it out three times before committing.”\n\nThen there’s James from Michigan, who built a dedicated 8×10 structure specifically for hydroponics after realizing his garage wasn’t suitable. “I thought any space would work, but temperature control was impossible in the garage,” he explains. His custom-built insulated shed now houses a sophisticated NFT system producing cucumbers and peppers through winter. His advice? “Start smaller than you think you need. I’m glad I built with expansion in mind, but I would have been overwhelmed if I’d started with my current setup.”\n\n
 \n
\n\n\n\n
Maintenance and Seasonal Considerations
\n\n
Winter Protection Strategies
\n\nCold weather doesn’t have to shut down your hydroponic operation. Start by insulating your shed or greenhouse walls with foam board or bubble wrap insulation to retain heat. Seal any gaps around doors and windows with weatherstripping to prevent drafts. For heating, consider thermostat-controlled space heaters or heat cables designed for greenhouse use, which maintain consistent temperatures without constant monitoring. Implementing proper climate control solutions protects both your plants and equipment investment. Before winter arrives, drain and clean water lines to prevent freezing damage, and position your reservoir away from exterior walls where temperatures fluctuate most. One homeowner in Michigan shared how adding a simple thermal blanket over her system at night reduced heating costs by 40 percent while maintaining ideal growing conditions throughout winter months.\n\n
Summer Cooling Challenges
\n\nSummer heat poses real challenges for large hydroponic systems housed in sheds or greenhouses. When temperatures climb above 75°F, your nutrient solution can quickly become a breeding ground for harmful bacteria and algae, while stressed plants struggle to absorb nutrients properly. Installing solar-powered ventilation helps maintain airflow without adding to your electric bill. Consider adding shade cloth to reduce direct sunlight by 30-50% during peak hours, and insulate your reservoir with reflective material to keep water temperatures between 65-68°F. Many growers find success using frozen water bottles rotated throughout the day as a simple cooling method. Mike from Texas shares that adding a small chiller to his 100-gallon system made the difference between struggling plants and abundant harvests during their scorching summers.\n\n\nTransforming your outdoor storage into a productive hydroponic garden solves two challenges at once: you’ll maximize underutilized space while growing fresh, nutritious food year-round. The beauty of this approach is that you don’t need to dive in headfirst. Starting with a small hydroponic setup in one corner of your shed or greenhouse lets you learn the basics without overwhelming yourself or your budget. As you gain confidence and see those first crisp lettuce leaves or plump tomatoes, expanding becomes a natural next step.\n\nThink of Sarah from Oregon, who converted just 40 square feet of her backyard shed into a thriving herb garden that now supplies her kitchen and local farmers market. She started with a simple system and gradually added more as her skills grew.\n\nThe real magic happens when storage and food production work together seamlessly. Your shed protects your investment from weather extremes, provides convenient access to supplies, and creates the controlled environment hydroponics needs to flourish. Whether you’re looking to supplement your grocery bill, enjoy the satisfaction of homegrown produce, or create a new hobby, combining storage solutions with hydroponics offers a practical, rewarding path forward. Start small, dream big, and watch your space work harder for you.