
Why K Trusses Keep Your Shed Roof from Collapsing (And How to Connect Them Right)
Inspect your shed’s roof framing before installation to determine if K trusses suit your span requirements—these distinctive trusses feature a central vertical post with diagonal webbing that forms a “K” pattern, typically supporting spans from 20 to 40 feet without interior load-bearing walls. Mark connection points accurately on your top and bottom chords using a speed square and pencil, ensuring every joint aligns perfectly since misalignment creates structural weakness that compounds across multiple trusses. Secure each connection with metal truss plates or gusset plates rated for your specific load requirements, positioning them on both sides of joints and fastening with 1.5-inch truss plate nails driven at the manufacturer’s specified pattern.
Space your K trusses 24 inches on center for standard shed applications, though heavier snow loads may require 16-inch spacing—measure from the center of one truss to the center of the next, not from edge to edge. Install temporary bracing immediately after setting each truss to prevent racking during construction; use 2×4 boards diagonally across the web members and leave them in place until your roof sheathing is completely attached. Check for plumb using a 4-foot level on the vertical king post of each truss, making adjustments before permanent fastening since even slight tilts multiply into significant roof plane problems.
Add permanent lateral bracing between trusses at midspan and near supports, creating a rigid three-dimensional structure that resists wind uplift and distributes loads evenly across your entire roof system.
What Makes K Trusses Different from Other Shed Roof Trusses
The K Pattern Advantage for Shed Roofs
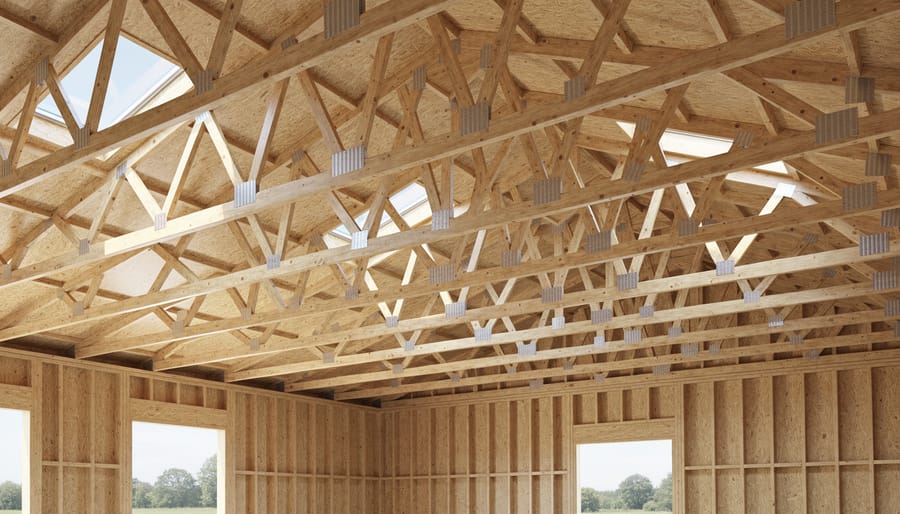
Think of a K truss like a smart weight distribution system for your shed roof. The distinctive K shape features diagonal members that form a series of triangles, creating multiple load paths from the roof peak down to the walls. This clever geometry is what makes K trusses shine for wider sheds, typically ranging from 20 to 30 feet across.
Here’s why this matters for your project: when you’re building a larger shed, standard roof framing can struggle under the span. The weight of roofing materials, snow loads, and even your stored items pressing against the ceiling all add up. K trusses handle these challenges by breaking down the total load into smaller segments, channeling stress through those diagonal members rather than letting it concentrate in one spot.
For homeowners planning a workshop, garden equipment storage, or multi-purpose shed, this design advantage translates to real benefits. You’ll experience less sagging over time, reduced risk of structural issues, and the confidence that your investment is built to last. The K configuration essentially creates a self-supporting network within your truss shed roof construction, making it remarkably stable even when spanning those longer distances that would challenge simpler truss designs.
When Your Shed Actually Needs K Trusses
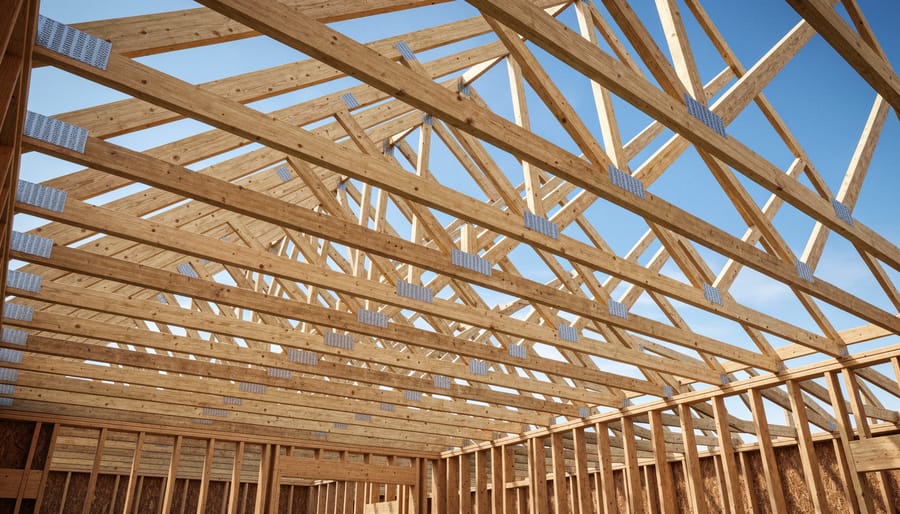
K trusses become necessary when your shed project moves beyond basic backyard storage. Generally, if your shed spans more than 20 feet wide, K trusses offer the structural support you need without requiring interior support posts. They’re particularly valuable for widths between 20-30 feet where simpler truss designs would sag or require additional bracing that eats into your usable space.
Consider roof load too. Planning to store heavy equipment or build in an area with significant snow accumulation? K trusses distribute these loads more effectively than standard W or Fink trusses. For example, a homeowner in Minnesota building a 24-foot workshop for his vintage car collection chose K trusses specifically to handle their region’s 40-pound-per-square-foot snow load while maintaining an open interior.
If you’re building a standard 10×12 garden shed, simpler truss designs will serve you perfectly well and save money. But when you’re creating a spacious workshop, hobby space, or storing riding mowers and ATVs in a structure over 20 feet wide, K trusses provide that sweet spot of strength and clearance. They solve the problem of wanting wide-open interior space without compromising structural integrity, which makes them popular for garages and workshops where every foot of headroom matters.
The Critical Connection Points That Keep Everything Together
Top Chord Connections
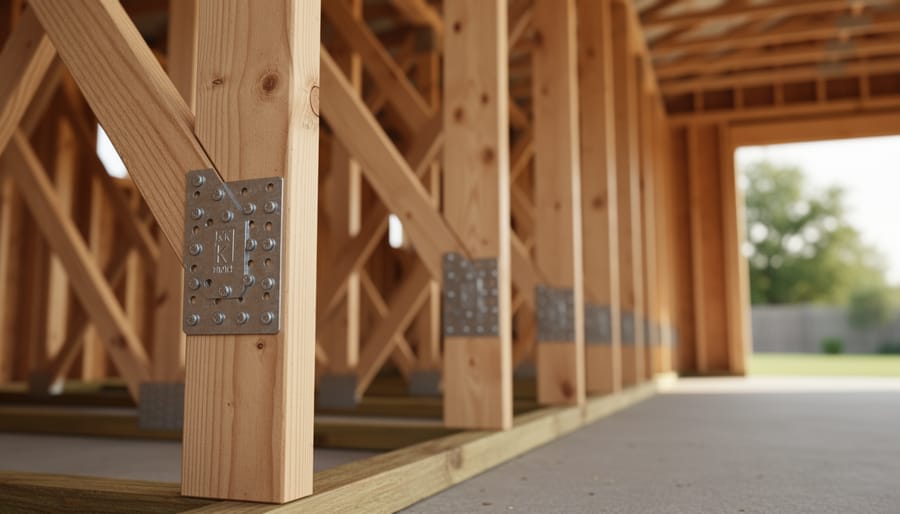
The top chords of your K truss form the angled support that directly carries your roof load, making their connections absolutely critical for shed stability. These chords typically meet at the peak, where they should be connected with either metal truss plates or securely fastened gusset plates on both sides. For most shed applications, galvanized truss plates provide the strongest connection and resist moisture damage over time.
When fastening top chords, use appropriately sized nails or screws recommended by your truss manufacturer. A common mistake is under-fastening, so don’t skimp here. Each connection point should have fasteners penetrating at least 1.5 inches into the wood. If you’re using gusset plates, space your fasteners evenly around the perimeter, typically every 2-3 inches.
The top chords also need solid bearing points where they rest on your shed walls. Ensure these contact points sit fully on the wall plates with proper blocking or hurricane ties for added security. Many DIYers have found that pre-drilling pilot holes prevents wood splitting and makes installation smoother, especially when working with pressure-treated lumber that can be particularly dense and prone to cracking.
Bottom Chord and Ceiling Load Considerations
The bottom chord of your K truss does more than complete the triangular framework—it carries the weight of your ceiling and anything you store up there. This is where planning ahead makes a real difference. If you’re dreaming of organized storage bins tucked away in your shed’s attic space, you’ll need to account for that extra load from the start.
Standard K trusses are typically designed for minimal ceiling loads, like insulation and drywall. However, many homeowners discover later they want actual storage space, which requires stronger bottom chord connections and potentially closer truss spacing. Before installation, honestly assess your needs. Will you store seasonal decorations, tools, or heavier equipment overhead?
One homeowner shared how reinforcing bottom chord connections during initial construction saved them from costly modifications when they later needed extra storage. The solution often involves adding gusset plates at connection points and ensuring the truss design accounts for live loads, not just dead weight. When in doubt, consult your truss manufacturer’s specifications or a structural engineer—this small investment prevents sagging ceilings and potential safety hazards down the road.
Web Member Connections (The K Pattern Itself)
The magic of a K truss happens at the connection points where diagonal and vertical members meet the top and bottom chords. Think of these joints as the hardworking hubs that transfer loads throughout your shed’s roof structure. When wind pushes down on one side or snow accumulates unevenly, these connections distribute those forces along the diagonal members, preventing any single point from bearing too much weight.
Why does this matter for your shed project? Properly secured connections are what keep your roof from sagging or shifting over time. Each joint needs to be fastened with appropriately sized metal gusset plates or plywood gussets, ensuring the diagonal members stay firmly attached at the correct angles. Loose or inadequate connections create weak spots where movement can occur, potentially leading to structural problems down the road. When inspecting or installing K trusses, pay special attention to these connection points. They should feel solid without any wobble or gaps between members. Many homeowners who’ve tackled truss repairs share that reinforcing these joints solved mysterious creaking sounds or minor sagging issues before they became major headaches.
How to Properly Connect K Trusses to Your Shed Walls
Required Hardware and Fasteners
Getting your K truss fasteners right isn’t just about holding things together—it’s about keeping your shed standing strong through every storm and season. Let’s break down what you actually need.
Start with metal connector plates, sometimes called truss plates or gusset plates. These flat metal pieces reinforce the joints where your truss members meet, distributing stress across a wider area than nails alone ever could. They’re your first line of defense against joint failure.
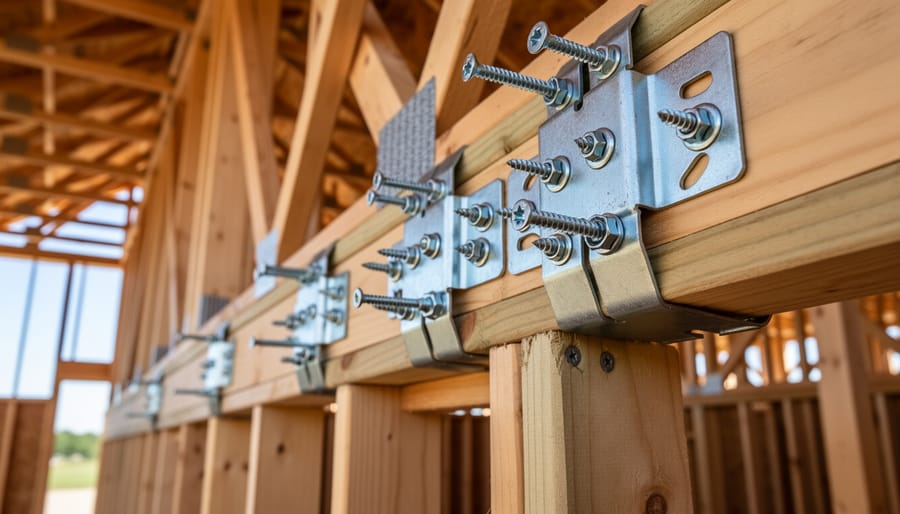
Hurricane ties or truss clips are non-negotiable if you live anywhere with serious wind. These L-shaped metal brackets anchor each truss directly to your wall’s top plate, preventing uplift during storms. One homeowner in Florida told us these little brackets kept his shed roof attached during a tropical storm while his neighbor’s went sailing—literally.
For fasteners, use 10d or 16d galvanized nails for general framing connections. The galvanized coating prevents rust, which matters more than you might think. Structural screws or 3/8-inch carriage bolts work best for critical connections where trusses meet support beams, offering superior holding power.
Don’t forget joist hangers if you’re attaching ceiling joists between trusses. These U-shaped metal brackets provide clean, strong connections without complicated angle cuts. Quality fasteners cost a bit more upfront, but they’re insurance against expensive repairs down the road.
Proper Spacing and Placement
Getting your K trusses positioned correctly is crucial for a sturdy, long-lasting shed roof. The standard spacing for most residential sheds is 24 inches on center, meaning you measure from the center of one truss to the center of the next. This spacing works well with standard 4×8 sheathing panels and provides adequate support for typical roof loads.
Before you start installing, mark your truss positions clearly on both the front and back top plates of your shed wall framing. Use a pencil and measuring tape, double-checking your marks to ensure they align perfectly on both walls. A helpful tip from experienced builders: mark an X on the side of the line where each truss will sit, preventing confusion during installation.
When positioning trusses, always start at one gable end and work your way across. Have a helper hold each truss plumb while you secure it temporarily with a brace. Use a level to verify each truss is perfectly vertical before final fastening. Remember, even small alignment errors can compound across multiple trusses, potentially causing problems with your roof sheathing installation later. Taking time to position trusses accurately now saves headaches down the road.
Common Installation Mistakes to Avoid
Even experienced DIYers can stumble when installing K trusses, and these mistakes can compromise your shed’s structural integrity. One of the most common errors is using inadequate fasteners or too few of them. Some builders rely on a single nail per connection point, thinking it’ll hold, but trusses need multiple fasteners rated for structural use to handle wind and snow loads safely.
Improper spacing is another frequent issue. When trusses are placed too far apart, usually more than 24 inches on center, your roof can sag over time. Conversely, cramming them too close together wastes materials and makes installation unnecessarily difficult. Always follow your building plans and measure twice before securing each truss.
Perhaps the biggest mistake is skipping or improperly installing bracing. Temporary bracing during installation prevents trusses from tipping or twisting, while permanent bracing keeps everything stable long-term. Without proper bracing, your entire roof system becomes vulnerable to racking and collapse, especially during storms. Taking shortcuts here can turn a weekend project into a costly repair down the road, so invest the extra time to brace correctly from the start.
Bracing Your K Trusses for Maximum Stability
Temporary Bracing During Installation
Installing K trusses might seem straightforward, but here’s something many DIYers overlook: trusses are incredibly vulnerable before they’re permanently secured. Without proper temporary bracing, they can easily collapse, twist, or shift out of position, creating serious safety hazards and structural problems.
Think of temporary bracing as a safety net for your project. Start by installing lateral bracing across the tops of multiple trusses as soon as you position each one. Use straight 2×4 lumber secured perpendicular to the trusses, spacing them every 8-10 feet along the span. This prevents sideways movement and keeps everything aligned.
Never walk on unbraced trusses or leave them standing overnight without adequate support. One homeowner shared how a sudden afternoon windstorm knocked over three unbraced trusses, setting his project back two weeks and requiring replacement materials.
Always work with at least two people during installation. One person can hold the truss plumb while another secures temporary bracing. Keep all temporary supports in place until you’ve installed permanent sheathing and roofing materials. Remember, taking these precautions isn’t just about protecting your investment—it’s about keeping everyone on-site safe throughout the building process.
Permanent Lateral Bracing Requirements
Once your K trusses are installed, they need permanent lateral bracing to keep them standing straight and stable for years to come. Think of lateral bracing as the support system that runs perpendicular to your trusses, connecting them together and preventing sideways wobble or twisting.
This bracing typically consists of wooden boards (often 1×4 or 2×4 lumber) or metal strapping that connects across multiple trusses at regular intervals. You’ll want to install bracing at several points along the truss length, especially near the peak and at mid-span locations. Many building codes require bracing every 8 to 10 feet, but check your local requirements.
Without proper lateral bracing, even professionally made trusses can rack or twist under wind loads or snow weight, leading to serious structural problems. One homeowner learned this the hard way when his shed roof began sagging after just one winter because he skipped the cross-bracing step.
Installing lateral bracing is straightforward: secure the boards firmly to each truss using appropriate fasteners, ensuring they’re level and evenly spaced. This small investment of time creates a rigid, interconnected roof system that distributes loads properly and keeps everything square and solid.
Diagonal Bracing for Wind Resistance
Wind can be your shed roof’s biggest enemy, especially if you live in an area prone to storms. That’s where diagonal bracing becomes your K truss system’s secret weapon. These angled supports create a rigid framework that prevents two major problems: wind uplift (when gusts try to literally peel your roof off) and racking (that side-to-side wobble that weakens connections over time).
Think of diagonal bracing like the crossbars on a gate—without them, the whole structure would sag and twist. For K trusses, you’ll typically install these braces between the bottom chords, connecting multiple trusses into one solid unit. This becomes even more critical when you install metal roofing, which can catch wind like a sail. Combined with proper wind resistance anchoring at ground level, diagonal bracing ensures your shed stands strong through whatever Mother Nature throws at it.
Signs Your K Truss Connections Need Attention
Visual Inspection Checklist
Regular visual inspections can catch small issues before they become big headaches. Every six months, take a walk around and inside your shed with a flashlight and notepad to document what you find.
Start by examining all connection points where the K truss meets the walls and where members join together. Look for loose bolts, nails backing out, or metal plates that have separated from the wood. Even slight movement at these junctions can signal trouble.
Check for gaps between truss members and connecting plates. These shouldn’t appear over time, and if they do, it means your structure is shifting or settling unevenly.
Run your eyes along each wooden member looking for cracks, splits, or signs of rot. Pay special attention to areas where water might collect or where moisture damage is common.
Stand back and sight along the roofline from different angles. Any sagging or dipping indicates the trusses aren’t carrying the load properly anymore. Inside the shed, watch for visible movement when wind blows or when you press gently upward on a truss member. Your roof structure should feel solid and stable, not flexible or bouncy.
When to Call a Professional
While many K truss installations and minor adjustments fall within DIY territory, certain situations absolutely require professional expertise. If you notice sagging roof lines, cracks in truss members, or separation at connector plates, don’t attempt repairs yourself—these indicate serious structural compromise that needs an engineer’s assessment.
Similarly, if your shed spans more than 16 feet or you’re planning to add a second story or heavy roof materials like tile, bring in a structural engineer from the design phase. They’ll calculate load requirements and ensure your K trusses meet local building codes.
Water damage affecting multiple trusses, visible wood rot, or insect infestation also warrant professional evaluation. A contractor can determine whether repair or complete replacement is necessary.
Finally, if you’re simply unsure about your truss installation—whether spacing is correct, bracing is adequate, or connections are secure—investing in a professional inspection provides peace of mind. As homeowner Tom from Oregon shares: “Having an expert verify my truss setup before adding roofing saved me from a costly mistake. Best $200 I spent on the project.”
Building Code and Load Considerations for Your Area
Before you start assembling those K trusses, let’s talk about something that might sound boring but could save you serious headaches down the road: building codes and load requirements. Trust me, getting this right from the start means your shed will stand strong for years to come, no matter what Mother Nature throws at it.
First things first, contact your local building department or visit their website. Most areas require permits for sheds over a certain size, typically 120 square feet, though this varies widely. The permitting process isn’t just bureaucratic red tape. It ensures your shed meets safety standards and won’t become a liability. Some homeowners skip this step and later face fines or even forced removal of their shed.
Now, let’s discuss loads. Snow load refers to how much weight from accumulated snow your roof needs to support. If you’re in Minnesota, you’ll need trusses rated for much heavier snow loads than someone in Georgia. Your local building code will specify the minimum requirements, usually measured in pounds per square foot. Wind loads are equally important, especially in coastal or open areas where high winds can literally lift your roof off if connections aren’t properly secured.
K trusses are excellent for handling these loads when properly designed and installed, but they need the right specifications for your area. Many building departments provide load maps or charts showing required ratings for your zone. Don’t guess at these numbers. Your K trusses should be engineered and stamped by a professional if required by code.
Remember, a properly engineered roof system starts with a stable shed foundation. Work with your building inspector rather than around them. They’re actually helpful resources who want your project to succeed safely.
Building a sturdy shed roof with K trusses might feel overwhelming at first, but here’s the encouraging truth: when you take your time and follow proper connection procedures, it’s absolutely manageable for DIY enthusiasts like you. The key is respecting each step of the process, especially those critical connection points we’ve covered.
Your shed’s longevity and safety directly depend on how well you secure those K truss connections. Skipping steps like installing gusset plates properly, rushing through bracing installation, or overlooking hurricane ties might save an hour today, but could cost you significantly down the road. One homeowner shared how investing an extra afternoon double-checking connections gave him complete peace of mind during his first major storm season.
Remember, there’s no prize for finishing fastest. Take breaks when you need them, double-check your measurements, and don’t hesitate to ask questions at your local hardware store. The technical aspects become second nature once you’ve worked through them systematically.
By investing proper attention to your K truss connections now, you’re building a shed that will reliably protect your belongings for decades. That’s the kind of DIY success story worth creating, and you’re completely capable of achieving it.