
Why Your Shed Attracts Pests (And How One Deep Clean Can Stop Them)

Your shed’s biggest pest problem isn’t just the critters themselves—it’s the dirt, clutter, and moisture that rolled out the welcome mat for them. Every spider web in the corner, every pile of forgotten cardboard boxes, and every damp spot on the floor creates the perfect breeding ground for unwanted visitors. The good news? A strategic cleaning approach can eliminate existing pests and stop new ones from moving in, without relying solely on chemical treatments.\n\nMost homeowners don’t realize that mice, insects, and other pests are drawn to sheds because these spaces offer exactly what they need: shelter, food sources, and undisturbed hiding spots. That bag of birdseed you stored last spring? It’s a buffet. Those stacked clay pots with drainage holes? Prime real estate for spiders. The gaps around your door where dirt has accumulated? A highway for ants and beetles.\n\nPest control cleaning goes beyond basic tidying. It’s a systematic process that removes attractants, eliminates hiding places, and creates an environment where pests simply can’t thrive. This approach tackles the root cause rather than just treating symptoms, saving you money on repeated exterminator visits while protecting your stored belongings from damage.\n\nWhether you’re dealing with an active infestation or want to prevent one from starting, understanding the connection between cleanliness and pest prevention transforms your shed from a pest haven into a clean, functional space you’ll actually want to use.\n\n\n
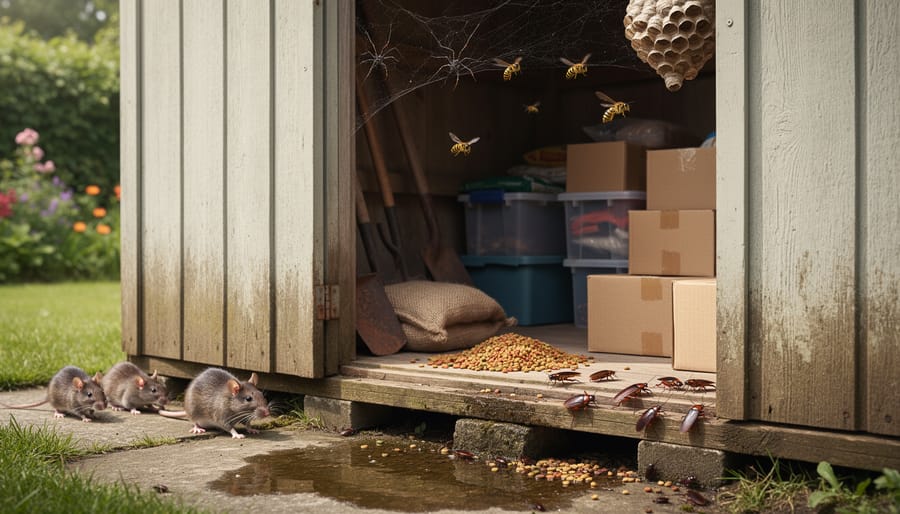
The Real Reason Pests Love Your Shed
\n\n
Common Shed Pests and What They’re Looking For
\n\nUnderstanding what draws pests to your shed is the first step in creating an effective cleaning strategy. Each unwanted visitor has specific needs, and your shed might be meeting them without you realizing it.\n\nMice and rats are primarily searching for three things: food, warmth, and nesting materials. That forgotten bag of birdseed, the cozy insulation behind your wall panels, and those old rags in the corner create the perfect rodent paradise. These clever creatures can squeeze through openingly as small as a dime, making mice prevention cleaning absolutely essential for keeping them out.\n\nSpiders follow their food source—other insects. If your shed has accumulated cobwebs in corners and behind stored items, you’ve likely got a thriving spider population. They’re attracted to dark, undisturbed areas where they can build webs undisturbed.\n\nAnts march toward any available food sources, especially sweet substances and proteins. Even the smallest crumbs from a stored lunchbox or pet food container will attract entire colonies. They also seek moisture, so any dampness in your shed becomes an invitation.\n\nWasps and hornets look for sheltered spaces to build nests, particularly in roof eaves, corners, and between stored items. They appreciate protection from weather and predators.\n\nTermites target wood, especially moisture-damaged lumber. They need humidity to survive and thrive in poorly ventilated sheds where condensation collects. Even small water leaks can transform your shed into termite territory.\n\n
 \n
\n\n\n\n
The Pest Control Cleaning Method That Actually Works
\n\n
Step 1: The Complete Shed Emptying
\n\nStarting with a completely empty shed is absolutely essential for effective pest control cleaning. You simply can’t reach hidden nests, droppings, or entry points when items are blocking your view and access. Think of it as a fresh canvas approach – every corner, crack, and crevice needs your attention, and that’s impossible with clutter in the way.\n\nAs you remove items, create three distinct sorting areas outside your shed: keep, toss, and clean. This system saves time and prevents reintroducing contaminated items back into your freshly cleaned space. Items that show signs of pest damage – chewed corners, droppings, or greasy rub marks – need immediate attention or disposal.\n\nDuring this emptying process, pay close attention to what you’re discovering. Look for telltale signs like mouse droppings (small, dark pellets), spider webs in corners, or sawdust trails indicating wood-boring insects. Notice any unusual odors too, as they often signal hidden pest activity. This detective work helps you understand the severity of your pest problem and which areas need extra focus during cleaning. Many homeowners are surprised to find pest damage they never knew existed, simply because items were stacked and stored without regular inspection.\n\n
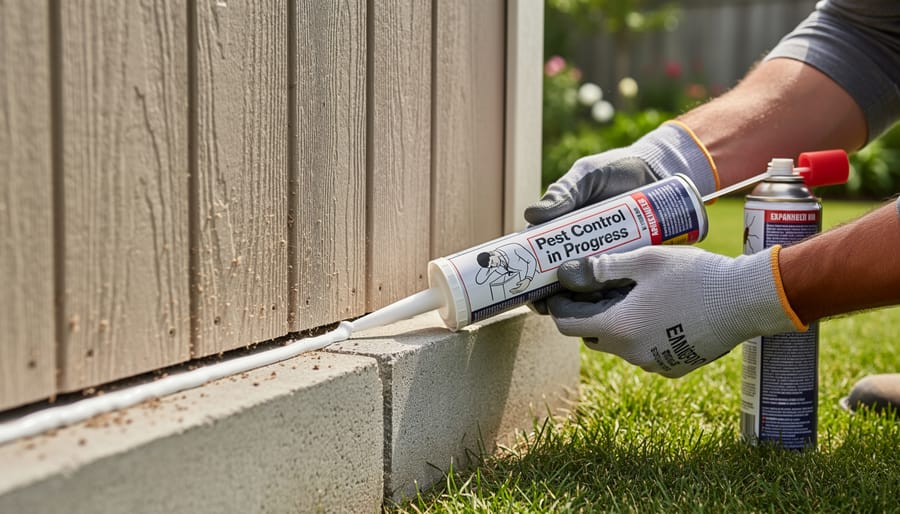
Step 2: Identifying and Sealing Entry Points
\n\nBefore implementing pest control solutions, you need to understand how pests are getting into your shed in the first place. Think of your shed inspection like a detective mission – you’re looking for every possible entry point, no matter how small. Remember, mice can squeeze through openings as tiny as a dime!\n\nStart your inspection at ground level, examining where your shed meets the foundation. Look carefully around door frames and window edges, as these are common trouble spots. Don’t forget to check corners, utility penetrations where pipes or wires enter, and any damaged siding or trim.\n\nFor wood sheds, inspect for rotted boards, loose trim, and gaps between panels. Small cracks can be filled with exterior-grade caulk, while larger holes need wood filler or replacement boards. Metal sheds often develop gaps at seams and where panels connect – use weatherproof sealant or metal tape designed for outdoor use. Vinyl sheds are generally pest-resistant, but check where sections snap together and around door tracks.\n\nWeatherstripping works wonders for door gaps, while steel wool stuffed into holes deters gnawing pests before you seal over it with foam or caulk. For foundation gaps, consider installing a gravel barrier or metal flashing that extends below ground level.\n\nPro tip: Perform your inspection on a sunny day from inside the shed with the door closed. Any light streaming through reveals an entry point you need to seal.\n\n
 \n
\n\n\n
Step 3: Deep Cleaning Every Surface
\n\nNow comes the satisfying part where you transform your shed from pest paradise to pristine storage space. Start from the top down to prevent recontaminating cleaned areas. Use a stiff brush or vacuum to remove cobwebs and debris from the ceiling and exposed beams, paying attention to corners where spiders love to nest.\n\nFor walls, create an effective pest-deterring solution by mixing one cup of white vinegar with a gallon of warm water. This natural formula cleans effectively while repelling many insects without damaging your stored items. Wipe down all wall surfaces, including behind anything mounted on them. If you’ve spotted evidence of rodents, add a few drops of peppermint oil to your cleaning mixture as mice find the scent particularly offensive.\n\nShelving requires special attention since it holds your belongings. Remove everything, vacuum thoroughly, then wipe with your vinegar solution. Check shelf brackets and supports for pest hideouts before returning items.\n\nFloor cleaning makes the biggest impact on long-term pest control. Sweep thoroughly, then mop with a mixture of hot water, dish soap, and vinegar. For concrete floors, a diluted bleach solution works wonderfully for stubborn stains and provides extra disinfection, though ensure proper ventilation. Wood floors respond well to gentle soap-based cleaners that won’t strip protective finishes.\n\nDon’t forget baseboards and the space where walls meet floors, prime real estate for crawling insects establishing entry points.\n\n
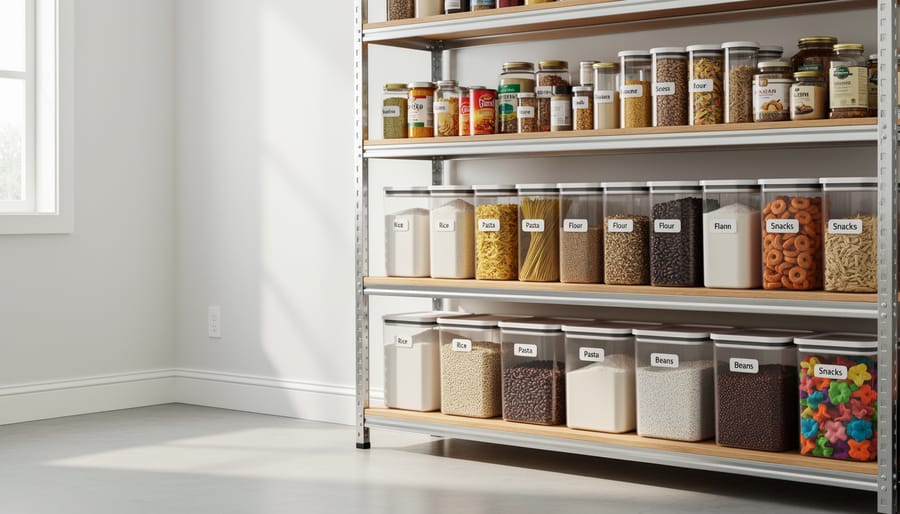
Step 4: Strategic Re-organization for Pest Prevention
\n\nNow that your shed is sparkling clean, it’s time to rethink how you organize everything. The way you arrange items can make the difference between a pest-free space and an invitation for unwanted visitors. Let’s explore some practical strategic organization methods that keep pests at bay.\n\nStart by elevating everything off the floor. Use shelving units, pallets, or storage racks to create at least 6 inches of clearance. This simple step eliminates hiding spots and makes it easier to spot pest activity during routine checks. Consider metal or heavy-duty plastic shelving, which pests can’t chew through or nest in.\n\nChoose sealed storage containers over cardboard boxes. Airtight plastic bins with secure lids protect items like birdseed, pet food, and fertilizer from becoming pest buffets. Label everything clearly so you’re not constantly opening containers and creating opportunities for pest access.\n\nMaintain spacing between stored items and walls. Leave a few inches of breathing room to improve air circulation and prevent moisture buildup that attracts insects. Group similar items together, but avoid creating dense, cluttered zones where pests can hide undetected. Keep frequently used items near the entrance for easy access, reducing the time your door stays open and limiting pest entry points.\n\n
 \n
\n\n\n\n
Cleaning Products and Tools That Double as Pest Deterrents
\n\nThe right cleaning products can work double-duty in your shed, keeping surfaces spotless while naturally discouraging pests from taking up residence. Let’s explore some effective options that won’t break the bank.\n\nWhite vinegar stands as a cleaning powerhouse with excellent pest-deterring properties. Mix equal parts water and vinegar in a spray bottle for an all-purpose cleaner that rodents and insects find particularly unpleasant. Use it on shelves, floors, and walls—the acidic smell disrupts pests’ scent trails and masks the odors that attract them. One homeowner shared that after switching to vinegar-based cleaning in her garden shed, she noticed a significant drop in ant activity within just two weeks.\n\nPeppermint oil offers another natural solution that smells wonderful to us but terrible to mice, spiders, and many insects. Add 10-15 drops to a cup of water with a splash of dish soap for a refreshing cleaning spray. Focus on entry points, corners, and areas where you’ve noticed pest activity. Reapply weekly for best results, as the scent fades over time.\n\nFor those preferring commercial products, look for cleaners containing citrus oils or eucalyptus. These ingredients naturally repel many common shed pests while cutting through grease and grime effectively. Pine-based cleaners also work well, offering that fresh scent while deterring insects.\n\nDon’t overlook diatomaceous earth for dry cleaning tasks. This food-grade powder kills crawling insects mechanically rather than chemically. Sprinkle it in corners, along baseboards, and behind stored items. It remains effective as long as it stays dry.\n\nCedar oil sprays combine cleaning power with long-lasting pest prevention, making them ideal for treating wooden surfaces and storage areas where fabric or paper goods live.\n\n\n
What to Do If You Find Active Pest Problems During Cleaning
\n\nDiscovering pests mid-cleaning can feel unsettling, but staying calm and taking the right steps will help you handle the situation effectively. Here’s what to do when you encounter active pest problems in your shed.\n\nFirst, assess what you’ve found. Small amounts of droppings or a few individual insects might be manageable on your own, but certain situations require professional help immediately. Call a pest control expert if you discover large nests, extensive droppings, signs of rodent damage to wiring or insulation, wasp or hornet nests, or evidence of termites or carpenter ants. These scenarios pose safety risks or potential structural damage that DIY methods can’t adequately address.\n\nFor minor issues like scattered droppings or a few spiders, you can handle cleanup yourself with proper precautions. Always wear protective gloves, a dust mask, and eye protection when dealing with pest evidence. Droppings can carry harmful bacteria and allergens, so never sweep them dry as this releases particles into the air. Instead, spray the area with a disinfectant solution, let it sit for five minutes, then wipe with disposable paper towels. Place all waste in sealed plastic bags before disposal.\n\nIf you find an active nest, don’t disturb it. Mark the location, exit the shed calmly, and contact a professional. Agitating certain pests, especially stinging insects, can create dangerous situations.\n\nAfter pest control professionals treat your shed, proper cleaning after pest treatment ensures the solution remains effective while eliminating remaining debris. Your pest control company will provide specific instructions about timing and methods.\n\nDocument what you find with photos. This helps professionals identify the pest and develop targeted treatment plans. Also note where you found evidence, as patterns reveal entry points and nesting preferences. This information proves invaluable for preventing future infestations and helps you make informed decisions about whether professional intervention is necessary.\n\n\n
Maintaining Your Pest-Free Shed After the Deep Clean
\n\n
The Quick Monthly Pest-Check Routine
\n\nSet aside just 15 minutes each month for a quick pest-prevention check that can save you from bigger headaches down the road. Think of it as a mini health checkup for your shed – catching small issues before they become full-blown infestations.\n\nStart at the entrance and work your way around systematically. Check corners and floor edges for droppings, chewed materials, or suspicious trails. These telltale signs help you spot problems early. Run your hand along shelves to feel for accumulated dust and debris where insects love to hide.\n\nNext, inspect any food storage areas, pet supplies, or organic materials like potting soil. These are pest magnets, so give them extra attention. Look for any packaging damage or tiny holes that signal unwanted visitors.\n\nGrab a broom and quickly sweep high-traffic areas, focusing on those often-overlooked spaces behind boxes and under workbenches. Wipe down a couple of shelves each month – rotating which ones you tackle keeps the whole shed fresh without overwhelming your schedule.\n\nFinally, check that doors and windows close properly and weather stripping remains intact. This simple routine complements your regular shed maintenance and keeps pests at bay year-round without requiring professional intervention.\n\n\n
Real Stories: How One Weekend Changed Everything
\n\nSarah from Portland still remembers the Friday afternoon she discovered mice droppings scattered across her garden shed floor. “I’d been avoiding that shed for months because it felt cluttered and overwhelming,” she shares. “But when I finally saw evidence of rodents, I knew I had to act.” That weekend, Sarah rolled up her sleeves and spent both days deep cleaning every corner, removing old cardboard boxes that had become nesting material, and reorganizing her storage. “Within two weeks of maintaining my new cleaning routine, the mice were gone. The transformation wasn’t just about getting rid of pests—it was about reclaiming a space I’d given up on.”\n\nMike and Jennifer from Ohio had a similar wake-up call when wasps built a nest in their cluttered shed corner. “We realized our piles of unused items and dusty shelves were creating perfect hiding spots,” Jennifer explains. Their weekend cleaning project involved pressure washing the walls, disposing of junk, and creating clear, organized zones for their tools and supplies. “The peace of mind we gained was incredible,” Mike adds. “Now we actually enjoy going into our shed, and we’ve stayed pest-free for over a year just by keeping up with monthly cleanings. It’s amazing how something as simple as consistent tidying can solve what felt like an impossible problem.”\n\n\nInvesting time in pest control cleaning isn’t just about tackling an immediate problem—it’s about protecting everything you’ve stored in your shed and maintaining the structure’s long-term value. A clean, pest-free space means your tools stay rust-free, your seasonal decorations remain intact, and your shed continues serving as the functional storage solution you need.\n\nThe satisfaction of opening your shed door to an organized, fresh-smelling space that’s free from unwanted visitors is hard to beat. You’ll save money by preventing pest damage, avoid the stress of discovering ruined belongings, and enjoy peace of mind knowing your storage area is truly secure.\n\nNow’s the perfect time to schedule your deep clean. Whether you tackle it over a weekend or break it into manageable sessions, the effort you put in today will pay dividends for months to come. Start with that initial thorough cleaning, then commit to your quarterly maintenance routine. Your shed—and everything inside it—will thank you. Remember, a little prevention now saves considerable headache later, and there’s genuine pride in maintaining a space that works as hard as you do.