
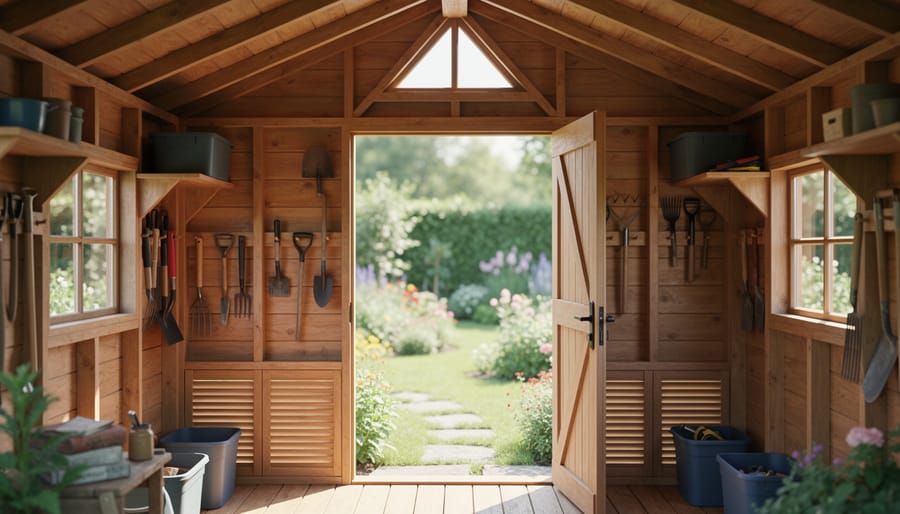
Why Your Shed Smells Musty (And How Proper Ventilation Fixes It)
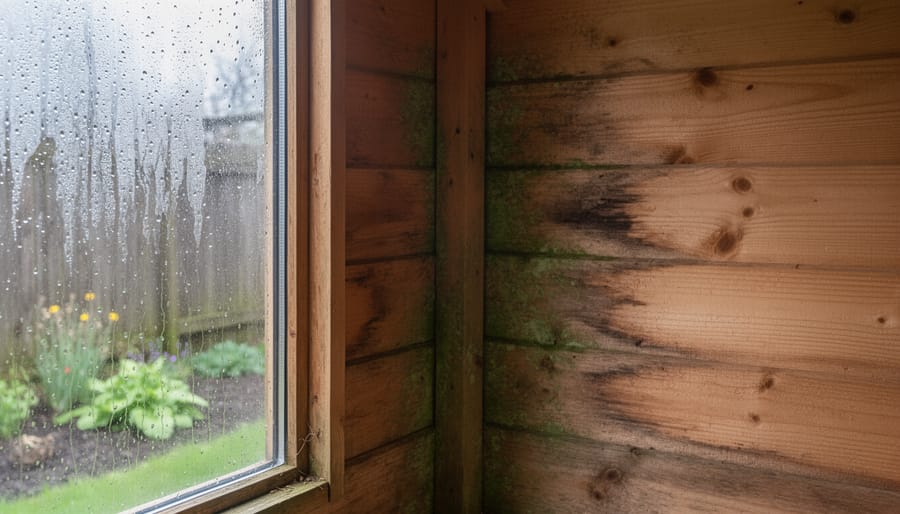
That musty smell hitting you when you open your shed door? The condensation dripping from the ceiling onto your stored belongings? These aren’t just minor annoyances—they’re warning signs that your shed lacks proper ventilation. Without adequate airflow, moisture becomes trapped inside, creating the perfect environment for mold growth, preventing tool rust becomes nearly impossible, and you’ll soon be dealing with expensive wood rot treatment.\n\nThe good news? Understanding shed ventilation doesn’t require an engineering degree. A simple ventilation diagram shows you exactly where to place intake vents near the bottom of your shed walls and exhaust vents near the roof peak, creating natural airflow that keeps your space dry and fresh. This cross-ventilation principle works whether you have a compact 8×6 garden shed or a spacious 12×16 workshop.\n\nIn this guide, you’ll discover how to read and apply ventilation diagrams tailored to your specific shed size and climate. We’ll walk you through choosing the right vent types, calculating how many you need, and installing them correctly—even if you’ve never tackled a DIY ventilation project before. You’ll also learn to spot and fix common ventilation mistakes that leave sheds damp despite having vents installed. By the end, you’ll have a clear roadmap to transform your stuffy, moisture-prone shed into a well-ventilated storage space that protects your valuable tools and equipment year-round.\n\n\n
Understanding How Air Moves Through Your Shed
\n\n
The Science Behind Moisture Buildup
\n\nUnderstanding moisture buildup in your shed starts with recognizing that these structures face unique challenges. When warm, humid air meets cooler surfaces inside your shed, condensation forms—just like water droplets on a cold glass of lemonade on a summer day. This becomes particularly problematic in sheds because they experience dramatic temperature swings throughout the day and night, creating the perfect conditions for moisture to accumulate.\n\nYour shed’s enclosed design naturally traps humid air inside, and without proper airflow, that moisture has nowhere to go. The items you store make things worse—garden tools with damp soil, bags of mulch, wet lawn equipment, or firewood all release moisture into the air. Metal tools and equipment become rust magnets, while wooden structures can develop rot and mold. Many homeowners don’t realize their wood shed ventilation needs are different from their garage or basement because sheds lack the insulation and climate control of attached structures.\n\nThe good news? Once you understand how moisture behaves, solving the problem becomes straightforward. Proper ventilation creates air circulation that carries humid air out while bringing fresh, drier air in, maintaining a healthier environment for both your shed and everything stored inside.\n\n
 \n
\n\n\n\n
Essential Components of an Effective Shed Ventilation System
\n\n
Intake Vents: Where Fresh Air Enters
\n\nFresh air intake vents are the unsung heroes of your shed’s ventilation system, and proper placement makes all the difference. Position these vents low on your shed walls, ideally within 12-18 inches of the floor. Why down low? Cool air naturally settles at ground level, and these lower vents capture that fresh breeze while creating the perfect setup for air circulation.\n\nFor a typical 8×10 shed, you’ll want at least two intake vents positioned on opposite walls to encourage cross-ventilation. Larger sheds benefit from additional vents—think one vent for every 50-100 square feet of floor space. Popular intake vent options include rectangular foundation vents (easy to install and affordable), circular soffit vents, or louvered vents that offer weather protection while maintaining airflow.\n\nHere’s a real-world tip from experienced shed owners: don’t skimp on intake size. A common mistake is installing tiny vents that restrict airflow, leaving you with the same musty smell you’re trying to eliminate. Your intake vents should collectively provide an opening equal to or larger than your exhaust vents. This balance ensures smooth air movement and prevents negative pressure that can actually trap moisture inside your shed.\n\n
 \n
\n\n\n
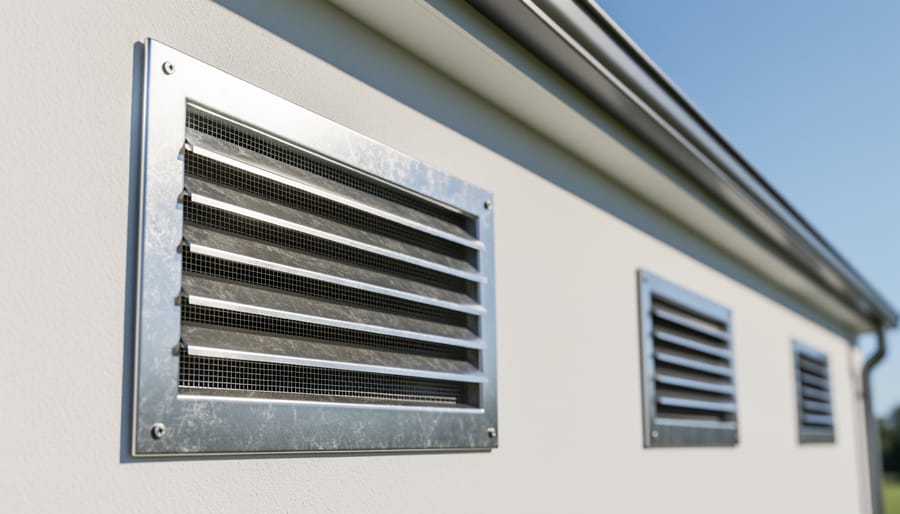
Exhaust Vents: Where Humid Air Escapes
\n\nThink of exhaust vents as your shed’s natural exit strategy for warm, humid air. Because hot air naturally rises, positioning these vents at the highest points of your shed creates the most effective air flow system.\n\nRidge vents run along the peak of your roof and work beautifully for larger sheds. They’re continuous vents that allow moisture-laden air to escape along the entire roofline. One homeowner in Oregon shared how installing a ridge vent finally solved her persistent condensation problem that had been damaging stored furniture.\n\nGable vents sit on the triangular wall sections at either end of a peaked roof. They’re perfect for smaller to medium sheds and come in various decorative styles to match your shed’s appearance. Position them near the roof peak for maximum effectiveness.\n\nRoof vents, those mushroom-shaped fixtures you might recognize from houses, work wonderfully as standalone exhaust points. They’re easy to install and particularly useful if your shed design doesn’t accommodate ridge or gable vents.\n\nThe key is placement. The higher your exhaust vents sit, the better they’ll pull warm air upward and out. When paired with lower intake vents, you create that essential circulation loop that keeps your shed dry and fresh year-round.\n\n
Creating Cross-Ventilation
\n\nThe secret to effective shed ventilation lies in creating cross-ventilation, where fresh air enters from one side and stale, moisture-laden air exits from another. Think of it as giving your shed the ability to breathe naturally. Position intake vents low on one wall, ideally on the side facing prevailing winds, and exhaust vents high on the opposite wall or in the gable end. This arrangement harnesses natural convection, where warm air rises and escapes through upper vents while cooler air flows in below.\n\nFor single-wall sheds, placing vents at different heights on the same wall can still promote airflow, though opposite-wall placement works best. Many homeowners discover this solution after noticing condensation on tools or walls. As one DIY enthusiast shared, “Once I installed vents on both ends of my shed at different heights, the musty smell disappeared within days.” This simple positioning strategy creates continuous air movement that prevents moisture buildup and keeps your stored items safe year-round.\n\n\n
Reading and Applying Shed Ventilation Diagrams
\n\n
Basic Ventilation Layout for Small Sheds (Under 100 sq ft)
\n\nFor compact sheds under 100 square feet, you’ll want a straightforward two-vent system that gets the job done without overcomplicating things. Picture this: one intake vent positioned low on the wall (about 12 inches from the ground) on your shed’s cooler side, typically facing north or east. Then, place an exhaust vent high up on the opposite wall (within 6 inches of the roofline) on the warmer side.\n\nHere’s how the magic happens: cool, fresh air enters through the lower vent, naturally rises as it warms up inside your shed, and exits through the upper vent. This creates a gentle, continuous airflow that prevents moisture buildup and keeps things fresh.\n\nYou’ll need just a few materials to make this work: two louvered vents (4×8 inches work great for small spaces), galvanized screws, a drill, a jigsaw for cutting the openings, and some exterior caulk to seal around the edges. The beauty of this simple setup is that it requires no electricity and works automatically using natural convection. Many homeowners tell us they noticed a dramatic difference within days, with condensation disappearing and that musty smell vanishing completely.\n\n
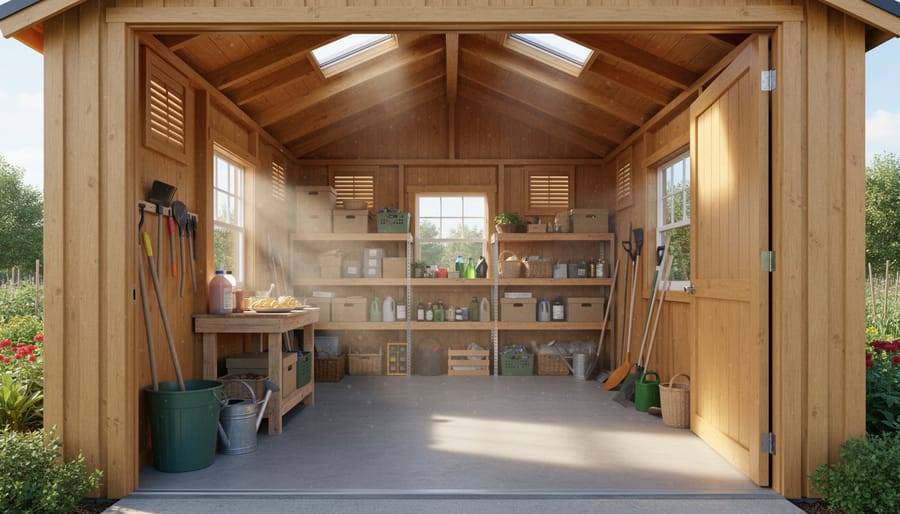
Medium to Large Shed Ventilation (100-200+ sq ft)
\n\nWhen you’re ventilating a medium to large shed, think of it like creating a breathing system for your entire structure. You’ll need a more comprehensive approach than smaller sheds, but don’t worry—it’s still manageable with the right plan.\n\nThe most effective setup combines ridge vents running along the peak of your roof with soffit vents installed under the eaves. This creates what’s called passive ventilation, where hot air naturally rises and escapes through the ridge while cooler air enters through the soffits. For every 150 square feet of floor space, aim for at least one square foot of total vent area split between intake and exhaust.\n\nIf your shed doesn’t have soffits, gable vents on opposite ends work beautifully. Position them as high as possible on each gable end to maximize airflow. Sarah, a homeowner in Oregon, told us she eliminated her moisture problems completely by installing two 14-inch gable vents after struggling with condensation for months.\n\nFor sheds approaching 200 square feet or larger, consider adding a powered exhaust fan to boost airflow during humid summer months. Mount it opposite your intake vents to pull air through efficiently. The key is maintaining balance—adequate intake prevents your exhaust from working against itself. Calculate your needs based on your specific climate and what you’re storing inside.\n\n
Adapting Diagrams to Your Shed’s Specific Needs
\n\nStandard ventilation diagrams provide an excellent starting point, but your shed’s unique situation matters. Let’s look at how to customize these plans for best results.\n\nClimate plays a huge role in ventilation needs. If you live in a humid region, you’ll want to increase the number of vents shown in basic diagrams by about 25-30%. One homeowner in Florida told us she doubled her ridge vents after following a standard plan, finally eliminating her mildew problem. Conversely, in dry climates, you can often scale back slightly while still maintaining good airflow.\n\nWhat you store inside makes a difference too. Gasoline-powered equipment releases fumes that require lower vents near the floor, even if your diagram doesn’t show them. Paint supplies need consistent air movement to prevent vapor buildup, so consider adding an extra roof vent.\n\nMetal sheds heat up faster than wood ones, creating more condensation. For metal structures, position vents on opposite walls rather than the standard front-and-back configuration to combat this temperature spike.\n\nAlready have a shed? Work with what you’ve got. If adding ridge vents isn’t feasible, compensate with additional gable vents. The key is maintaining that high-low airflow pattern. Measure your existing openings and adjust the diagram’s vent sizes proportionally to match your square footage, keeping that critical cross-ventilation flowing.\n\n\n
Step-by-Step: Installing Your Ventilation System
\n\n
Tools and Materials You’ll Need
\n\nGetting your shed properly ventilated doesn’t require a toolbox full of expensive equipment. Most of the items you’ll need are probably sitting in your garage right now. Start with a power drill and appropriate drill bits for creating pilot holes in your shed walls. A jigsaw will be essential for cutting larger openings for passive vents or exhaust fans. Don’t forget your measuring tape and pencil to mark precise locations based on your ventilation diagram.\n\nFor materials, you’ll need vent covers or louvered vents that allow air to flow while keeping rain and pests out. Fine mesh screening is crucial for blocking insects without restricting airflow. Pick up some exterior-grade sealant or caulk to weatherproof your installations and prevent water infiltration around new openings. If you’re installing active ventilation, grab a solar-powered fan or small exhaust fan designed for outdoor use. Finally, keep screws or mounting hardware handy for securing everything in place. These basic supplies will have you solving moisture problems in no time.\n\n
Marking and Cutting Vent Openings
\n\nBefore making any cuts, double-check your ventilation diagram measurements and mark your openings with a pencil on both the interior and exterior of your shed. This ensures accuracy and prevents costly mistakes that could compromise your shed’s structural integrity.\n\nFor wooden sheds, start by drilling pilot holes at each corner of your marked vent opening. Use a jigsaw with a fine-tooth blade to connect these holes, cutting slowly to maintain control and prevent splintering. Apply painter’s tape along your cut line beforehand to minimize rough edges.\n\nMetal shed owners should use tin snips for smaller vents or a metal-cutting blade for larger openings. Always wear safety goggles and heavy-duty gloves, as metal edges can be extremely sharp. File down any rough edges immediately after cutting to prevent injuries and improve the vent’s fit.\n\nVinyl or plastic sheds require a different approach. Use a fine-tooth saw and cut at a slower pace to prevent cracking. Avoid cutting in extremely cold weather when materials become more brittle.\n\nRegardless of material, never cut through structural supports or corner posts. If your diagram places a vent near a support beam, adjust the position slightly. Keep a level handy to ensure your cuts remain straight, and always have your vent cover ready to test-fit before completing the full cut.\n\n
Installing and Sealing Vents Properly
\n\nOnce you’ve determined the best locations for your vents based on your diagram, it’s time to install them properly. Getting this step right makes all the difference in preventing water damage and keeping unwanted visitors out.\n\nStart by marking your vent openings carefully. Use your diagram as a reference to ensure proper placement, then cut cleanly through the shed wall. When securing vents, apply a generous bead of exterior-grade caulk around the opening before positioning the vent. This creates your first line of defense against moisture. Fasten vents with corrosion-resistant screws, spacing them evenly around the perimeter for a firm hold.\n\nAdding pest screening is non-negotiable. Many homeowners learn this lesson the hard way after discovering wasps, mice, or birds have taken up residence. Choose metal mesh screening over plastic, as it’s more durable and harder for pests to chew through. Cut the screen slightly larger than the vent opening and secure it between the vent and the wall during installation.\n\nFor weatherproofing, don’t skimp on sealant. After the vent is mounted, apply another bead of caulk around the exterior edge where the vent meets the wall. Smooth it with your finger to create a seamless seal. Pay special attention to the top edge where rain typically runs down.\n\nOne DIY enthusiast shared that adding a small drip edge above her ridge vent completely eliminated water intrusion during heavy storms. These small details protect your investment and keep your ventilation system working effectively year-round, preventing those frustrating moisture problems that brought you here in the first place.\n\n\n
Common Ventilation Mistakes That Make Moisture Problems Worse
\n\n
Not Enough Ventilation vs. Too Much
\n\nFinding the sweet spot for shed ventilation isn’t complicated once you understand the basics. Too little airflow leads to condensation, mildew, and that unmistakable musty smell we’re trying to avoid. But overdoing it can expose your belongings to excessive dust, temperature swings, and moisture during heavy rain.\n\nA good rule of thumb is to aim for one square foot of ventilation for every 150 square feet of shed floor space. For an 8×10 shed (80 square feet), that’s about 75 square inches of total vent area. Divide this between intake vents low on the walls and exhaust vents near the roof peak to create natural airflow.\n\nWatch for signs you’ve hit the mark: no condensation on windows or metal surfaces, fresh-smelling interior, and no visible moisture on walls. If you notice excessive dust accumulation inside, you might have oversized your vents. Conversely, foggy windows or dampness means you need to boost airflow. Start conservative and add more ventilation if needed—it’s easier than scaling back.\n\n
Poor Vent Placement That Blocks Airflow
\n\nEven with vents installed, poor placement can leave you battling the same moisture and stuffiness you’re trying to eliminate. One common mistake is positioning intake vents too high on the wall, which prevents cool air from entering near floor level where it’s needed most. The fix? Place intake vents within 12 inches of the floor on the cooler side of your shed, typically facing north or east.\n\nAnother frequent issue is installing exhaust vents on the same wall as intake vents, creating a short circuit where air exits immediately without circulating through the entire space. Instead, position exhaust vents on the opposite wall near the roof peak to encourage proper cross-ventilation. Homeowners also struggle when vents are blocked by shelving, garden tools, or equipment stored directly in front of them. Regular checks ensure nothing obstructs airflow paths. If you’ve already installed vents in less-than-ideal spots, don’t worry. Adding complementary vents in better positions often solves the problem without requiring you to relocate existing ones.\n\n
Forgetting About Pest Prevention
\n\nHere’s an often-overlooked detail that can turn your well-ventilated shed into a haven for unwanted guests: forgetting proper screening. While you’re focused on creating the perfect airflow through vents and openings, those same passages become open invitations for insects, mice, and other critters.\n\nThe solution is straightforward but essential. Cover all ventilation openings with galvanized wire mesh or specialized vent screens with quarter-inch or smaller openings. This keeps out most pests while maintaining excellent airflow. For ridge vents and eave vents, choose products with built-in screening or add mesh before installation. Gable vents should have tight-fitting covers that include screening material.\n\nRegular maintenance matters too. Check screens seasonally for tears, rust, or gaps where pests might squeeze through. Even small damage can let in unwanted visitors. If you notice droppings or nesting materials near your vents, it’s time to upgrade your pest prevention measures. Remember, effective ventilation and pest protection work hand in hand to keep your shed dry, fresh, and critter-free year-round.\n\n\n
 \n
\n\n\n
Real Results: How Proper Ventilation Transformed These Sheds
\n\nSarah from Minnesota had been storing garden tools in her 10×12 shed for three years when she noticed rusty equipment and a persistent musty smell. “I thought I just needed to clean more often,” she admits. “But the problem kept getting worse.” After installing ridge vents along the roof peak and adding soffit vents near the floor, following a basic cross-ventilation diagram, Sarah saw dramatic improvements within weeks. “The air smells fresh now, and my tools stay rust-free even through our humid summers.”\n\nMark’s story resonates with many tool enthusiasts. His workshop shed in Georgia was plagued with condensation dripping from the ceiling each morning. “I couldn’t use power tools safely because everything was damp,” he explains. Mark added gable vents on opposite walls and installed a small solar-powered exhaust fan near the roof. The temperature inside dropped noticeably, and condensation disappeared completely. “I followed a simple diagram showing high and low vent placement, and it solved everything.”\n\nLinda’s situation was different but equally frustrating. Her craft supplies were developing mold in her backyard studio shed. She combined passive ridge vents with strategically placed wall vents low on the structure. “Within a month, the mold stopped spreading, and my fabric storage bins stayed dry,” she shares. “Understanding how air naturally flows up and out made all the difference.”\n\n\nGetting your shed ventilation right isn’t just about following a diagram—it’s about protecting everything you’ve invested in your outdoor storage space. Whether you’re storing expensive tools, garden equipment, or treasured family heirlooms, proper airflow makes all the difference between items that last for years and those that deteriorate from moisture damage.\n\nTake a moment this weekend to walk into your shed and really assess what’s happening. Do you notice condensation on the walls? Is there a musty smell when you open the door? These are clear signs that your ventilation needs attention. The good news is that most ventilation improvements are straightforward weekend projects that don’t require professional help.\n\nRemember, good ventilation works hand-in-hand with regular shed maintenance to keep your structure in excellent condition. By combining proper airflow with routine upkeep, you’re ensuring that both your shed and its contents stay protected from the elements.\n\nDon’t wait until you discover mold or rust—start planning your ventilation improvements today. Review the diagrams we’ve discussed, choose the configuration that fits your shed size and budget, and take that first step toward a healthier storage environment.