
Transform Your Extension Shed Through Every Season (Without Starting From Scratch)
Your extension shed shouldn’t sit idle when the seasons change. Transform this versatile space from a winter workshop into a spring potting station, then shift it to summer entertainment headquarters before converting it to autumn harvest storage—all with minimal effort and maximum impact.
The secret lies in smart planning and adaptable systems. Most homeowners treat their extension sheds as single-purpose structures, missing out on hundreds of square feet of potential living and working space throughout the year. Whether you’re storing garden tools in July or creating a cozy craft room in January, your shed can work harder for you with the right seasonal adjustments.
Consider Sarah from Portland, who converted her 10×12 extension shed from a cluttered catch-all into a year-round functional space. In spring, she uses removable shelving for seedling propagation. Summer brings in folding furniture for backyard gatherings. Fall transforms it into a produce preservation station, while winter sees it become her husband’s woodworking retreat. The key? Flexible storage solutions and climate-appropriate modifications that take minutes, not days, to implement.
This guide walks you through practical, budget-friendly transformations for each season. You’ll discover storage hacks, climate control tips, and layout strategies that keep your extension shed relevant and useful twelve months a year. No complicated renovations required—just smart thinking and strategic planning that matches your lifestyle to the changing calendar.
What Makes an Extension Shed Perfect for Seasonal Changes
The Unique Advantage of Extension Shed Design
Extension sheds offer a distinct advantage over standalone structures that makes them particularly well-suited for seasonal transformations. Because they’re physically connected to your home or garage, you enjoy convenient access without braving harsh weather conditions. This connected design means you won’t hesitate to swap out seasonal items when the temperature drops or the snow starts falling.
The shared wall construction also provides built-in climate benefits. Your extension shed naturally benefits from some temperature regulation from the main structure, making it more comfortable to work in during extreme weather. This matters when you’re reorganizing winter equipment in November or sorting through gardening supplies in early spring.
From a practical standpoint, running electricity for lighting or adding heating becomes significantly easier and more affordable compared to standalone sheds. Many homeowners find they can complete seasonal changeovers in a single afternoon because everything they need is just steps from their kitchen or mudroom.
Real-world experience shows that extension sheds get used more frequently throughout the year precisely because of this accessibility. As one homeowner shared, “I actually rotate my seasonal items now instead of letting everything pile up. The fact that I don’t have to walk across a wet lawn makes all the difference.”
Real-Life Example: From Garden Storage to Winter Workshop
Meet Sarah from Minnesota, who discovered the year-round potential of her 10×12 extension shed. During spring and summer, her shed houses garden tools, potting supplies, and lawn equipment with everything neatly organized on wall-mounted racks. But when winter arrives, Sarah performs a simple transformation that completely reimagines the space.
“I clear out the seasonal garden items in late fall and bring in my woodworking tools,” Sarah explains. “With a small portable heater and proper insulation I added to the walls, it becomes my cozy winter workshop where I build birdhouses and furniture projects.”
The key to Sarah’s success? Planning for dual purposes from the start. She installed electrical outlets during initial setup and chose wider doors that accommodate both a riding mower in summer and her workbench in winter. She also added removable shelving units that adapt to whatever season demands.
“My extension shed pays for itself by giving me dedicated hobby space without taking over the garage,” she says. “It’s honestly become my favorite spot on the property, no matter the season.”
Spring and Summer: Your Extension Shed as an Active Outdoor Hub
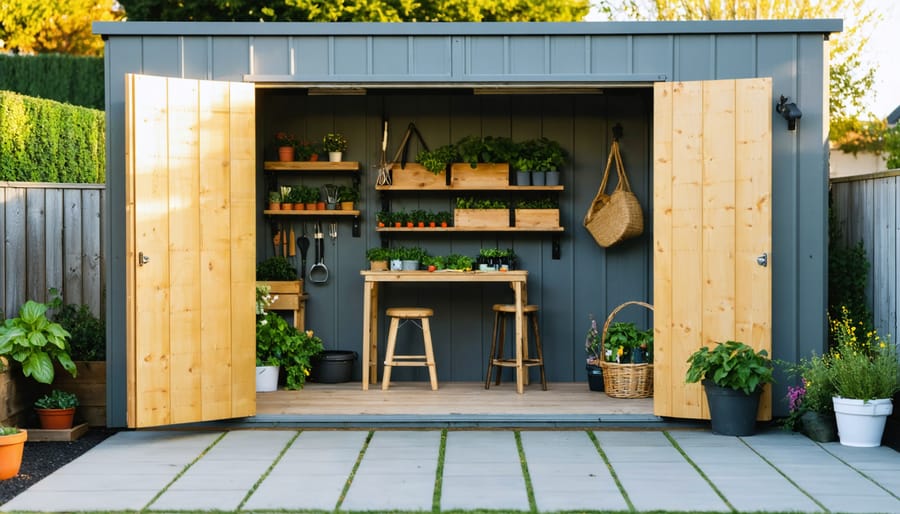
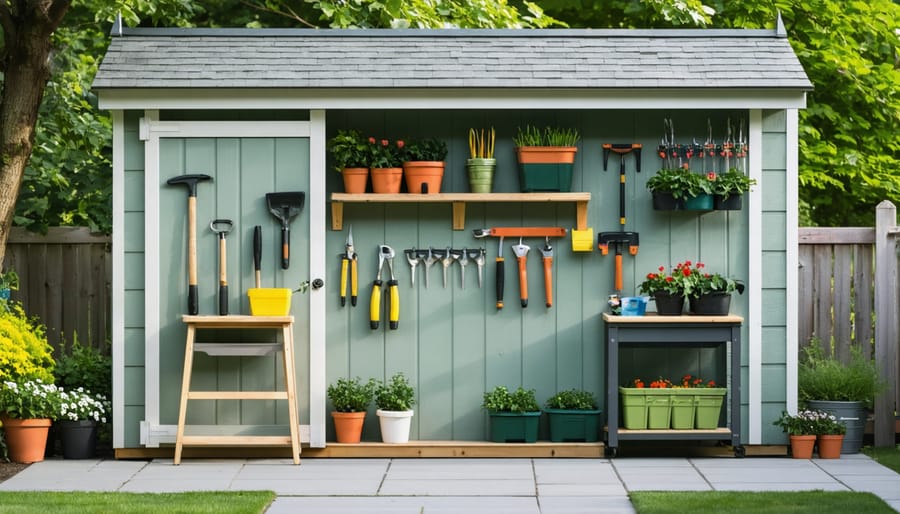
Gardening Command Center Setup
Spring is when your extension shed truly earns its keep as gardening headquarters. Start by dedicating one wall to a pegboard system where hand tools, gloves, and twine hang within easy reach. Sarah, a Vermont homeowner, solved her potting chaos by installing a simple fold-down table beneath the pegboard—it provides workspace when needed but folds flat to preserve floor space during winter storage months.
Store seeds in labeled, airtight containers on shallow shelving where you can see everything at a glance. A small basket near the door for pruners and your favorite trowel means no more hunting for essentials when inspiration strikes. Consider adding a watering station with a bucket and funnel for mixing fertilizers, keeping these tasks contained and organized.
Natural light makes all the difference, so position your potting area near a window if possible. For larger extension sheds, creating a dedicated garden sanctuary setup with zones for different tasks keeps everything flowing smoothly during your busiest season. A rolling cart holds soil bags and compost, moving easily between your potting bench and the door when it’s time to head outdoors.
Ventilation and Temperature Control for Warm Months
When summer heat arrives, your extension shed can quickly become uncomfortably warm, putting stored items at risk and making the space unusable. The good news? A few straightforward modifications can keep temperatures manageable and air circulating properly.
Start by adding passive ventilation through roof vents or gable vents positioned near the peak of your shed. Heat naturally rises, so these high vents release hot air while lower vents or gaps near the floor allow cooler air to enter. This creates a natural convection cycle without any power needed. For enhanced airflow, consider installing temperature-controlled ventilation that automatically adjusts based on conditions inside your shed.
Battery-powered or solar fans offer another budget-friendly solution, especially for sheds without electrical hookups. Position fans to push hot air out rather than pull cool air in for maximum efficiency. One homeowner shared that adding two small solar fans dropped her shed’s interior temperature by nearly 15 degrees, making it comfortable for her pottery hobby throughout summer.
Don’t forget about reflective barriers or light-colored paint on your roof, which deflect heat before it penetrates inside. These simple adjustments transform your extension shed from a sweltering box into a comfortable, year-round workspace.
Quick-Access Storage for Outdoor Recreation
Your extension shed becomes a game-changer for outdoor recreation when you organize it with quick access in mind. Start by installing wall-mounted bike racks to keep cycles off the floor and ready to roll. Many homeowners find that vertical storage doubles their usable space, making room for everything from paddleboards to camping gear.
Create dedicated zones for different activities. Position pool supplies near the door for summer convenience, then rotate that prime spot to winter sports equipment when seasons change. Sports equipment benefits from open shelving or clear bins, so kids can grab basketballs or soccer balls without digging through boxes.
For outdoor furniture and cushions, consider weatherproof storage bags stacked on sturdy shelves. This protects your investment while keeping items accessible when unexpected guests arrive. One satisfied shed owner shared how adding simple hooks transformed her space: “I can now grab beach chairs in seconds instead of moving everything around.”
The key is thinking about frequency of use. Items you need weekly deserve front-row placement, while seasonal gear can retreat to back corners until needed.
Fall Transformation: Preparing Your Extension Shed for the Transition
Weather-Sealing and Insulation Basics
Weatherproofing your extension shed makes it comfortable and functional regardless of the season. Start by inspecting all door and window seals for gaps or cracks. Walk around your shed on a sunny day and look for light streaming through gaps, which indicates where cold air and moisture can enter.
Adding weatherstripping is your first line of defense and takes just minutes. Self-adhesive foam tape works perfectly for door frames and windows. Simply clean the surface, measure the gap, cut the weatherstripping to size, and press firmly into place. For larger gaps under doors, install a door sweep or threshold seal.
For basic insulation that doesn’t require professional installation, consider foam board panels. These lightweight sheets can be cut with a utility knife and attached directly to interior walls using construction adhesive. Bubble foil insulation is another DIY-friendly option that reflects heat in summer and retains warmth in winter. Just staple it between wall studs or attach with double-sided tape.
Sarah, a homeowner in Minnesota, shared how simple weatherstripping and foam board insulation transformed her shed from “unusable in January to my favorite winter workspace.” These straightforward improvements are essential for winter-ready transformations while keeping your space cool during summer months. Most supplies cost under fifty dollars and installation typically takes just one afternoon.
Reorganizing for Seasonal Equipment Swap
As temperatures drop and leaves begin to fall, it’s time to swap out your warm-weather equipment for cold-season essentials. Start by creating a transition plan about six weeks before the first frost. Remove summer items like lawn mowers, garden tools, and patio furniture cushions, giving them a thorough cleaning before storage. Elevate these items on shelves or overhead racks to free up prime floor space for bulky winter gear.
Designate your most accessible area for frequently needed items like snow shovels, ice melt, and snow blowers. These tools should sit near the entrance for quick access during snowstorms. Consider installing vertical hooks for hanging snow shovels and brooms, keeping them off the floor and within easy reach.
If you store firewood in your extension shed, dedicate a dry corner away from your main walkway. Stack wood on pallets to promote air circulation and prevent moisture damage. Create a separate zone for holiday decorations using clearly labeled bins, placing next season’s decorations toward the back and upcoming items front and center.
The key is to maximize storage efficiency by rotating items seasonally rather than cramming everything inside year-round. This approach keeps your extension shed organized and ensures you can always find what you need when you need it.
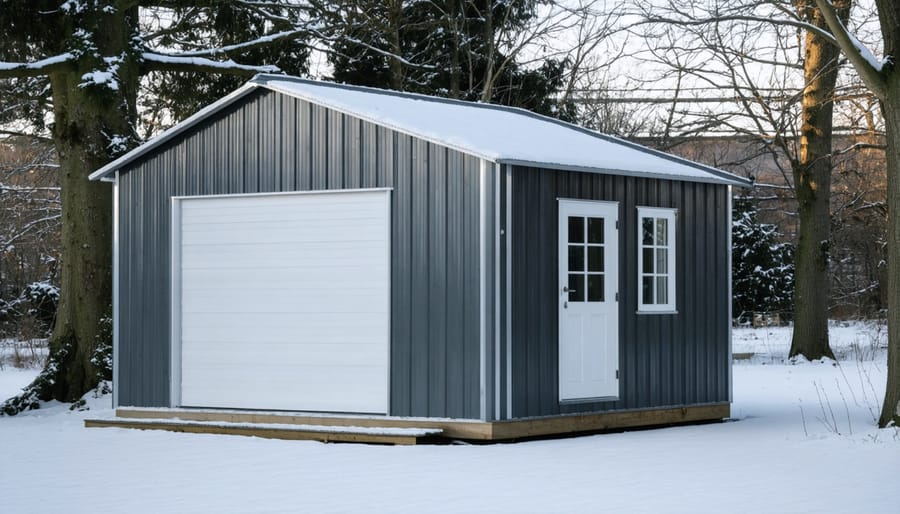
Winter Shelter: Maximizing Your Extension Shed in Cold Months
Creating a Weatherproof Workshop Space
Transforming your extension shed into a year-round workshop requires thoughtful planning, especially during colder months. Start by addressing insulation—even basic wall and ceiling insulation can make a dramatic difference in maintaining comfortable temperatures. Consider winterizing your workshop with weather stripping around doors and windows to prevent drafts.
Heating options vary based on your budget and shed size. Electric space heaters offer convenient, safe warmth for smaller spaces, while infrared heaters provide energy-efficient heat for larger workshops. Always ensure proper ventilation when using any heating device and keep fire safety top of mind.
Lighting becomes crucial during shorter winter days. Install LED shop lights or task lighting above workbenches to reduce eye strain and improve precision. Motion-sensor lights near entrances add convenience when carrying materials in and out.
Cold weather can damage sensitive tools and equipment. Store power tools in insulated cabinets or bring them indoors between projects. Keep lubricants and adhesives in temperature-controlled areas, as many lose effectiveness below freezing. A simple solution is designating one corner with a small heater for storing temperature-sensitive items.
Finally, ensure electrical outlets are positioned conveniently for power tools and heating units, with proper GFCI protection for safety.
Protecting Sensitive Items from Freezing
Winter temperatures can wreak havoc on certain stored items, so knowing what to protect is essential. Paints, adhesives, and water-based chemicals should never remain in your extension shed during freezing weather—they’ll separate, clump, or become completely unusable. Instead, relocate these items indoors to a basement, garage, or utility closet when temperatures drop below 40°F.
If your extension shed has running water, insulating exposed pipes with foam sleeves is your first line of defense against bursting. For particularly harsh climates, consider adding heat tape or a small space heater on a thermostat to maintain just-above-freezing temperatures. One homeowner in Minnesota shared that a simple pipe insulation kit saved her from a costly spring repair after a brutal winter.
Create a “cold-sensitive” inventory list and check it each fall—this simple habit prevents those frustrating spring discoveries of ruined supplies. Your future self will thank you when everything’s ready to use come gardening season.
Snow Equipment Ready-Access
Winter brings the constant need for snow shovels, ice melt, and brushes, but nothing’s worse than digging through a cluttered shed during a storm. Create a dedicated winter zone near your extension shed’s entrance using wall-mounted racks or pegboards for quick grab-and-go access. Sarah, a Minnesota homeowner, solved her morning routine chaos by installing a simple shelf system just inside the door, keeping her snow blower front and center with shovels hanging within arm’s reach.
Consider a rolling cart for smaller items like ice scrapers and salt spreaders—you can wheel it outside when needed and back in for storage. Keep pathways clear by designating a spot for wet equipment to dry, preventing slip hazards and rust damage. If you’re storing a snow blower, position it with the chute facing outward for easy maneuvering. This thoughtful arrangement transforms frantic snow day scrambles into smooth, efficient routines that make winter maintenance far less stressful.
Material Considerations for Seasonal Flexibility
Choosing the right material for your extension shed makes all the difference when you’re planning to use it through every season. Each material brings its own personality to the table, and understanding these differences helps you create a space that works hard all year long.
Metal sheds are the workhorses of temperature extremes. They’re incredibly durable and stand up brilliantly to winter snow loads, but here’s the catch: they can turn into ovens in summer and ice boxes in winter without proper insulation. Sarah, a homeowner in Minnesota, solved this by adding foam board insulation to her metal extension shed, transforming it into a comfortable workshop even during harsh winters. Metal also resists moisture well, making it ideal if you’re storing temperature-sensitive items with added climate control.
Wood sheds offer natural insulation properties that help moderate temperature swings throughout the seasons. They’re easier to customize with windows, ventilation, or additional insulation between the studs. The trade-off? Wood requires more maintenance to handle seasonal moisture changes. Regular sealing protects against winter dampness and summer humidity, but many homeowners find the aesthetic warmth worth the extra care.
Vinyl and plastic sheds shine when it comes to low maintenance across seasons. They won’t rust, rot, or need repainting, and they handle moisture beautifully. However, they typically offer less insulation than wood and can become brittle in extreme cold. They’re perfect for homeowners wanting a three-season space without constant upkeep.
The bottom line? Match your material choice to your climate and intended use. If you’re planning heated winter workshops, invest in insulation regardless of material. For simple seasonal storage rotation, focus on weatherproofing and ventilation. Your extension shed should adapt as easily as your needs change throughout the year.
Budget-Friendly Modifications That Make the Biggest Impact
Transforming your extension shed across seasons doesn’t require expensive renovations. Start with weatherstripping—this simple addition around doors and windows costs under $30 but dramatically improves temperature control year-round. Sarah from Minnesota shares: “Adding basic weatherstripping to my garden shed made winter storage so much more practical. My tools don’t rust anymore!”
Reflective insulation panels offer another budget-conscious solution. These foil-backed foam boards slip behind existing wall panels for around $50-75 total and reflect heat in summer while retaining warmth in winter. They’re perfect for DIYers since installation requires only a utility knife and measuring tape.
Reclaimed materials work wonders too. Old pallets transform into vertical storage walls, while salvaged windows add natural light without the cost of new installations. Jake, a DIY enthusiast, converted shipping pallets into seasonal shelving: “I spent $15 on screws and stain, and now I can reconfigure my storage every few months.”
Paint makes a surprising difference. Light-colored interior paint reflects available light during darker months, making your shed more inviting when you need to access winter gear. A single gallon costs around $25 and brightens the entire space.
Finally, invest in quality hooks and magnetic strips rather than bulky storage units. They maximize wall space efficiently and adapt easily as your seasonal needs change. This approach keeps your extension shed flexible without locking you into permanent, costly modifications.
Transforming your extension shed through the seasons doesn’t have to be overwhelming or expensive. The beauty of seasonal adaptations lies in their flexibility—you can start small with just one or two simple changes and gradually build up your approach as you discover what works best for your lifestyle and space.
Even something as straightforward as swapping out storage containers, adding weather-appropriate shelving, or installing a few hooks can make a remarkable difference in how functional your shed feels throughout the year. Many homeowners find that once they make that first seasonal adjustment, they’re inspired to do more because they see the immediate impact on their daily routines.
The key is choosing an extension shed that gives you the foundation to work with. A well-built structure with proper ventilation, adequate space, and good weatherproofing makes seasonal transformations far easier to implement. When you start with quality construction, you’re not fighting against the elements—you’re working with a reliable space that adapts to your changing needs.
At Storage Sheds Outlet, we understand that your shed is more than just storage—it’s a solution that evolves with your life. Whether you’re protecting winter equipment, organizing spring gardening supplies, creating summer workshop space, or storing fall decorations, the right extension shed becomes an invaluable partner in managing your home throughout every season. Start with one transformation today, and you’ll wonder how you ever managed without this versatile space.
Looking for a storage sheds?
Browse our full range of storage sheds from authorized dealer brands. Free shipping to the continental US.