
How to Install Skylights in Your Shed Without Ruining Your Roof
Transform your shed from a dark storage space into a bright, inviting workspace by adding a skylight—a project that’s entirely achievable for DIY homeowners with the right approach. Natural light flooding through your shed roof not only makes the space more functional but can also reduce energy costs and create a more pleasant environment for hobbies, gardening prep, or workshop activities.
The key to successful skylight installation lies in proper planning and execution. Choose a skylight designed specifically for the pitch and material of your shed roof, whether you’re working with metal panels, asphalt shingles, or polycarbonate roofing. Position your skylight to maximize light while avoiding structural supports, and always account for proper flashing to prevent leaks—the number-one concern for DIYers tackling this project.
Much like installing windows in sheds, skylight installation requires attention to weatherproofing details, but the rewards are substantial. You’ll gain natural ventilation options, reduce reliance on artificial lighting, and significantly increase your shed’s usability. This guide walks you through every step, from selecting the right skylight type to cutting your first roof opening, ensuring your project succeeds without costly mistakes or frustrating leaks.
Why Your Shed Needs a Skylight (More Than You Think)
When most people think about adding a skylight to their shed, they imagine a little extra natural light—and that’s certainly one benefit. But the advantages go far beyond simply brightening up your workspace.
First, let’s talk about your wallet. A skylight dramatically reduces your need for electric lighting during daytime hours, which can add up to noticeable savings over time, especially if you spend hours in your shed workshop or hobby space. Natural light is also easier on your eyes when you’re working on detailed projects, reducing strain and fatigue.
Beyond lighting, skylights contribute to proper ventilation. Many skylight models come with venting options that allow hot air to escape naturally, keeping your shed cooler in summer without running fans constantly. This is particularly valuable if you’re storing temperature-sensitive items or spending long periods working inside.
There’s also the enjoyment factor that’s hard to quantify. Working under natural light simply feels better than being cooped up under fluorescent bulbs. It makes your shed feel less like a dark storage cave and more like a genuine extension of your living space.
“I installed a skylight in my woodworking shed last spring, and it completely transformed how I use the space,” shares Mike from Portland. “I used to avoid going out there on weekends because it felt so dungeon-like. Now I actually look forward to my projects. Plus, my wife noticed our electric bill dropped—bonus points for me!”
Finally, if you ever decide to sell your property, a well-lit, properly ventilated shed with skylights is a genuine selling point that can increase your home’s overall value.
Choosing the Right Skylight for Your Shed Roof
Types of Skylights That Work Best for Sheds
Choosing the right skylight for your shed depends on your needs and budget. Let’s break down your main options in simple terms.
**Fixed vs. Vented Skylights**
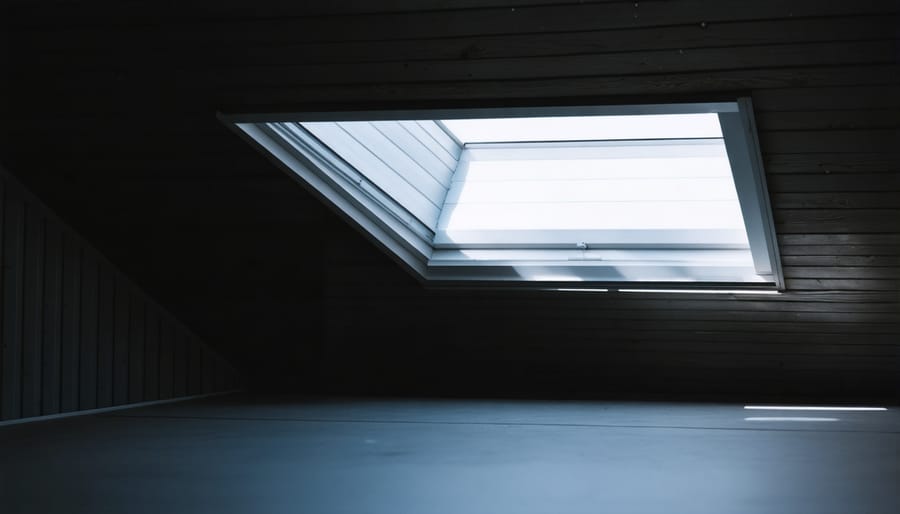
Fixed skylights stay sealed and simply let light in—perfect if you just want to brighten up your workspace. They’re typically more affordable and easier to install since there are no moving parts. Vented skylights, on the other hand, open to allow airflow, which is fantastic if your shed gets stuffy during summer months or if you’re working with materials that produce fumes. The tradeoff? Vented models cost more and require more careful weatherproofing.
**Dome vs. Flat Options**
Dome skylights have that classic bubble shape that naturally sheds water and snow—a real advantage if you live in areas with heavy weather. They’re self-cleaning to some extent and less prone to leaks. Flat skylights offer a sleeker, more modern look and sit closer to your roof line. However, they may require more maintenance to prevent debris buildup.
**Polycarbonate vs. Acrylic Materials**
Polycarbonate is the tough choice—nearly impossible to break and excellent for hail-prone areas. It’s also more forgiving during installation if you’re new to DIY projects. Acrylic provides clearer, glass-like transparency and won’t yellow as quickly over time, but it’s more brittle and scratches easier. One DIY enthusiast shared that polycarbonate was “perfect for my woodworking shed where I occasionally bump things around.” For most shed applications, polycarbonate offers the best balance of durability and value.
Matching Your Skylight to Your Roof Panel Material
Choosing the right skylight for your roof material prevents headaches down the road. Each roofing type has unique characteristics that affect installation methods and skylight compatibility.
**Metal roofs** are skylight-friendly thanks to their durability and ease of cutting. Curb-mounted skylights work best here, creating a weather-tight seal. If you’re working with metal panels, check out our guide on metal roofing installation for foundational techniques.
**Asphalt shingle roofs** offer excellent flexibility. Self-flashing skylights integrate seamlessly by tucking beneath existing shingles, creating natural water diversion. The key is working with your shingle layout rather than against it.
**Corrugated plastic panels** require gentle handling—they’re lightweight but can crack under pressure. Use specialized mounting brackets designed for corrugated profiles, and never overtighten screws. Pre-drill holes to prevent splitting.
**Wood roofs** need extra moisture protection. Apply waterproof underlayment generously around the skylight opening, and consider raised curbs to keep water flowing away from vulnerable wood fibers.
One homeowner shared: “I initially worried my metal roof was too tricky, but matching the right flashing kit made installation straightforward.” The right pairing truly simplifies everything!
Size and Placement: Getting the Light Where You Need It
Getting your skylight size right makes all the difference between a dimly lit space and a bright, welcoming shed. A good rule of thumb is to aim for skylights that total about 5-15% of your floor space—too small won’t provide enough light, while oversized skylights can create heat issues and weaken your roof structure.
Position your skylight where you actually work or spend time. For potting sheds, place it directly above your workbench. Storage sheds benefit from central placement to illuminate the entire space evenly. Always avoid placing skylights near roof edges where structural support is minimal, and steer clear of areas directly under tree branches that could cause damage.
Consider the sun’s path too—south-facing skylights deliver consistent light throughout the day, while north-facing options provide softer, more diffused illumination. One homeowner told us she positioned her skylight over her crafting corner, transforming it from a gloomy spot into her favorite workspace. Think about how you’ll use your shed, and let that guide your placement decisions for the best results.
Tools and Materials You’ll Need
Before you climb up to start your skylight installation project, let’s gather everything you’ll need. Having the right tools on hand will make your project safer and more enjoyable.
**Essential Safety Equipment:**
Start with a sturdy extension ladder rated for your weight plus materials. Safety glasses protect your eyes from debris, while work gloves prevent cuts from sharp metal edges. A safety harness is crucial when working on pitched roofs—this isn’t the place to cut corners.
**Measuring and Marking Tools:**
You’ll need a tape measure for precise measurements and a carpenter’s pencil to mark cutting lines. A speed square helps ensure your skylight frame sits perfectly aligned with your roof panels. A level confirms everything is straight before you secure it permanently.
**Cutting and Fastening Tools:**
For metal roofing, tin snips or aviation snears make clean cuts through panels. A cordless drill with assorted bits drives screws efficiently. You’ll also need a caulking gun for applying sealant—this prevents those dreaded leaks that can ruin your hard work.
**Specialized Items:**
Self-tapping roofing screws with rubber washers create weathertight seals. Butyl tape and high-quality roofing sealant are non-negotiable for waterproofing. Metal flashing forms a protective barrier around your skylight opening.
**Consider Renting:**
If you don’t own a circular saw with a metal-cutting blade, most hardware stores rent them affordably. Scaffolding can also be rented for larger projects, offering safer access than ladders alone.
Planning Your Installation: The Critical First Steps
Finding the Perfect Spot (Without Hitting Rafters)
Before you cut a single opening, you’ll need to map out your shed’s hidden framework. The key to successful skylight installation is finding those rafters—they’re your structural allies, not obstacles to avoid.
Start with a simple stud finder, slowly scanning your ceiling from inside the shed. Mark each rafter location with painter’s tape so you can visualize the spacing. Most sheds have rafters running every 16 or 24 inches, creating a predictable pattern. If your shed doesn’t have interior paneling yet, you’re in luck—you can see exactly where everything sits.
Here’s a common mistake to sidestep: Don’t assume your skylight can go anywhere. Position it *between* two rafters, not directly over one. Measure your skylight’s rough opening dimensions first, then confirm you have adequate clearance. Think about the sun’s path too—a skylight facing south floods your space with natural light, while north-facing options provide gentler, more consistent illumination.
Pro tip from experienced DIYers: Hold a flashlight against the roof from inside on a sunny day. Light penetrating through nail holes will reveal rafter locations if your stud finder gives inconsistent readings.
Consider furniture placement and workflow inside your shed. You’ll want that natural light highlighting your workbench or potting station, not illuminating a forgotten corner piled with empty paint cans.
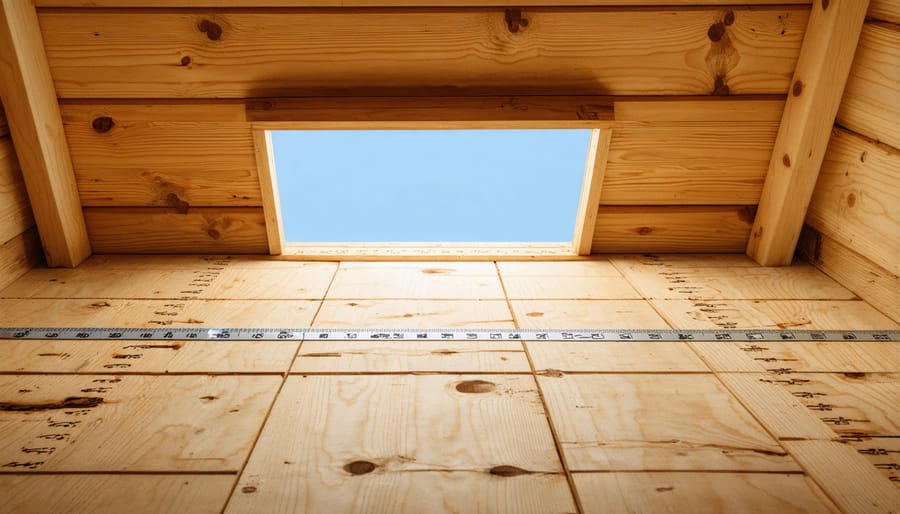
Measuring and Marking Your Opening
Precision is everything when it comes to skylight installation—remember the golden rule: measure twice, cut once! Start by locating the exact position where your skylight will sit, considering how natural light will enter your space throughout the day. Use a tape measure to mark the opening dimensions on the interior ceiling, then transfer these measurements to the exterior roof using a drill to create pilot holes at each corner.
Before making any cuts, double-check your measurements against the skylight’s rough opening specifications from the manufacturer. Add an extra quarter-inch to account for any adjustments, but never exceed recommended dimensions. Use a carpenter’s square to ensure your corners are perfectly perpendicular—uneven angles can cause serious sealing problems down the road.
Pro tip from experienced DIYers: photograph your measurements and create a simple sketch with all dimensions labeled. This visual reference prevents costly mistakes when you’re up on the roof. Mark your cut lines clearly with chalk or a marker, and have a helper verify measurements from both inside and outside before you pick up that saw.
Understanding Weatherproofing Before You Cut
Before you pick up that saw, let’s talk about protecting your shed from water damage—the number one concern when cutting into any roof. Think of your roof like a carefully designed waterslide: water needs a clear, unobstructed path to flow down and off. Different roof materials handle water flow differently. Metal panels channel water along their ridges, while asphalt shingles rely on overlapping layers. When you cut a hole for your skylight, you’re interrupting that flow, which means you’ll need proper flashing—metal or rubber barriers that redirect water around your skylight opening. Just like waterproofing your shed foundation prevents ground moisture from creeping up, good flashing keeps rain from sneaking in through your roof. Planning your flashing strategy before cutting saves you from discovering leaks during the next storm.
Step-by-Step Installation Process
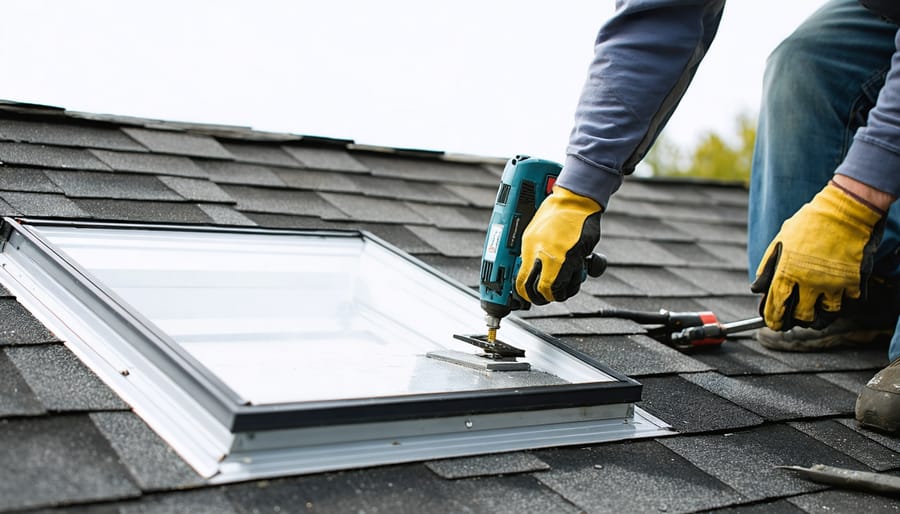
Cutting the Roof Opening Safely
This step can feel intimidating, but with the right approach, you’ll make clean, precise cuts safely. First, let’s talk safety: wear safety goggles, gloves, and a dust mask. Ensure you’re securely positioned with proper fall protection—never rush this part.
Before cutting anything, double-check your measurements from inside the shed. Mark your cutting line clearly on the roof surface using a chalk line or marker. For metal roofing, use tin snips or a metal-cutting circular saw blade at low speed to prevent jagged edges. Work slowly and support the material as you cut to avoid dangerous vibrations.
With corrugated panels, cut at the valley (low point) rather than the ridge for easier flashing installation later. Shingle roofs require a reciprocating saw or circular saw—cut carefully to avoid damaging surrounding shingles you’ll need intact.
Here’s a confidence booster: start with a small pilot hole using a drill, then work outward to your marked lines. This gives you control and lets you stop if something feels off. Many first-timers worry about “there’s no going back,” but remember—you’ve measured twice, and flashing will cover minor imperfections. Take your time, and the opening will turn out great.
Framing the Opening for Structural Support
Proper framing is the foundation of a leak-free, long-lasting skylight installation. Think of it as creating a reinforced “window” in your roof—you’ll need to redirect the structural load around the opening while providing a solid anchor point for your skylight.
Start by marking your opening dimensions on the roof rafters or trusses. You’ll need to install headers (horizontal beams) at both the top and bottom of the opening to carry the weight that the removed section would have supported. These headers should be the same depth as your existing rafters and fastened securely with joist hangers or hurricane ties. Many DIYers underestimate this step, but skipping proper framing and structural support can lead to sagging roofs or even collapse over time.
Next, add jack studs (vertical supports) on both sides of the opening if your skylight spans more than one rafter space. Double-check that everything is level and square—a twisted frame will prevent your skylight from sealing properly.
Why does this matter? A well-framed opening distributes weight evenly, prevents roof sag, and creates the stable platform your skylight needs to maintain its weatherproof seal for years to come. Take your time here—it’s much easier than fixing water damage later!
Installing Flashing and Creating a Watertight Seal
Flashing is your skylight’s first line of defense against water infiltration, so getting this step right is absolutely crucial. Think of it as creating a carefully orchestrated waterfall system that directs moisture away from your opening.
Start by understanding the golden rule: flashing should always overlap in a shingle-like fashion, with upper pieces overlapping lower ones. This ensures water flows down and out, never finding a pathway inside. For corrugated metal panels, you’ll need specialized step flashing that conforms to the panel profile—standard flat flashing won’t create a proper seal on those ridges and valleys.
Begin installation at the bottom edge of your skylight opening. Install the bottom flashing piece first, tucking it at least 4 inches under your existing roofing material on the sides and securing it according to manufacturer specifications. Next, install side flashings that overlap the bottom piece by at least 3 inches. Finally, add the top flashing, which should slide under your roof panels above and overlap the side pieces.
A common mistake many DIYers make is insufficient overlap—skimping even an inch can create leak pathways. Another pitfall is over-tightening screws through the flashing, which can create dimples where water pools. Snug is sufficient; you’re not trying to compress the metal.
For asphalt shingle roofs, weave the step flashing between each shingle course as you work upward. With metal roofing, use compatible flashing material to prevent galvanic corrosion—mixing metals accelerates rust.
Apply a continuous bead of high-quality roofing sealant along all flashing seams for extra protection, but remember: flashing design matters most, sealant is backup insurance.
Mounting the Skylight and Final Securing
With your flashing properly installed, you’re ready to position the skylight unit. Carefully lift the skylight onto the curb, ensuring it’s centered and square. Most skylight units come with pre-drilled mounting holes—align these with your curb frame before securing.
Start by inserting fasteners at opposite corners first, tightening them just enough to hold the unit in place without fully compressing the gasket. This allows for minor adjustments. Work your way around the perimeter, placing screws every 6-8 inches as recommended by your manufacturer. Use stainless steel or coated fasteners to prevent rust—a common problem that homeowner Jake from Vermont learned the hard way after his first skylight installation leaked within a year.
Apply even pressure when tightening to avoid warping the frame or cracking the glazing. You’ll know you’ve achieved the right tension when the gasket compresses slightly but doesn’t bulge out. Give the skylight a gentle shake test—there should be zero movement.
Finally, run a bead of high-quality exterior caulk along the outer edge where the skylight meets the curb for extra weatherproofing. This belt-and-suspenders approach ensures your new skylight stays watertight through years of weather.
Interior Finishing Touches
Once your skylight is weatherproofed from above, turn your attention inside. Start by trimming the interior opening with pre-finished wood or PVC trim that matches your shed’s aesthetic. These materials frame the skylight neatly while hiding rough cuts. Don’t forget insulation—fill gaps around the frame with spray foam or fiberglass to prevent heat loss and drafts. A clean interior finish not only looks professional but also protects against moisture infiltration. Many DIYers find that adding a simple painted trim transforms their skylight from functional to beautiful, creating a polished focal point that brightens their workspace for years to come.
Common Problems and How to Fix Them
Even with careful installation, you might encounter a few bumps along the way. The good news? Most skylight issues are fixable with some simple troubleshooting.
**Leaks around the skylight** are the most common concern, and they’re often caused by improper flashing or sealant application. If you notice water dripping during rain, first check that your flashing overlaps correctly—each piece should layer over the one below it, creating a shingled effect that directs water downward. Reapply roofing sealant to any gaps or cracks, paying special attention to corners where water tends to pool. Sometimes what looks like a leak is actually condensation, so wipe the area dry and monitor whether moisture returns during dry weather.
**Condensation buildup** happens when warm interior air meets the cold skylight surface. This is especially common in sheds used as workshops or studios. Installing a small battery-operated vent fan or simply cracking a window during use can dramatically improve air circulation. Consider adding weatherstripping around the skylight frame to reduce the temperature differential.
**Rattling or whistling sounds** during windy conditions usually mean your skylight isn’t secured tightly enough. Check that all mounting screws are snug (but not overtightened, which can crack the frame). Adding a bead of flexible sealant between the frame and roof panel can dampen vibrations while maintaining the seal.
**Improper sealing** becomes obvious when you feel drafts or see daylight peeking through gaps. Run your hand around the interior frame on a sunny day—any light or air movement indicates areas needing attention. Apply butyl tape or additional sealant to these spots, working from the inside for immediate improvement.
Maintaining Your Shed Skylight for Years of Natural Light
A well-maintained skylight will flood your shed with beautiful natural light for years to come. The good news? Keeping it in top shape requires just a little attention throughout the year.
**Your Seasonal Maintenance Checklist:**
**Spring and Fall:** Clear debris like leaves and branches from around the skylight. Gently clean both interior and exterior surfaces with mild soap and water—avoid abrasive cleaners that can scratch the material. Inspect the sealant around the edges for any cracks or gaps.
**Winter:** After heavy snow, carefully remove excess buildup to prevent unnecessary weight stress. Check for any condensation inside, which might indicate seal problems.
**Summer:** Verify that flashing remains securely attached after storm season.
**Watch for These Warning Signs:**
Discoloration or yellowing of the skylight material often signals UV damage. Water stains on surrounding wood, dripping during rain, or foggy appearance between double-pane layers all indicate seal failure requiring prompt attention.
One shed owner shared: “I check my skylight every time I clean my gutters—it’s become part of my routine, and I caught a small seal issue before it became a leak!”
Address minor issues quickly to avoid costly repairs down the road.
Adding a skylight to your shed roof is absolutely within reach for DIY enthusiasts willing to take their time and follow proper techniques. You’ll transform a dark, stuffy storage space into a bright, inviting workshop or hobby area while improving ventilation and extending the usability of your shed throughout the day. The satisfaction of completing this upgrade yourself—and the money you’ll save—makes it a rewarding weekend project.
Remember to measure twice, seal thoroughly, and don’t rush the flashing details. These simple practices prevent the most common installation issues. If you need quality materials or are considering a new shed that’s skylight-ready from the start, Storage Sheds Outlet offers both pre-built options and accessories designed to work seamlessly together. With the right preparation and confidence in your abilities, you’re ready to bring natural light into your shed!