
Keep Your Shed Cool Without Breaking the Bank
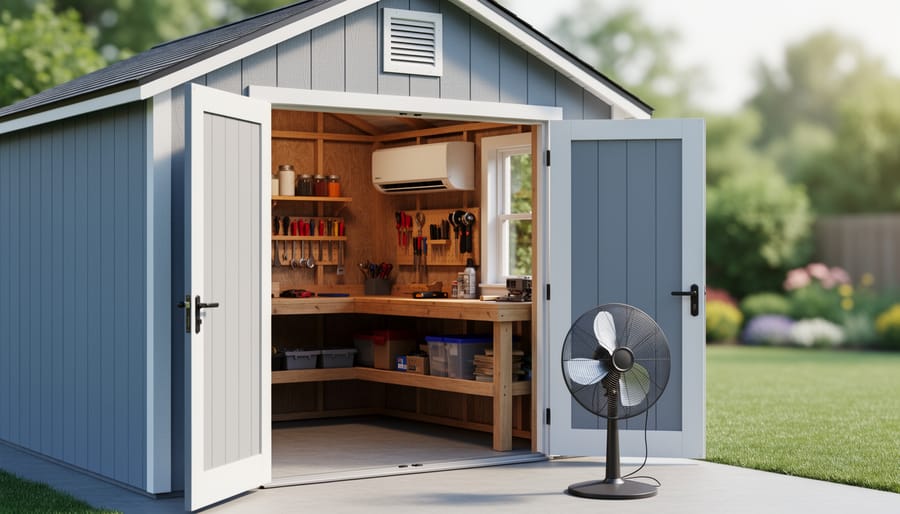
Transform your shed into a comfortable, year-round workspace by understanding your cooling options and matching them to your specific needs. A sweltering shed isn’t just uncomfortable—it’s unusable during summer months when temperatures can soar 20-30 degrees above outdoor readings, making tools too hot to handle and hobbies impossible to enjoy.
Start by assessing your shed’s insulation and ventilation before investing in any cooling system. Poor insulation means you’ll waste money running an air conditioner that fights against heat constantly pouring through walls and roof. Installing basic insulation and adding ridge vents or gable vents creates the foundation for effective cooling.
Choose your cooling method based on how you use the space. Window-mounted AC units work perfectly for weekend workshops where you need quick cooling for 4-8 hours. Mini-split systems offer superior efficiency for daily use as home offices or studios. Portable air conditioners provide flexibility if you’re renting or want to move the unit between locations.
Calculate your BTU requirements using your shed’s square footage—typically 20 BTUs per square foot—then add 30% if your shed has poor insulation or sits in direct sunlight. This prevents underpowered units from running constantly without achieving comfortable temperatures. Most homeowners find solutions between portable fans costing under $100 to mini-split installations around $1,500 that genuinely transform their shed experience.
Why Your Shed Needs More Than Just a Window
Many shed owners assume cracking open a window or leaving the door ajar provides enough ventilation, but this common misconception can lead to serious problems. Without proper air circulation and temperature control, your shed becomes more than just uncomfortable—it can actually damage your belongings and limit how you use the space.
During summer months, sheds can become ovens, with internal temperatures soaring 20-30 degrees above outdoor readings. This extreme heat warps wooden tools, melts plastic containers, and can even damage electronics or paint supplies you’re storing. If you’re hoping to transform your shed into a workshop or hobby space, working in 100-plus degree heat simply isn’t practical or safe.
Moisture problems present another challenge. Poor ventilation traps humidity inside, creating the perfect environment for mold, mildew, and rust. Garden tools develop corrosion, cardboard boxes deteriorate, and that musty smell becomes nearly impossible to eliminate. Even in winter, condensation from temperature differences can cause similar damage.
Take Sarah from Oregon, who stored her woodworking equipment in an unventilated shed. “I thought opening the window occasionally was enough,” she explains. “But after one humid summer, I found rust on my table saw and mold growing on stored lumber. It was a costly lesson about proper climate control.”
A single window simply cannot move enough air to combat these issues. Sheds need a comprehensive approach to temperature management—combining ventilation, insulation, and in many cases, active cooling systems. The good news? Solutions exist for every budget and skill level, from simple exhaust fans to full air conditioning units that make your shed genuinely comfortable year-round.
Understanding Your Shed’s Cooling Needs
Shed Size and Insulation Matters
Before you invest in an air conditioning unit, understanding your shed’s size and insulation is crucial to choosing the right cooling solution and keeping energy costs manageable.
Shed size directly impacts how powerful your AC unit needs to be. A compact 8×10 shed requires far less cooling capacity than a spacious 12×20 workspace. Generally, you’ll need about 20 BTUs (British Thermal Units) per square foot of space. So a 100 square foot shed needs a 2,000 BTU unit, while a 200 square foot shed requires 4,000 BTUs. Buying an undersized unit means it’ll run constantly without adequately cooling the space, while an oversized unit wastes energy and money.
Insulation makes a dramatic difference in efficiency. An uninsulated shed loses cool air quickly, forcing your AC to work overtime. One DIY enthusiast shared how adding basic R-13 insulation to his workshop shed reduced his cooling costs by nearly 40 percent. Even simple improvements like weather stripping around doors and reflective barriers in the roof can significantly improve temperature control. If your shed lacks insulation, consider adding it before purchasing an AC unit—you might even downsize your cooling needs and save on both the unit cost and ongoing electricity bills.
How You Use Your Shed Changes Everything
Before you invest in cooling equipment, think about how you actually use your space. A shed storing garden tools and holiday decorations rarely needs more than basic ventilation to prevent mustiness. The occasional breeze through a window or vent is usually sufficient.
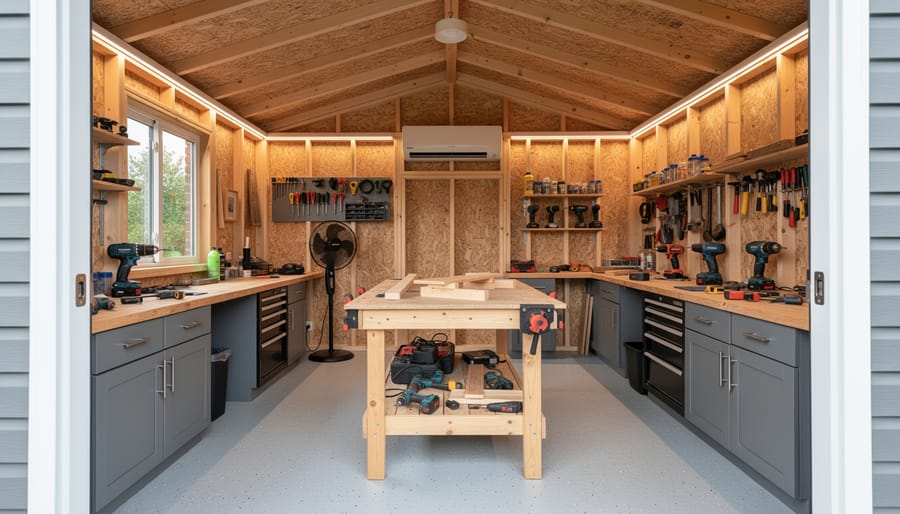
However, if you’re spending hours working in your shed, your cooling needs change dramatically. Take Sarah, a watercolor artist who converted her 10×12 shed into a painting studio. She quickly discovered that summer afternoons made it impossible to work comfortably. After installing a mini-split AC unit, she gained year-round access to her creative space.
Similarly, Mike transformed his shed into a shed home office for his remote work setup. With computer equipment generating additional heat and daily eight-hour sessions, he needed consistent temperature control. A portable AC unit gave him the flexibility to cool the space during work hours without the permanent installation commitment.
Workshop users face another scenario entirely. If you’re running power tools occasionally on weekends, a combination of good ventilation and a fan might be plenty. But woodworkers spending extended time sanding and finishing projects need better air quality control and consistent cooling for both comfort and proper material curing.
Climate and Location Considerations
Your shed’s location plays a huge role in determining the best cooling strategy. If you’re dealing with hot, humid climates like the Southeast, you’ll likely need a system that tackles both temperature and moisture control—a portable AC unit with dehumidification features often works wonders. Meanwhile, homeowners in dry desert regions might find that an evaporative cooler provides excellent relief at a fraction of the cost.
Sun exposure matters too. A shed baking in direct afternoon sun will naturally run hotter than one shaded by trees or positioned on the north side of your property. Before investing in air conditioning, consider whether simple solutions like reflective roof coatings, strategically placed awnings, or even planting shade trees could reduce your cooling needs significantly. One DIY enthusiast in Arizona shared how adding a simple sunshade reduced his shed’s interior temperature by 15 degrees, making his existing fan setup finally effective. Understanding your specific conditions helps you avoid over-investing in cooling power you don’t actually need.
Budget-Friendly Air Conditioning Options That Actually Work
Passive Ventilation: The Foundation of Shed Cooling
Before investing in an air conditioning unit, it’s worth exploring passive ventilation—the most cost-effective way to keep your shed comfortable. Natural airflow can reduce temperatures by 10-15 degrees without any electricity costs, and it’s often all you need for seasonal use.
Ridge vents sit at the peak of your roof, allowing hot air to escape naturally. Since heat rises, these create the perfect exit point for trapped warmth. Pair them with soffit vents installed under your roof’s overhang, and you’ve created a continuous airflow system. Cool air enters through the soffits, travels upward as it warms, and exits through the ridge—this is called the stack effect, and it works beautifully without any moving parts.
Gable vents offer another excellent option, especially if your shed has a triangular gable end. These louver-style vents are easy to install—simply cut an opening, secure the vent with screws, and seal around the edges. They work well for sheds where ridge vents aren’t practical.
For boosted ventilation, consider turbine vents. These spinning fixtures harness wind to pull air out of your shed. Even the slightest breeze gets them rotating, creating impressive airflow. One homeowner told us their workshop went from stifling to comfortable just by adding two turbine vents and opening a window on opposite ends.
Installation is straightforward for most DIYers. Measure carefully, use a quality saw for clean cuts, and always seal around openings to prevent water intrusion. For many shed owners, this foundation of passive cooling eliminates the need for air conditioning altogether.
Exhaust Fans and Solar-Powered Solutions
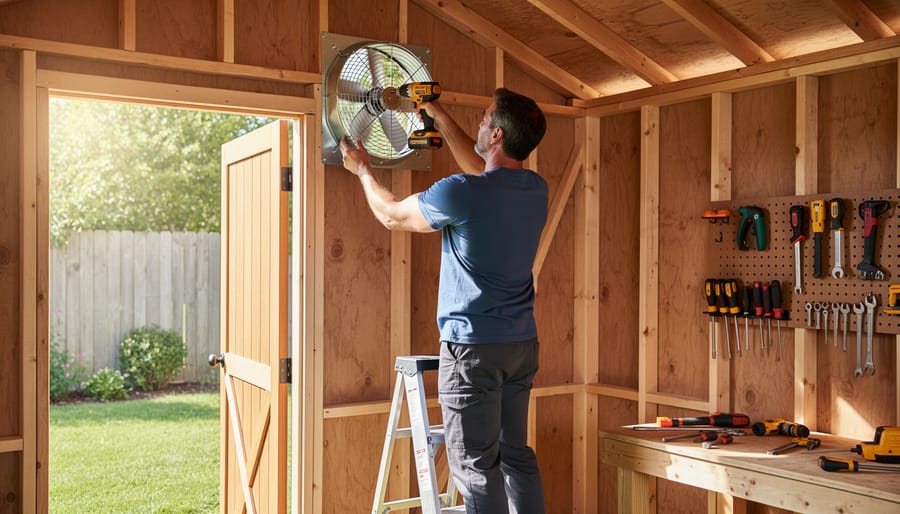
Exhaust fans offer an excellent middle ground between passive ventilation and full air conditioning, making them perfect for budget-conscious homeowners. These active ventilation solutions work by pulling hot air out of your shed, creating negative pressure that draws in cooler air through vents or open windows. The result? A noticeable temperature drop without the hefty utility bills.
For basic setups, a standard electric exhaust fan costs between $30-$100 and requires a nearby power source. Most 120-volt fans pull 50-150 watts, adding just a few dollars monthly to your electricity bill. Installation is straightforward for DIY enthusiasts – simply cut an opening near the roof line, mount the fan, and wire it to a power outlet or dedicated circuit.
Solar-powered attic fans present an even more economical long-term solution. These self-contained units cost $150-$400 upfront but eliminate ongoing electricity costs entirely. They’re ideal for remote sheds without electrical service and work most efficiently during the hottest parts of the day when you need cooling most. Installation requires only basic tools and takes about an hour.
Consider pairing exhaust fans with temperature-controlled vents or thermostat-controlled switches that automatically activate when temperatures climb above your set point. This automation ensures your shed stays comfortable while preventing energy waste. One workshop owner shared that adding a thermostat-controlled exhaust fan dropped his shed temperature by 15 degrees while costing less than $5 monthly to operate.
Portable and Window AC Units for Serious Cooling
When simpler cooling methods just aren’t cutting it, it’s time to consider a proper air conditioning unit. This is especially true if you’re using your shed as a home office, art studio, or workshop where you’ll spend several hours at a time. The investment makes sense when comfort directly impacts productivity and enjoyment.
Portable AC units are the most shed-friendly option for most homeowners. They’re easy to install, require no permanent modifications, and you can move them if needed. For sheds up to 150 square feet, look for a unit with 8,000-10,000 BTUs. Larger spaces up to 300 square feet need 12,000-14,000 BTUs. One happy shed owner shared that adding a 10,000 BTU portable unit transformed her craft room from unbearable to perfectly comfortable, even during July heat waves.
Window units offer another practical solution if your shed has a suitable window. They’re typically more energy-efficient than portable models and cost less upfront. Just ensure your window can support the weight and that you can properly seal around the unit to prevent air leaks.
The main challenge is power supply. Most AC units need dedicated 110V or 220V circuits. Before purchasing, verify your shed’s electrical capacity. If you only have basic lighting circuits, you’ll need an electrician to upgrade your power. Also consider adding insulation first since cooling an uninsulated shed is like air conditioning the outdoors. Plan for proper drainage too, as AC units produce condensation that needs somewhere to go.
Evaporative Coolers: The Middle Ground
Evaporative coolers, often called swamp coolers, offer a budget-friendly middle ground between basic fans and full air conditioning systems. These units work by pulling warm air through water-saturated pads, causing the water to evaporate and naturally cool the air by 15-40 degrees before circulating it throughout your shed.
They shine in hot, dry climates where humidity levels stay below 50 percent—think Arizona, Nevada, and similar regions. The drier the air, the more effective the cooling. However, they’re not ideal for humid areas like the Southeast, where they’ll add unwanted moisture and struggle to provide relief.
The advantages are compelling: they cost about half as much to purchase and operate compared to traditional AC units, use up to 75 percent less electricity, and add beneficial moisture in arid environments. Installation is straightforward for DIYers—most portable models simply need a window opening for exhaust and a standard electrical outlet.
The downside? They require regular maintenance, including cleaning pads and changing water, and they need a constant water supply. One homeowner in New Mexico shared that her portable evaporative cooler transformed her craft shed into a comfortable workspace for under $200, though she fills the water tank twice weekly during peak summer.
Step-by-Step: Installing Your Shed Air Conditioning System
Preparing Your Shed for Installation
Before you start cooling your shed, a bit of groundwork will ensure a smooth installation and safe operation. Think of this prep stage as setting yourself up for success—it’s worth the effort!
First, assess your electrical requirements. Most portable AC units need a standard 120-volt outlet, but larger systems require 240-volt service and potentially a dedicated circuit. Check your shed’s current electrical setup and consider hiring a licensed electrician if upgrades are needed. Safety first!
Next, evaluate your shed’s structure. Does it have proper insulation? Gaps around doors and windows will make any cooling system work overtime. Seal air leaks with weatherstripping and consider adding insulation if your walls are bare. This simple step can cut cooling costs significantly.
For installation, you’ll typically need basic tools: a drill with bits, screwdriver set, level, measuring tape, and possibly a jigsaw for window-mounted units. Have a helper on hand—AC units can be heavy and awkward to position alone.
Finally, ensure adequate ventilation space around your chosen unit and clear the installation area of obstructions. One homeowner shared that simply clearing clutter beforehand made their installation go three times faster.
Adding Ventilation Points
Before installing any AC system, proper ventilation points are essential for maintaining healthy airflow in your shed. Start by planning your vent placement strategically. Position intake vents low on the cooler side of your shed (typically north-facing) and exhaust vents high on the opposite wall. This creates natural convection that helps your cooling system work more efficiently.
When cutting vent holes, measure twice and cut once. Mark your opening clearly, then drill pilot holes at each corner before using a jigsaw for clean cuts. Always wear safety goggles and a dust mask during this process. For metal sheds, use metal-cutting blades and file any sharp edges smooth to prevent injury.
Size matters when selecting vents. A general rule is one square foot of ventilation per 150 square feet of shed space. Choose vents with built-in louvers or screens to keep insects and debris out while allowing air to flow freely.
Secure your vents properly to withstand weather conditions. Apply a generous bead of exterior-grade silicone caulk around the edges before fastening with corrosion-resistant screws. This prevents water infiltration during storms while maintaining an airtight seal when your AC is running. Many homeowners find that investing time in proper ventilation installation pays off with lower cooling costs and better comfort year-round.
Setting Up Your Cooling Unit
Once you’ve chosen your cooling unit, proper installation makes all the difference in performance and energy efficiency. Start by selecting the best location—typically a wall or window position that allows easy drainage and outdoor airflow. For window units, you’ll need to create a secure opening if one doesn’t exist, ensuring the frame can support the unit’s weight.
Sealing gaps is crucial to prevent cooled air from escaping and hot air from entering. Use weatherstripping around window units and foam insulation to fill any spaces. For mini-split systems, the installation requires drilling a small hole through your shed wall for the refrigerant lines—consider hiring a professional for this step if you’re not comfortable with electrical work.
Don’t forget to weatherproof the exterior penetrations with silicone caulk to prevent water damage and pest entry. Many DIYers find success with portable units since they require minimal installation—just position near a window or door for the exhaust hose and ensure proper ventilation.
Before powering up your unit, double-check that your shed’s electrical system can handle the load. Most AC units need dedicated circuits to operate safely and efficiently.
Boosting Your Results: Insulation and Air Quality Tips
Insulation Upgrades That Make a Real Difference
Before installing air conditioning in your shed, investing in proper insulation can dramatically reduce your cooling costs and make your AC unit work more efficiently. Even basic insulation upgrades deliver impressive results.
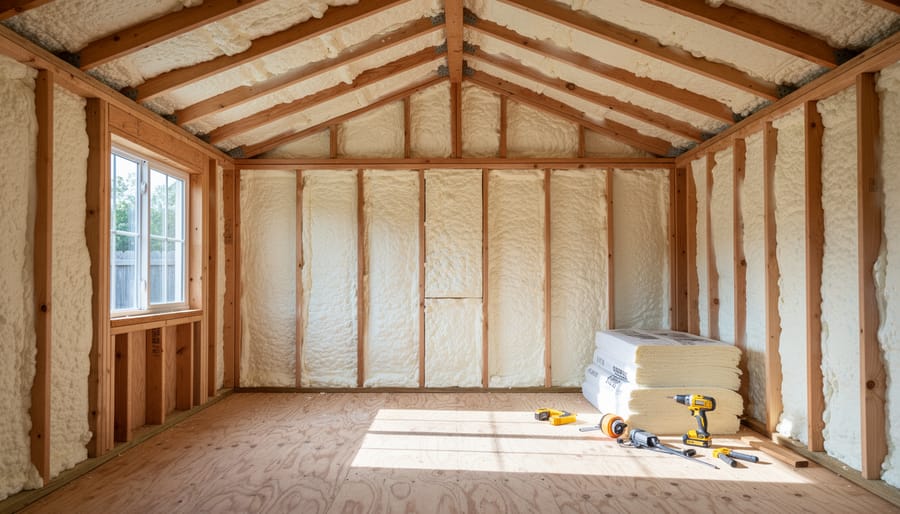
Start with the walls by adding fiberglass batts or foam board insulation between studs. This creates a thermal barrier that keeps cool air inside where it belongs. For sheds with exposed walls, consider affordable reflective insulation that’s easy to install yourself.
The roof is your biggest heat source, so don’t overlook it. Adding a layer of rigid foam insulation or reflective barrier underneath reduces heat transfer by up to 70 percent. One DIY enthusiast shared that insulating his shed roof dropped interior temperatures by 15 degrees before even turning on the AC.
Don’t forget the door and windows. Weather stripping costs just a few dollars but seals gaps that waste energy. For windows, reflective film blocks heat while maintaining natural light.
These simple improvements mean your air conditioner runs less frequently, saving you money every month while keeping your workspace consistently comfortable throughout summer.
Keeping Air Fresh and Moisture-Free
Once you’ve added air conditioning to your shed, keeping the air fresh and moisture-free becomes crucial for maintaining a healthy, comfortable space. Air conditioners naturally remove some moisture during cooling, but depending on your climate and shed usage, you might need extra help.
Consider adding a dehumidifier if you notice condensation on windows or a musty smell, especially in humid regions. A small portable dehumidifier works wonderfully in most sheds and can prevent that clammy feeling that undermines all your cooling efforts. For DIY enthusiasts using the space as a workshop, controlling humidity also protects your tools from rust and wood projects from warping.
Don’t overlook air quality either. A simple air filter or purifier keeps dust, pollen, and odors at bay, making your shed genuinely pleasant to spend time in. Sarah, a homeowner who converted her shed into a crafting studio, shares: “Adding a basic air purifier was a game-changer. I can spend hours painting without feeling stuffy.”
To prevent mold and mildew, ensure your AC unit’s drainage system works properly and check it regularly. Keep the shed clean, avoid storing wet items inside, and maintain good air circulation even when the AC isn’t running. These simple steps protect your investment and create a space you’ll actually want to use year-round.
Common Mistakes to Avoid When Cooling Your Shed
Even the most enthusiastic DIYers can hit some bumps when cooling their shed. Let’s walk through the most common pitfalls so you can dodge them and keep your project running smoothly.
The biggest mistake? Choosing an undersized air conditioning unit. Many homeowners underestimate their shed’s cooling needs, especially if there’s limited insulation or large windows. A unit that’s too small will run constantly, drive up your electricity bill, and still leave you sweating. Take time to properly calculate your shed’s square footage and consider factors like ceiling height, insulation quality, and sun exposure before purchasing.
Poor ventilation planning trips up many DIYers too. Placing your AC unit where it blocks airflow or positioning exhaust vents too close to intake areas creates a frustrating cycle where you’re essentially cooling the same hot air. Think about natural air circulation patterns and ensure there’s adequate space around your unit for proper function.
Power supply issues often surprise people mid-project. Running an extension cord from your house might seem convenient, but it’s both dangerous and inefficient for most AC units. Many cooling systems need dedicated circuits with proper amperage. Check your electrical capacity before committing to a specific unit, and don’t hesitate to call an electrician if you’re unsure.
Condensation problems catch folks off guard, particularly in humid climates. Without proper drainage planning, you’ll end up with puddles, moisture damage, or even mold. Always install a drip pan and ensure condensate can drain away from your shed’s foundation.
Finally, resist the temptation to over-invest in fancy features you won’t use. Smart controls and multiple cooling zones sound appealing, but a straightforward, appropriately sized unit often delivers better value for typical shed applications.
Real Shed Owners Share What Worked for Them
Nothing beats hearing from people who’ve actually tackled the challenge of cooling their sheds. Here are three real-world solutions that worked beautifully.
Mark transformed his 10×12 workshop shed in Texas, where summer temperatures regularly hit 100°F. “I installed a 10,000 BTU window unit in a custom-framed opening,” he shares. “Game changer! I added insulation first, which made all the difference. Now I can work on woodworking projects comfortably all afternoon instead of hiding indoors by noon.”
Jennifer created a peaceful she-shed retreat in her backyard using a more budget-friendly approach. “I went with a combination of a solar-powered attic fan and a portable evaporative cooler,” she explains. “My space dropped from unbearable to pleasant without breaking the bank on electricity. I spend hours reading and crafting in there now, even during summer.”
Carlos solved his Arizona storage shed dilemma differently. “I needed to protect temperature-sensitive items but didn’t want the expense of AC,” he says. “Radiant barrier insulation on the roof, strategic ventilation placement, and reflective roof coating brought the interior temperature down by about 25 degrees. My tools and equipment stay protected, and it cost me just a weekend of work.”
These examples show there’s no one-size-fits-all solution. Your perfect cooling strategy depends on your climate, budget, and how you plan to use your space.
Cooling your shed doesn’t have to be complicated or break the bank. Whether you’re transforming your space into a productive workshop, creative studio, or relaxing retreat, the right cooling solution is within reach. Start by honestly assessing your needs: How often will you use the space? What’s your budget? Do you have power access? These answers will guide you toward the perfect solution, from simple ventilation improvements to portable AC units or permanent installations.
Remember, even basic improvements like adding vents, fans, or reflective insulation can dramatically improve comfort levels during hot months. One of our customers, Mike from Arizona, started with just a basic exhaust fan and insulation upgrade before eventually adding a window unit the following summer. His gradual approach kept costs manageable while making his woodworking shed usable year-round.
The key is taking that first step. Measure your shed, calculate your cooling needs, and choose a solution that fits both your lifestyle and wallet. Effective shed cooling isn’t just for those with unlimited budgets—smart planning and the right approach make comfort achievable for everyone. Ready to get started? Browse our selection of shed accessories and climate control solutions to find everything you need for your perfect backyard workspace.