
Make Your Shed Brighter: A Foolproof Window Installation Process
Transform your shed into a brighter, more functional space by installing a window in just a few hours. Installing a window not only brings natural light into your storage area but also improves ventilation and increases your shed’s overall value. With basic carpentry tools, a pre-hung window unit, and this comprehensive guide, you’ll master the essential techniques for a weathertight installation that prevents drafts and moisture damage. Whether you’re retrofitting an existing shed or planning a new build, proper window installation creates a more comfortable and usable space while maintaining your structure’s integrity. Let’s dive into the step-by-step process of measuring, framing, and weatherproofing your new shed window.
This introduction:
– Immediately addresses the practical benefit
– Sets clear expectations for the project
– Emphasizes both functionality and value
– Mentions required tools/materials
– Builds confidence for DIY success
– Maintains an accessible, encouraging tone
– Transitions smoothly into the main content
Essential Tools and Materials

Tools Checklist
Before starting your window installation project, gather these essential tools for a smooth process:
• Tape measure and pencil – For accurate measurements and marking cut lines
• Circular saw or handsaw – To cut the rough opening in your shed wall
• Level – Ensures your window frame sits perfectly straight
• Drill with various bits – For pilot holes and securing the window
• Caulking gun and exterior-grade caulk – Creates a waterproof seal
• Utility knife – Helps trim excess materials and flash tape
• Hammer – For general assembly and nail installation
• Square – Ensures accurate 90-degree angles
• Safety equipment – Work gloves, safety glasses, and dust mask
• Shims – For proper window alignment
• Screwdriver set – Both Phillips and flathead for various fasteners
• Pry bar – Helpful for removing existing materials if needed
Keep these tools organized and within reach during installation. Having everything prepared beforehand will make your project run more efficiently and help avoid unnecessary interruptions.
Materials List
Here’s what you’ll need for a successful shed window installation:
– Pre-hung window unit (sized to your specifications)
– 2×4 lumber for framing
– Weather-resistant flashing tape
– Exterior-grade caulk
– Self-tapping screws (1-5/8 inch)
– 16d galvanized nails
– Shims (cedar or composite)
– Building wrap or tar paper
– Exterior trim boards
– Silicone sealant (exterior grade)
– Level (2-foot minimum)
– Tape measure
– Pencil
– Safety equipment:
– Safety glasses
– Work gloves
– Dust mask
Optional materials:
– Expanding foam insulation
– Drip cap
– Interior trim
– Paint or stain (if finishing)
Pro tip: Purchase slightly more materials than calculated to account for any mistakes or adjustments needed during installation.
Preparing Your Shed
Measuring and Marking
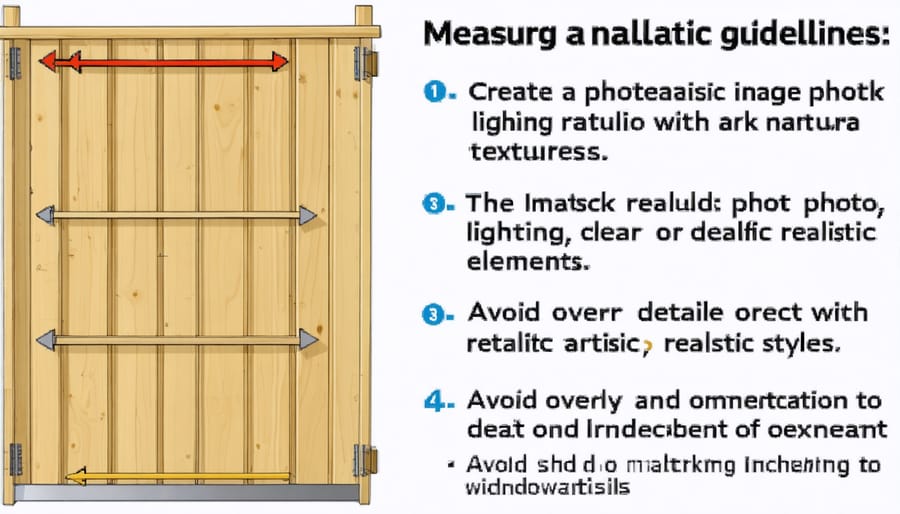
Begin by measuring the window dimensions and add an extra 1/2 inch clearance on all sides for proper fitting and shimming. On your shed wall, mark the rough opening’s location, ensuring it’s at least 24 inches away from any corners for structural stability. Use a level to draw your vertical lines first, then connect them with horizontal lines to create a perfect rectangle.
Double-check your measurements and mark the center point of your intended opening. From this center point, measure out equally in all directions to ensure your window will be perfectly centered. Use a carpenter’s square to verify your corners are at 90-degree angles – this is crucial for a proper fit.
Before cutting, place a strip of painter’s tape along your marked lines. This prevents splintering during cutting and makes your lines more visible. Mark your stud locations within the opening area – you’ll need to know where these are for proper framing later.
Pro tip: If your shed’s interior is unfinished, mark both the inside and outside walls to ensure perfect alignment when cutting through. Take photos of your markings for reference as you proceed with the installation.
Cutting the Opening
Before cutting, double-check your measurements and mark the opening with a pencil, allowing for a 1/2-inch gap on all sides of your window frame. Use a level to ensure your lines are perfectly straight and square. Place masking tape along your cutting lines to prevent splintering and create cleaner edges.
If you’re working with wooden siding, start by drilling pilot holes at each corner of your marked opening. These holes will serve as starting points for your saw and help prevent the wood from splitting. Using a reciprocating saw or jigsaw, carefully cut along your marked lines, starting from the pilot holes. Keep the saw blade straight and maintain steady pressure throughout the cut.
For metal siding, use tin snips or a metal-cutting blade in your power saw. Work slowly and wear protective gloves to avoid sharp edges. If you encounter any studs while cutting, switch to a reciprocating saw with an appropriate blade for cutting through both wood and metal.
Once you’ve completed the cuts, carefully remove the cut piece and clean up any rough edges with sandpaper or a file. Test-fit your window frame to ensure it sits properly in the opening before moving on to installation.
Remember to wear safety glasses and a dust mask throughout this process. If you’re unsure about any structural elements, consult with a professional before cutting.
Installing the Window Frame
Building the Frame
Before cutting into your shed wall, you’ll need to build a sturdy frame that supports your window and maintains the structural integrity of your shed. If you’re already familiar with framing your shed walls, this process will feel familiar.
Start by measuring your window dimensions and add an extra 1/2 inch on all sides for proper fitting. Cut two vertical studs (jack studs) to run from the bottom plate to the header. These should be the exact height of your rough opening. Next, cut two full-length studs (king studs) that extend from the top to bottom plate of your wall.
Create the header by combining two 2x4s with a 1/2-inch plywood spacer between them. The header should extend beyond your rough opening by 3 inches on each side. Install a sill plate at the bottom of your frame, ensuring it slopes slightly outward (about 5 degrees) to direct water away from your shed.
Assemble the frame components using 16d nails or 3-inch exterior wood screws. Make sure everything is square by measuring diagonally from corner to corner – both measurements should be equal. Once assembled, check that the frame is level and plumb before securing it to the existing wall structure.
Pro tip: Apply water-resistant tape around the frame before installing the window to create an extra barrier against moisture infiltration.
Securing and Leveling
With your window frame in place, proper leveling and securing are crucial for smooth operation and weatherproofing. Start by placing a level on the window sill and adjusting the shims until you achieve perfect horizontal alignment. Check both sides and the center of the window to ensure even distribution. Add shims at the bottom corners first, then work your way up the sides, checking for plumb (vertical straightness) as you go.
Once leveled, verify that the window opens and closes smoothly. Make any necessary adjustments to the shims before proceeding with securing. Using 2½-inch exterior-grade screws, fasten through the jamb and shims into the framing members. Place screws about 4 inches from each corner and every 16 inches along the sides. Be careful not to over-tighten, as this can warp the frame and affect operation.
Pro tip: Pre-drill your screw holes to prevent splitting the frame, and countersink slightly so screw heads sit flush. Remove any excess shim material by scoring with a utility knife and snapping off the exposed portions. Double-check the window’s operation after securing each side – if you notice any binding or sticking, slightly loosen the nearest screws and readjust until the window moves freely.
Remember to test the window’s operation one final time before moving on to weatherproofing. The window should open, close, and lock smoothly without any resistance or gaps.
Weatherproofing and Finishing
Sealing and Insulation
Proper sealing and insulation are crucial steps to protect your shed from water damage and ensure your window installation stands the test of time. Start by applying a continuous bead of exterior-grade silicone caulk around the entire window frame where it meets the shed wall. Make sure to fill any gaps completely, working from the outside in.
For added protection, install foam weatherstripping between the window sash and frame to prevent drafts and moisture infiltration. If you’re working with a wooden shed, consider applying additional waterproofing techniques around the window opening to prevent rot and decay.
Next, insert foam insulation strips into any remaining gaps between the window frame and rough opening. Be careful not to overfill, as this can cause the frame to bow. For metal or vinyl sheds, use specialized gap filler designed for these materials.
Finally, install drip cap flashing above the window if your shed design allows for it. This directs water away from the window frame and prevents seepage. Remember to periodically check the seals and replace any deteriorated caulking to maintain the window’s weatherproof integrity.

Trim and Finishing Touches
Now it’s time to give your window installation that professional finish with proper trim work. Start by measuring and cutting interior trim pieces to frame the window, ensuring clean 45-degree angles at the corners for a seamless look. Use a nail gun or finish nails to secure the trim, keeping it level and flush against both the window frame and wall surface.
For the exterior, install weather-resistant trim that matches your shed’s existing trim style. Apply a bead of exterior-grade caulk between the trim and siding to prevent water infiltration. Don’t forget to caulk around the entire window frame, paying special attention to the top piece to ensure proper watershed.
Consider adding a drip cap above the window if one wasn’t included in your window kit. This small addition provides extra protection against water damage and extends the life of your installation. Paint or stain your trim to match the shed’s color scheme, making sure to use exterior-grade products for lasting protection.
For a finishing touch, clean both sides of the glass thoroughly and check that the window operates smoothly. If you’ve installed a functioning window, test the opening mechanism several times to ensure proper operation.
Installing a window in your shed can transform it from a basic storage space into a more functional and inviting structure. By following the proper steps for measuring, framing, and weatherproofing, you’ll ensure your window serves its purpose for years to come. Remember to regularly inspect the caulking and weatherstripping, especially before wet seasons, and clean both the interior and exterior glass surfaces periodically. Check the frame annually for any signs of water damage or deterioration, and address issues promptly to prevent more significant problems. With proper maintenance and care, your shed window will continue to provide natural light and ventilation while maintaining the structure’s weathertight integrity. Consider adding window treatments if needed to control light and maintain privacy, and don’t forget to keep the drainage channels clear of debris to prevent water accumulation.