
Smart Insulation Makes Your Metal Shed Comfortable Year-Round

Transform your metal shed into a climate-controlled storage space with professional-grade insulation techniques that protect valuable items year-round. Start by selecting cost-effective insulation options like rigid foam boards or reflective foil, which deliver maximum thermal resistance in minimal space. Install a moisture barrier against the metal walls first, preventing condensation damage and ensuring long-term effectiveness. Create a framework using treated wooden battens to secure insulation panels while maintaining crucial air gaps that prevent heat transfer and moisture buildup.\n\nModern insulation methods for metal sheds have evolved significantly, offering DIY-friendly solutions that combine durability with superior temperature control. Whether storing temperature-sensitive equipment, converting your shed into a workshop, or simply protecting tools from extreme weather, proper insulation transforms a basic metal structure into a reliable, comfortable space that maintains consistent temperatures throughout changing seasons.\n\n\n
Why Metal Sheds Need Special Insulation
\n\n
Temperature Challenges
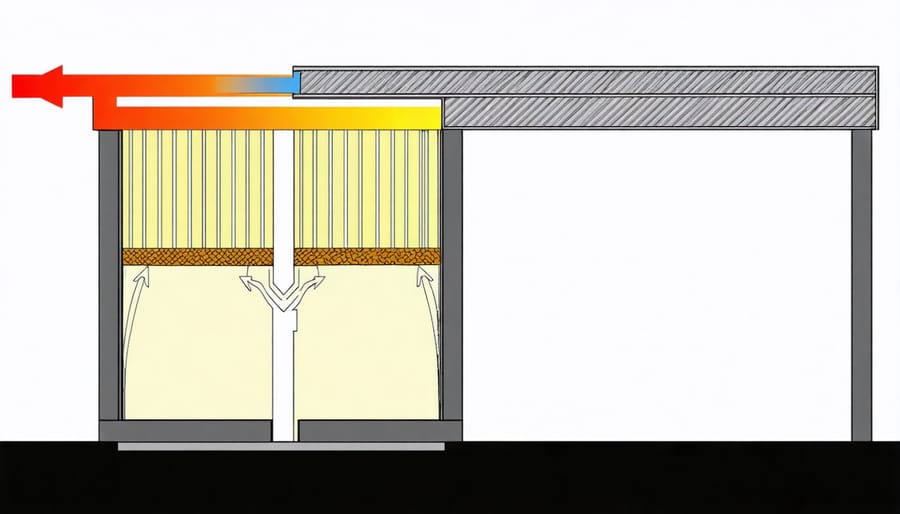
\n\nMetal sheds present unique temperature control challenges due to their excellent heat conductivity. During summer months, these structures can quickly become uncomfortably hot as metal readily absorbs and transfers heat from the sun. In winter, the opposite occurs, with the thin metal walls allowing heat to escape rapidly, potentially creating a damp, cold environment that can damage stored items.\n\nThe constant temperature fluctuations can be particularly problematic, as dramatic shifts between day and night temperatures often lead to condensation. This moisture can accumulate on the interior walls and ceiling, potentially causing rust and creating an ideal environment for mold growth. Additionally, extreme temperature changes can affect sensitive items stored inside, such as electronics, garden chemicals, or paint supplies.\n\nWithout proper insulation, metal sheds can experience temperature swings of 30-40 degrees or more in a single day, making them impractical for storing temperature-sensitive items and uncomfortable for use as a workshop space.\n\n
 \n
\n\n\n
Condensation Control
\n\nProper insulation plays a crucial role in helping to prevent moisture damage in your metal shed. When warm, humid air meets the cool metal surfaces of your uninsulated shed, condensation forms, creating the perfect environment for rust, mold, and mildew. This moisture can seriously damage your stored items and compromise the shed’s structural integrity.\n\nBy installing effective insulation, you create a barrier that maintains a more stable temperature inside your shed. This temperature control significantly reduces condensation by preventing the dramatic temperature differences that cause water droplets to form. The insulation material also acts as a moisture barrier, keeping your tools, equipment, and seasonal items dry and protected.\n\nFor best results, combine your insulation with proper ventilation and consider using a vapor barrier between the insulation and metal walls. This comprehensive approach ensures your shed remains dry and your belongings stay in pristine condition year-round.\n\n\n
 \n
\n\n\n
Modern Insulation Materials for Metal Sheds
\n\n
Reflective Barriers
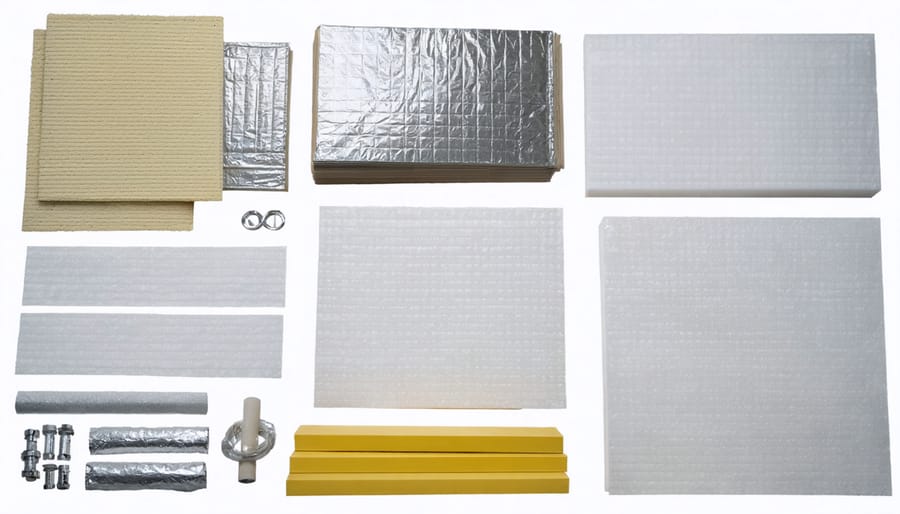
\n\nReflective barriers, also known as radiant barriers, are one of the most effective budget-friendly insulation materials for metal sheds. These barriers work by reflecting heat away from your shed’s interior, making them particularly useful during hot summer months when metal structures tend to absorb and retain heat.\n\nTypically made from aluminum foil laminated to kraft paper or plastic, reflective barriers can reduce heat transfer by up to 97% when properly installed. For metal sheds, these barriers are especially beneficial because they address the primary challenge of radiant heat transfer through metal surfaces.\n\nTo maximize effectiveness, install the reflective barrier with the shiny side facing the direction of heat flow. In most cases, this means facing upward toward the roof. Leave a small air gap between the barrier and the metal surface – this space enhances the insulating properties. You can create this gap using furring strips or specialized spacers.\n\nFor best results, consider using reflective barriers in combination with traditional insulation materials. While the barrier reflects radiant heat, conventional insulation helps control conductive heat transfer, creating a more comfortable and energy-efficient storage space year-round. Remember to seal any gaps or seams in the barrier with appropriate tape to prevent heat from sneaking through.\n\n
Foam-Based Solutions
\n\nFoam-based solutions offer excellent insulation properties and are particularly effective for metal sheds. Spray foam insulation creates a seamless barrier that fills every nook and cranny, making it ideal for irregular spaces and corners. When applied, it expands to fill gaps and creates an airtight seal that prevents both heat loss and moisture infiltration.\n\nFor DIY enthusiasts, rigid foam board presents a more manageable alternative. These lightweight panels come in various thicknesses and can be easily cut to size with a utility knife. Popular options include polyisocyanurate (polyiso), expanded polystyrene (EPS), and extruded polystyrene (XPS) boards. Each type offers different R-values and price points, with polyiso typically providing the highest insulation value per inch.\n\nTo install rigid foam boards, measure and cut panels to fit between the shed’s frame members, leaving a small gap for expansion. Secure the boards using adhesive designed for foam insulation and mechanical fasteners with washers to prevent the foam from tearing. For best results, seal the edges with foam-compatible tape to create a continuous barrier.\n\nConsider using a combination of both methods for optimal results. For example, use rigid foam boards for the main wall areas and spray foam for hard-to-reach spots or to seal around windows and doors. This approach provides comprehensive coverage while maintaining cost-effectiveness.\n\n\n
Step-by-Step Installation Process
\n\n
Preparation Steps
\n\nBefore diving into the DIY installation tips, proper preparation of your metal shed is crucial for successful insulation. Start by removing all items from the shed and thoroughly cleaning the interior walls, floor, and ceiling. Use a mild detergent solution and scrub brush to remove dirt, cobwebs, and any rust spots. Once clean, allow the surfaces to dry completely.\n\nInspect the shed for any holes, gaps, or damage that could compromise your insulation efforts. Pay special attention to corners, seams, and areas around windows or doors. Use weatherproof caulk to seal small gaps and patch any holes with appropriate metal repair materials. Check the roof for leaks and repair them before proceeding.\n\nNext, assess the ventilation situation. While insulation helps control temperature, proper airflow prevents moisture buildup. Install vents if needed, typically one near the floor and another near the roof for optimal air circulation.\n\nMeasure all surfaces carefully, including walls, ceiling, and floor if you plan to insulate it. Add an extra inch to your measurements to ensure adequate coverage. Document these measurements and create a simple sketch to help you calculate material needs accurately. This preparation phase might take a full day, but it’s essential for achieving the best results with your insulation project.\n\n
Wall Insulation
\n\nInsulating your metal shed’s walls is a crucial step in creating a comfortable and protected storage space. Start by measuring the interior wall dimensions to calculate how much insulation material you’ll need. For most small metal sheds, fiberglass batts or rigid foam boards work best, with foam boards being particularly effective at preventing condensation.\n\nBegin at the top corner of one wall and work your way down systematically. If using fiberglass batts, wear protective gear including gloves, a dust mask, and safety goggles. Cut the insulation to fit between the wall studs, leaving about ¼ inch of space on all sides to prevent compression. Press the insulation gently into place – avoid squishing it, as compressed insulation loses its effectiveness.\n\nFor rigid foam boards, cut pieces to fit snugly between the wall studs using a utility knife. Secure the boards with construction adhesive designed for foam products, or use plastic washers and screws for a more permanent hold. Pay special attention to corners and edges, ensuring there are no gaps where cold air could seep in.\n\nOnce the insulation is in place, cover it with a vapor barrier to prevent moisture buildup. Use 6-mil polyethylene sheeting, overlapping seams by at least 6 inches and securing it with staples or tape. For a finished look, install plywood or oriented strand board (OSB) panels over the vapor barrier. This creates a durable wall surface and protects the insulation.\n\nDon’t forget to insulate around windows and doors, using expanding foam to seal any gaps. Small pieces of insulation can be cut to fit these awkward spaces. Remember to work carefully around electrical outlets or fixtures, ensuring proper clearance and safety.\n\nPro tip: Consider installing a layer of reflective foil insulation before the main insulation for enhanced temperature control, especially in areas with extreme weather conditions.\n\n
 \n
\n\n\n
Roof and Floor Insulation
\n\nThe roof and floor are critical areas for insulation, as they’re major points where temperature fluctuations occur. Let’s start with the roof, where heat commonly escapes during winter and enters during summer.\n\nFor roof insulation, begin by measuring the interior roof space and cutting rigid foam boards to fit between the metal supports. Leave a small air gap between the insulation and metal roof to prevent condensation buildup. Secure the boards using construction adhesive or mechanical fasteners, ensuring they’re snug but not compressed. Cover the insulation with a vapor barrier, typically a heavy-duty plastic sheet, to protect against moisture.\n\nConsider adding reflective foil insulation beneath the foam boards for enhanced temperature control. This creates a radiant barrier that reflects heat away during summer and helps retain warmth in winter. Seal all seams with foil tape to prevent air leaks and maintain insulation efficiency.\n\nFor floor insulation, start by checking that your shed’s base is level and slightly elevated to prevent ground moisture from seeping in. Layer pressure-treated plywood as your initial base, followed by a moisture barrier. Cut rigid foam insulation boards to fit between floor joists, if present, or lay them directly on the plywood base.\n\nSecure the insulation with appropriate fasteners, ensuring there are no gaps between boards. Top with another layer of plywood to create your finished floor surface. For added protection, consider installing rubber floor mats or interlocking floor tiles over the plywood – this not only provides extra insulation but also creates a more comfortable walking surface.\n\nRemember to seal any gaps around the edges where the floor meets the walls using expanding foam sealant. This prevents drafts and helps maintain consistent temperature control throughout your shed.\n\n\n
Maintenance and Long-Term Care
\n\nRegular maintenance is key to maintain insulation effectiveness in your metal shed. Start by conducting seasonal inspections, paying special attention to corners and joints where moisture might accumulate. Check for any signs of water damage, mold, or compressed insulation material, particularly after severe weather events.\n\nKeep your shed’s ventilation system clean and unobstructed to prevent moisture buildup. Regularly dust and vacuum exposed insulation surfaces, being careful not to damage the vapor barrier. If you notice any tears in the vapor barrier, repair them promptly using appropriate patching materials to prevent moisture infiltration.\n\nWatch for signs of pest activity, as rodents and insects can damage insulation materials. Consider installing metal mesh barriers if you spot any potential entry points. Address any roof leaks immediately, as water damage can quickly compromise your insulation’s performance.\n\nFor long-term care, maintain proper airflow by keeping stored items slightly away from walls. This creates a small gap that helps prevent condensation from forming behind stored objects. Consider using dehumidifiers during particularly humid periods, and empty them regularly.\n\nIf you notice your shed’s temperature regulation becoming less effective, inspect the insulation for settling or compression. Some types of insulation may need occasional fluffing or adjustment to maintain their R-value. Replace any sections that show significant wear or damage, and remember that most insulation materials have a lifespan of 20-30 years when properly maintained.\n\nRegular cleaning of your shed’s exterior also helps protect the insulation by preventing rust and maintaining the shed’s structural integrity. Address any developing issues promptly to avoid more extensive repairs later.\n\n\nInsulating your metal shed is a worthwhile investment that pays dividends in both comfort and functionality. By following the steps and guidelines we’ve discussed, you can transform your basic metal shed into a climate-controlled storage space that protects your belongings year-round. Remember that proper insulation not only regulates temperature but also prevents condensation and moisture damage, extending the life of both your shed and its contents.\n\nWhether you’ve chosen traditional fiberglass, modern spray foam, or rigid foam boards, the key to success lies in thorough preparation and careful installation. Take time to address any existing issues, such as leaks or gaps, before beginning the insulation process. Don’t forget to pair your insulation efforts with proper ventilation to maintain optimal air quality and prevent moisture buildup.\n\nWhile the project requires some initial investment and effort, the long-term benefits far outweigh the costs. You’ll enjoy reduced energy bills if you’re heating or cooling the space, better protection for your stored items, and a more comfortable environment for working in your shed.\n\nReady to get started? Gather your materials, set aside a weekend, and tackle this project with confidence. With proper planning and execution, you’ll soon have a well-insulated shed that serves your needs throughout every season.