
Stop Water Dripping From Your Metal Carport Roof (The Condensation Barrier Solution)
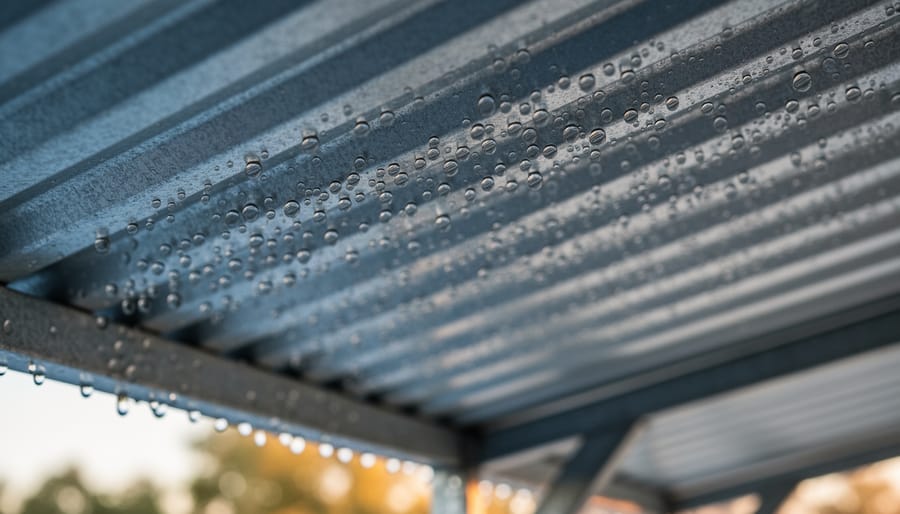
Wake up to water droplets falling on your car or tools stored under your metal carport, and you’re witnessing condensation in action. When warm, moist air meets the cold underside of metal roofing, water forms and drips down, creating puddles, rust spots, and potential damage to everything beneath. This frustrating problem affects thousands of metal carport and shed owners, but there’s a straightforward fix: a condensation barrier.
A condensation barrier is a protective layer installed beneath your metal roof that prevents moisture from forming and dripping. Think of it as an invisible shield that manages temperature differences and controls humidity, keeping the space below dry and protected. Whether you have a standard flat roof, a boxed eave design, or one of the other common metal carport roof styles, adding this barrier can transform your structure from a dripping headache into reliable, dry storage.
Understanding how condensation barriers work helps you choose the right solution for your situation. These barriers use special materials that either absorb moisture, create an air gap for ventilation, or block water vapor from reaching the cold metal surface. The best part? Installation is manageable for DIY enthusiasts, and the investment pays off quickly by protecting your vehicles, equipment, and building materials from constant moisture exposure. Let’s explore what makes these barriers effective and how to determine if your metal roof needs one.
Why Your Metal Carport Roof Sweats (Understanding Condensation)
You know that cold glass of lemonade on a hot summer day? Within minutes, water droplets appear on the outside of the glass, sometimes creating a small puddle on your table. That’s exactly what’s happening on your metal carport roof, just on a much larger scale.
Condensation forms when warm, moist air meets a cold surface. The air around us always contains water vapor, even when we can’t see it. When this moisture-laden air touches something significantly cooler, the water vapor transforms into liquid droplets. It’s a completely natural process, but one that can cause real headaches for carport owners.
Metal roofs are particularly vulnerable to this sweating problem for a simple reason: metal conducts temperature extremely well. On a cool night, your metal roof quickly becomes cold. When the sun rises and warms the air inside your carport, or when you park a warm vehicle underneath, that moisture in the warmer air immediately condenses on the chilly metal surface above.
Here’s a scenario many homeowners experience: You park your car under the carport after your morning commute. The next day, you notice water dripping onto your hood, even though it hasn’t rained. Or perhaps you’ve stored boxes in your metal shed, only to find them damp despite the roof being leak-free. These frustrating situations aren’t caused by roof damage; they’re condensation at work.
Temperature swings make the problem worse. The bigger the difference between your roof temperature and the air temperature, the more condensation you’ll see. That’s why the issue often peaks during spring and fall when days are warm but nights stay cool, or in humid climates where the air holds more moisture year-round.
Understanding this process is the first step toward solving it. The good news? Once you know what causes that annoying drip, you can take effective steps to prevent it.
What Exactly Is a Metal Roof Condensation Barrier?
If you’ve noticed water dripping from the ceiling of your metal shed or carport, you’re dealing with condensation, and a metal roof condensation barrier is designed to solve exactly that problem.
Think of a condensation barrier as a protective shield installed beneath your metal roof panels. When warm, moist air from inside your building meets the cold metal roof surface, tiny water droplets form—just like moisture appears on a cold glass of lemonade on a hot day. A condensation barrier catches these droplets before they can drip onto your stored belongings, vehicles, or equipment.
Here’s where things can get a bit confusing: people often use terms like vapor barrier, vapor retarder, and insulation interchangeably, but they’re actually different products that work together. A condensation barrier is specifically designed to collect moisture that’s already formed and channel it away, typically featuring a fabric or foam material with drainage properties. A vapor retarder, on the other hand, tries to prevent moisture from moving through walls and ceilings in the first place. Insulation serves a different purpose altogether—it regulates temperature and can reduce the temperature difference that causes condensation.
Most modern condensation barriers use materials like specialized foam backed with a moisture-resistant facing, or woven synthetic fabrics that absorb and redirect water. Some advanced options include reflective layers that also help with temperature control. The barrier typically installs directly against the metal panels, creating a gap where any collected moisture can drain to the building’s edges rather than dripping straight down onto whatever’s below.
The good news? Installing a condensation barrier is often much simpler and more affordable than dealing with ongoing water damage to your stored items.
How Condensation Barriers Work With Different Carport Roof Styles
Regular (Flat) Roof Style
Flat or low-pitched metal carport roofs present unique condensation challenges that require special attention. With minimal slope (typically 1:12 or less), these roofs don’t encourage water runoff as effectively as steeper designs, making proper condensation barrier installation absolutely essential.
The limited pitch means condensation droplets can pool rather than roll off quickly, increasing the risk of dripping onto your vehicle or stored items below. When installing a condensation barrier on a flat roof, pay extra attention to ensuring the fabric hangs with slight sag between supports. This strategic positioning allows condensed moisture to collect and gradually evaporate rather than dripping straight down.
Water drainage becomes your biggest concern with flat roofs. Consider installing the barrier in overlapping sections that direct moisture flow toward the roof’s edges. Some homeowners report success by creating deliberate channels within the barrier system that guide water away from the center area where you park.
One practical tip: check your flat roof barrier every few months, especially after heavy temperature swings. The reduced pitch means debris and moisture linger longer, potentially compromising the barrier’s effectiveness over time. Regular inspections help you catch small issues before they become dripping problems that damage your belongings or vehicle finish.
A-Frame (Vertical) Roof Style
If you’re dealing with condensation in a metal carport or shed featuring an A-frame design, you’re actually in a better position than you might think. The vertical roof panels that define this roof style naturally encourage water to run straight down rather than pooling or sitting on horizontal surfaces. This downward flow means condensation has less opportunity to accumulate and drip onto your vehicles or stored items.
When installing a condensation barrier under an A-frame roof, you’ll find the process more straightforward thanks to the steep pitch. The barrier material can be attached directly to the underside of the roof panels, and gravity works in your favor as any moisture that does form will quickly drain toward the edges. Many homeowners report that after adding a proper barrier to their vertical roof structures, their condensation problems virtually disappeared during temperature swings.
The key is ensuring your barrier extends all the way to the roof’s edge and that you’ve created adequate ventilation at the peak. This combination of vertical panel design and proper barrier installation creates an effective moisture management system that keeps your space dry year-round.
Boxed Eave Roof Style
If you’re considering a boxed eave designs for your metal carport or shed, understanding how this style affects condensation control is essential for keeping your space dry and protected.
Boxed eave roofs feature enclosed sides that create a clean, finished appearance. While they look great, these enclosed eaves present unique challenges for moisture management. Unlike open eave designs that allow natural air circulation along the roof edges, boxed eaves trap air and limit ventilation pathways. This means moisture has fewer escape routes, making a proper condensation barrier even more critical.
The enclosed nature of boxed eaves can create pockets where warm, moist air accumulates against the cold metal roof panels. Without adequate ventilation and a quality condensation barrier, you’re more likely to experience dripping water and potential damage to stored items.
Here’s the good news: installing a condensation barrier under your boxed eave roof is straightforward and highly effective. The key is ensuring the barrier extends completely to the edges where the boxed eaves meet the roof panels. Many homeowners report that after adding a proper barrier to their boxed eave structures, their condensation problems disappeared entirely.
Consider adding ridge vents or gable vents to complement your condensation barrier. These ventilation options work together to create airflow even in enclosed designs. This combination approach gives you both the attractive, finished look of boxed eaves and the moisture protection your belongings deserve.
Types of Condensation Barriers for Metal Carports
Reflective Foil-Backed Barriers
Foil-backed barriers are one of the most popular condensation solutions for metal carports, and it’s easy to see why. These products combine a layer of insulation with a reflective aluminum foil backing that creates a moisture barrier while also helping to regulate temperature. Think of it as giving your carport a protective shield against condensation issues.
The foil backing works double duty. First, it reflects radiant heat, which means your carport stays cooler in summer and helps reduce those dramatic temperature swings that cause condensation. Second, it acts as a vapor barrier, preventing warm, moist air from reaching the cold metal roof surface where water droplets would form.
Many homeowners have found these barriers incredibly effective for their carports. Sarah from Texas shared that after installing a foil-backed barrier, the constant dripping that damaged her stored boxes completely stopped within days. The installation is straightforward enough for confident DIYers, and the material cuts easily with scissors or a utility knife.
These barriers typically come in rolls and attach directly under your roof panels. They’re particularly effective for carports that house vehicles or equipment sensitive to moisture. The reflective surface also creates a brighter space underneath, which is a nice bonus when you’re working on projects or loading your car on dark mornings.
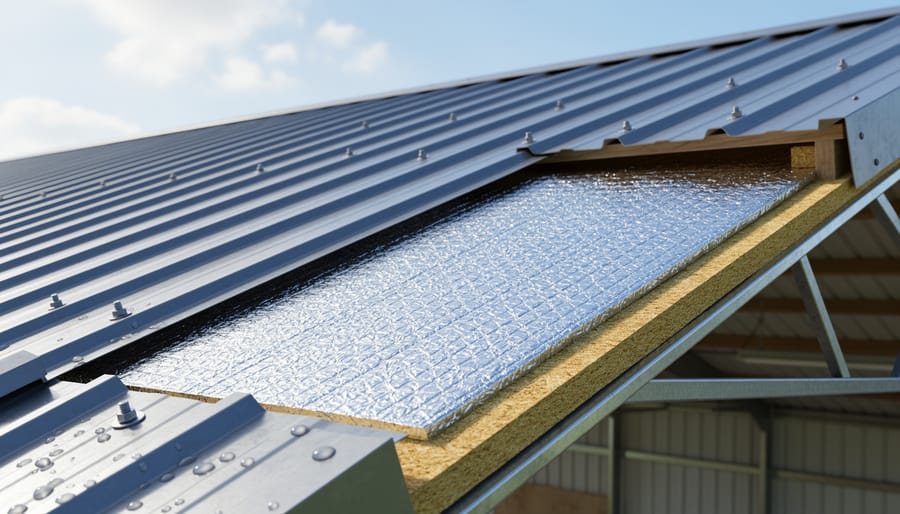
Insulated Panels With Built-In Barriers
If you’re building a new metal carport or shed, consider the ultimate convenience: combination systems that tackle insulation and moisture protection in one go. These insulated panels come with built-in vapor barriers already attached, saving you time and effort during installation.
Foam-backed metal panels are particularly popular among DIY enthusiasts. The factory-applied foam insulation includes an integrated moisture barrier, meaning you won’t need to install a separate layer underneath. This streamlined approach reduces installation time and potential errors that can happen when working with multiple materials.
One homeowner from Tennessee shared that switching to foam-backed panels eliminated the constant dripping she experienced every morning in her workshop. The built-in barrier kept moisture from forming on the underside of her metal roof completely.
These combination systems work especially well in climates with significant temperature swings. The insulation helps maintain more stable interior temperatures while the barrier prevents warm, moist air from reaching the cold metal surface where condensation would normally form. While they cost more upfront than standard panels, you’re essentially getting two products in one, plus the peace of mind that comes with professional factory assembly.
Spray Foam Solutions
Spray foam insulation offers a powerful two-in-one solution for metal roof condensation problems. When applied to the underside of your metal roof panels, closed-cell spray foam creates an airtight seal that both insulates and acts as a vapor barrier, stopping condensation before it starts.
For DIY enthusiasts, spray foam kits are available at most home improvement stores. These typically come with everything you need for smaller projects like sheds or single-bay carports. The application seems straightforward, but here’s the catch: getting an even, consistent coating requires practice and precision. Sarah from Tennessee shared her experience: “I thought I could save money doing it myself, but ended up with uneven patches and had to call in a pro anyway.”
Professional installation costs more upfront, usually between three to five dollars per square foot, but the results are remarkably superior. Professionals have the equipment to apply foam evenly, ensuring complete coverage without gaps where moisture could sneak through. They’ll also help you choose between open-cell and closed-cell foam based on your climate and budget.
The main drawback? Spray foam is permanent and difficult to remove if you ever need to access wiring or make repairs. Consider your long-term needs before committing to this highly effective condensation barrier solution.
Installing a Condensation Barrier: What You Need to Know
Best Time to Add a Barrier (New vs. Existing Carports)
The best time to install a condensation barrier is during initial construction, but don’t worry if your carport is already standing—retrofitting is absolutely possible!
Installing during new construction offers the smoothest experience. You’ll have easy access to the entire roof structure, can integrate the barrier seamlessly with your metal panels, and won’t need to work around existing fixtures or stored items. This approach typically takes less time and ensures the barrier is positioned perfectly from day one. Many homeowners who’ve gone this route say they wish they’d known about condensation issues beforehand, but appreciate tackling it right from the start.
Retrofitting an existing carport requires a bit more planning but delivers the same benefits. You’ll need to temporarily clear the space beneath your roof and may need to remove some roofing screws to properly install the barrier. The upside? You already know exactly where condensation problems occur, so you can focus your efforts strategically. One satisfied DIYer shared that retrofitting his five-year-old carport took just a weekend and completely eliminated the dripping issues that had plagued him every winter.
Whether building new or upgrading existing structures, the key is addressing condensation before it damages your belongings or creates rust issues on your metal roof.
DIY or Professional Installation?
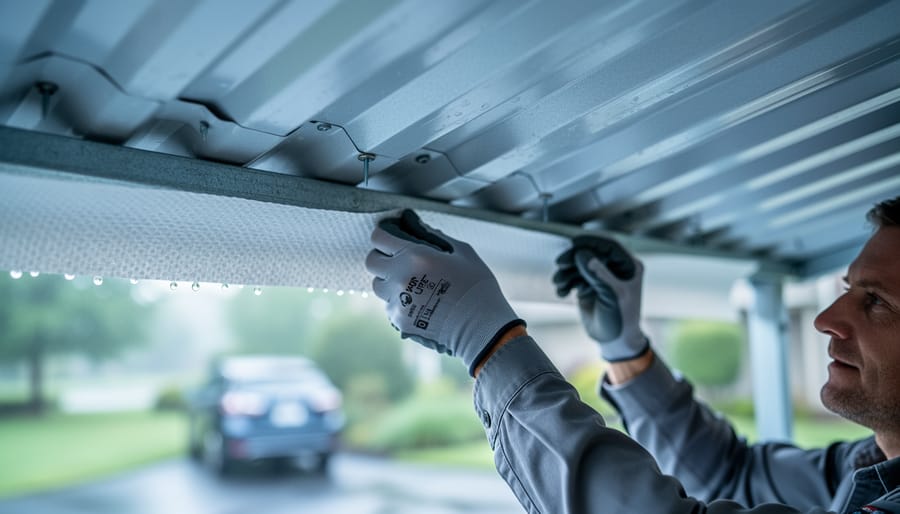
Installing a condensation barrier can be approached as either a DIY project or professional job, depending on your comfort level and roof complexity. For most homeowners with basic handyman skills, this is definitely a manageable weekend project that can save you hundreds of dollars in labor costs.
The DIY route works well if you have a simple roof structure and feel comfortable working on a ladder. You’ll need basic tools like a utility knife, measuring tape, and stapler or adhesive. Many homeowners successfully install barriers themselves, especially on smaller carports or sheds. Budget around $100-300 for materials depending on your roof size.
However, consider calling a professional if your roof is steep, particularly high, or has complex angles and penetrations. Professional installation typically costs $500-1,500 including materials, but ensures proper coverage without gaps that could compromise effectiveness. Safety is paramount—if you’re uncomfortable with heights or roofing work, the peace of mind from professional installation is worth the investment.
One satisfied DIYer shared: “I tackled my 12×20 carport myself in about four hours. The instructions were straightforward, and I haven’t had a single drip since.” For larger structures or if condensation problems persist after DIY attempts, professionals bring expertise that guarantees long-term results.
Key Installation Tips
Proper installation makes all the difference in stopping condensation problems. Start by ensuring your metal roof is completely clean and dry before attaching the barrier. Many homeowners make the mistake of installing on damp surfaces, which traps moisture right from the start.
Pay special attention to overlapping seams—overlap sections by at least 6 inches and seal them properly to prevent gaps where moisture can escape. Think of it like overlapping shingles on a traditional roof. Common pitfalls include pulling the material too tight, which can cause tears, or leaving it too loose, creating pockets where water collects.
Always install the barrier with the vapor-permeable side facing down toward the interior space. This allows any trapped moisture to escape while blocking outside condensation. Secure it firmly but don’t over-tighten fasteners, as this can damage the material.
One satisfied shed owner shared: “I wished I’d known to start from the bottom and work up—it prevents water from sneaking behind the barrier.” Taking your time during installation saves headaches later.
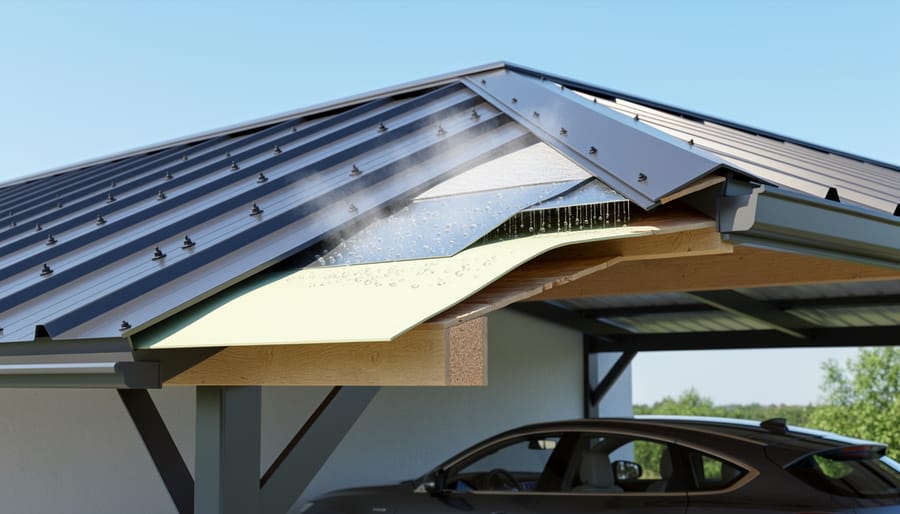
Beyond Barriers: Ventilation and Other Condensation Control Strategies
While condensation barriers are powerful tools in the fight against moisture, they work best when they’re part of a team effort. Think of it like this: a barrier catches the moisture, but you still need a way to get rid of it. That’s where ventilation and other strategies come into play.
Proper ventilation is your condensation barrier’s best friend. Without good airflow, you’re just trapping moisture in your carport or shed, and that defeated barrier will eventually give up the fight. Ridge vents installed along the peak of your roof allow warm, moist air to escape naturally, while soffit vents near the eaves bring in fresh, cooler air. This creates a continuous flow that carries moisture away before it can condense on your metal panels.
For most metal carport roof styles, you’ll want to aim for balanced ventilation—meaning your intake vents (soffits) and exhaust vents (ridge or gable) are roughly equal in size. A good rule of thumb is one square foot of ventilation for every 150 square feet of roof area.
Beyond ventilation, consider these complementary strategies. First, insulation works hand-in-hand with barriers by keeping the metal roof closer to the interior temperature, reducing the temperature差 difference that causes condensation. Second, control moisture sources inside your space—avoid storing wet items, fix any leaks promptly, and consider a dehumidifier if you live in a particularly humid climate.
Sarah from Georgia shared her experience: “After installing a condensation barrier, I still had issues until I added ridge vents. The combination was game-changing—no more drips on my classic car!”
Remember, addressing condensation isn’t about finding one magic solution. It’s about creating a system where barriers, ventilation, and smart moisture management work together to keep your space dry and protected.
You’ve taken an important step in protecting your vehicles and stored belongings by learning about condensation barriers for your metal carport roof. Those frustrating water drips and damp conditions don’t have to be part of your carport experience anymore. By understanding how condensation forms and knowing which barrier solution works best for your specific roof style, you’re well-equipped to create a dry, functional space that truly protects what matters to you.
Whether you have a standard R-panel roof, corrugated metal, or standing seam design, there’s a condensation barrier solution that fits your needs and budget. Remember, addressing this issue now prevents costly water damage down the road and makes your carport a more pleasant place to work and store items year-round.
Take a moment today to assess your current carport situation. Walk underneath and look for signs of moisture, check during temperature changes, and consider how much condensation you’re actually dealing with. Once you know what you’re working with, you can choose the right barrier and installation method confidently. Many homeowners find that tackling this project themselves is surprisingly manageable, especially with proper guidance and the right materials.
Your carport can be the dry, reliable shelter you need it to be. Don’t let condensation continue causing problems when the solution is within reach.