
Transform Your Chaotic Shed Into a Perfectly Organized Space
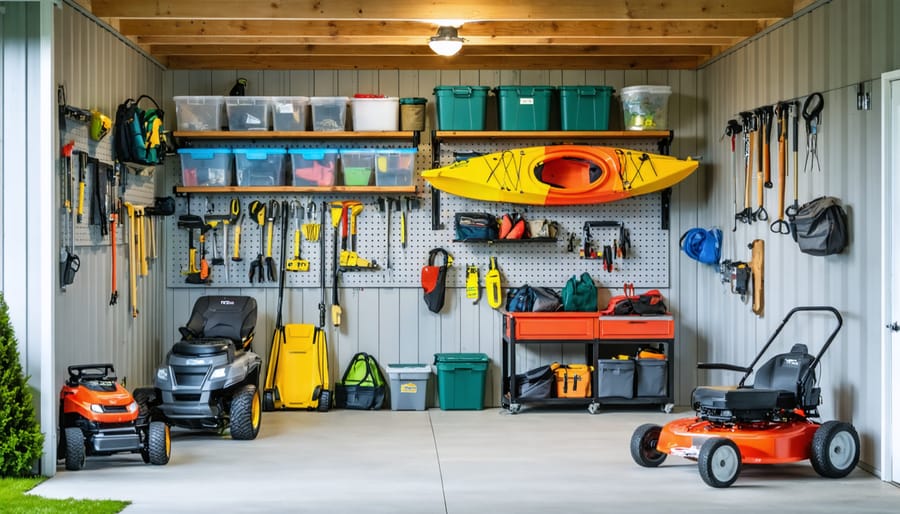
Transform your chaotic shed into an efficiently organized space by installing wall-mounted pegboards and slatwall systems that keep tools visible and within arm’s reach. Mount heavy-duty shelving units along the perimeter to maximize vertical storage while leaving floor space clear for larger equipment like lawnmowers and wheelbarrows. Add clear, labeled storage bins on those shelves to group similar items together—gardening supplies, seasonal decorations, automotive accessories—so you can find what you need in seconds instead of digging through piles. Utilize overhead ceiling space with hanging racks perfect for storing bulky items like kayaks, camping gear, and holiday decorations that you only need occasionally.\n\nThe difference between a frustrating shed and a functional one comes down to having the right systems in place. When organizing your shed, think beyond simple cleanup—you need storage solutions that maintain order long-term and actually save you time. Most homeowners struggle because they try to organize without addressing their specific storage challenges first, leading to wasted money on products that don’t fit their space or needs. This guide walks you through proven organization methods that work for real-world shed problems, from limited floor space to awkward ceiling heights, helping you create a customized system that keeps everything accessible and protected from the elements.\n\n\n
Why Your Shed Needs an Organization System (Not Just More Shelves)
\n\nPicture this: It’s Saturday morning, and you’re ready to tackle that outdoor project. You head to your shed, knowing your drill is somewhere inside. Twenty minutes later, you’re still moving boxes, shifting bags of fertilizer, and uncovering tools you forgot you owned. Frustration sets in, your enthusiasm fades, and you’ve wasted precious time before even starting.\n\nThis scenario plays out in sheds across the country every weekend, and it’s not because people don’t have storage solutions. Most sheds are packed with shelves, hooks, and containers. The problem isn’t a lack of storage pieces—it’s the absence of a cohesive organization system.\n\nRandom shelves scattered throughout your shed create visual chaos and force you to hunt through multiple areas for what you need. A proper organization system, however, assigns specific zones for specific items. Your gardening supplies live in one dedicated area, power tools in another, and seasonal items in their own space. When everything has a designated home, you’ll know exactly where to look every single time.\n\nBeyond saving time, an effective system protects your investments. Tools left lying around can suffer moisture damage, rust, or accidental breakage. A thoughtful organization approach ensures items are stored properly to protect your tools and extend their lifespan.\n\nSpace maximization is another critical benefit. When you implement a strategic system using vertical space, overhead storage, and properly sized containers, you’ll discover your shed holds far more than you imagined. Rather than cramming items wherever they fit, you’re using every square inch intentionally.\n\nThe difference between owning storage pieces and having an organization system is the difference between chaos and clarity.\n\n\n
Planning Your Shed Organization System Before You Buy Anything
\n\n
Take Inventory and Categorize What You Own
\n\nBefore you can implement any organization system, you need to see exactly what you’re working with. Start by completely emptying your shed—yes, everything! This might feel overwhelming, but it’s the only way to truly assess your inventory and make smart decisions about what deserves valuable space.\n\nAs you remove items, create designated zones in your yard or driveway for different categories. Group similar items together: gardening tools and supplies, power tools and hardware, seasonal decorations, sports equipment, lawn care items, and household chemicals. This visual sorting makes patterns obvious—you might discover you own three hedge trimmers or five bags of potting soil you forgot about.\n\nNow comes the honest part: deciding what stays and what goes. Apply the “used it in the last year” rule for most items. If you haven’t touched that edger in two seasons, it’s taking up space better used for things you actually need. Be particularly ruthless with duplicates, broken tools you’ve been meaning to fix for years, and dried-up chemicals past their expiration dates.\n\nCreate three piles: keep, donate, and discard. Quality tools in good condition that you simply don’t use make great donations to community gardens or tool libraries. Dispose of hazardous materials like old paint and chemicals properly through your local waste management facility—never just toss them in regular trash.\n\nThis inventory process isn’t just decluttering; it’s the foundation for choosing the right storage solutions. You can’t plan effective shelving or wall systems until you know exactly what you’re storing and how much space each category truly needs.\n\n
Measure Your Space and Identify Problem Areas
\n\nBefore you rush to buy storage solutions, grab a tape measure and spend twenty minutes assessing your shed properly. This simple step can save you from purchasing shelving that doesn’t fit or hanging systems that block your windows.\n\nStart by measuring all four walls from floor to ceiling, noting the exact dimensions in a simple notebook or phone app. Don’t forget to measure the distance from corners to any windows, doors, or built-in features. These measurements become crucial when you’re shopping for storage systems or planning DIY installations.\n\nWalk around your shed and identify those tricky spots that typically become junk magnets. Awkward corners, the space behind the door swing, and low-ceiling areas under roof slopes all deserve special attention. These problem zones can actually become storage goldmines with the right approach.\n\nTake photos of each wall with your phone, then sketch a basic floor plan on paper or use a free layout app. You don’t need artistic skills here – simple rectangles and labels work perfectly. Mark where doors swing open, windows let in light, and any electrical outlets you might use for power tools.\n\nSarah, a homeowner from Oregon, shared her experience: “I measured everything before shopping and realized my ‘wasted’ corner space could fit a rotating storage system perfectly. That simple sketch helped me maximize every inch without buying unnecessary products.”\n\nConsider headroom throughout your shed, especially if you’re planning overhead storage. Mark areas where you regularly walk through versus spots you access occasionally – this distinction guides your organization strategy perfectly.\n\n\n
 \n
\n\n\n
Wall-Mounted Storage Systems That Actually Work
\n\n
Pegboard Systems for Quick-Access Tools
\n\nPegboards transform chaotic tool collections into organized, visual displays where everything has its designated spot. The beauty of pegboard systems lies in their flexibility—you can rearrange hooks and accessories as your tool collection evolves, making them perfect for sheds that serve multiple purposes.\n\nMetal pegboards offer the most durability for shed environments, resisting moisture and supporting heavier tools like drills and hammers. They’re ideal if your shed experiences temperature fluctuations or humidity. Plastic pegboards work well for lighter hand tools and are budget-friendly, though they may become brittle in extreme cold. Traditional hardboard pegboard is the most affordable option but requires sealing or painting to withstand shed conditions—definitely worth the extra step for longevity.\n\nInstallation tip: Mount pegboards at least one inch away from the wall using spacers or furring strips. This gap allows hooks to fit properly and provides air circulation to prevent moisture buildup behind the board.\n\nArrange your most-used tools at eye level and within easy reach. Group similar items together—all screwdrivers in one zone, wrenches in another. Use painter’s tape to outline each tool before hanging it, creating a shadow system that makes it obvious when something’s missing. One homeowner shared how this simple trick finally got her family returning tools to their proper spots. Color-code hooks for different family members or project types to maximize efficiency.\n\n
Slatwall and Track Systems for Heavy Equipment
\n\nWhen you’re dealing with heavy-duty storage needs, slatwall panels and track systems are absolute game-changers. These robust mounting solutions attach directly to your shed walls and can handle significantly more weight than standard hooks or nails.\n\nSlatwall panels are grooved wall systems that accept specialized accessories like brackets, hooks, and baskets. Think of them as a complete wall organization system where you can easily move things around without creating new holes. They’re perfect for homeowners who want flexibility—you can reconfigure your storage layout as your needs change throughout the seasons.\n\nTrack-based systems work similarly but use horizontal rails mounted to studs, offering even greater weight capacity. Both options typically support 75-100 pounds per square foot when properly installed, making them ideal for your heaviest gear.\n\nThese systems truly shine when storing bulky items that eat up floor space. Ladders hang vertically using specialized brackets, mountain bikes lift easily onto horizontal hooks, and large power tools like circular saws and drills stay accessible on sturdy shelves. One homeowner shared that after installing slatwall in her 10×12 shed, she reclaimed enough floor space to actually work on projects inside.\n\nThe key consideration is proper installation—always mount these systems directly into wall studs or use appropriate anchors rated for your wall type. Taking time to install correctly ensures your heavy equipment stays safely secured overhead.\n\n
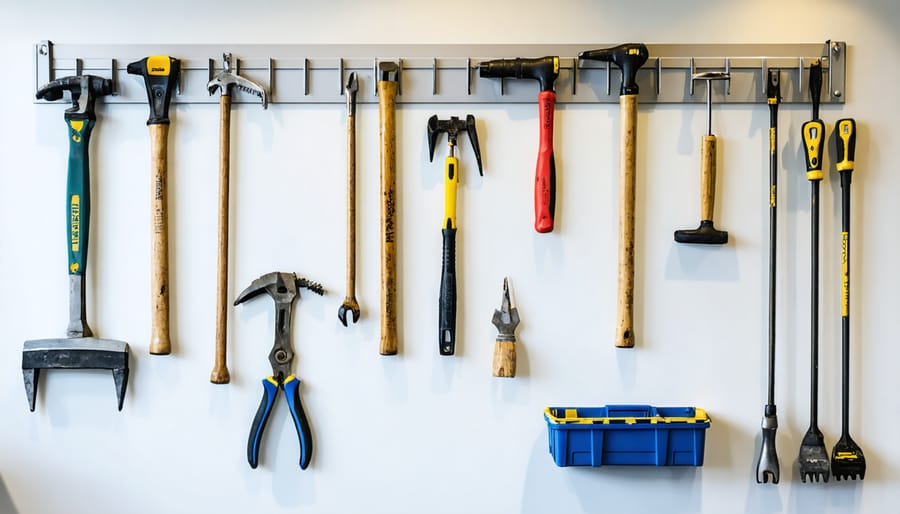
Simple Hook and Rail Solutions
\n\nSometimes the simplest solutions work best, especially when you’re dealing with tools and equipment you grab multiple times a day. Hook and rail systems offer immediate visual access and make returning items to their spots completely effortless—no fumbling with lids or bins when you’re mid-project.\n\nBasic hardware store hooks mounted on a wooden rail or directly into wall studs are remarkably affordable and incredibly effective. Position them at different heights for various tool lengths, and you’ve solved your garden tool chaos for under $20. One homeowner shared how installing a simple pegboard rail system transformed her shed from “tool avalanche waiting to happen” to organized workspace in just one afternoon.\n\nMagnetic strips deserve special mention for metal hand tools. Mount a 24-inch magnetic bar above your workbench, and suddenly screwdrivers, pliers, and wrenches stay visible and accessible. No more digging through drawers or dumping out entire toolboxes to find what you need.\n\nFor DIY enthusiasts, repurposing old ladder rungs or sturdy branches as rustic rails adds character while providing practical hanging solutions. The beauty of hook systems is their flexibility—rearrange them seasonally as your storage needs change without leaving behind dozens of unused screw holes or complicated mounting hardware.\n\n\n
Shelving and Storage Unit Solutions for Every Budget
\n\n
Sturdy Metal Shelving for Heavy-Duty Storage
\n\nMetal shelving units are game-changers for shed organization, especially when you’re dealing with heavy items like paint cans, power tools, or bags of fertilizer. These workhorses typically handle 200-500 pounds per shelf, making them ideal for bulky storage that would buckle plastic alternatives.\n\nThe beauty of metal shelving lies in its versatility. Look for powder-coated or galvanized options that resist rust and corrosion, particularly important in sheds where humidity fluctuates with the seasons. One homeowner shared how her galvanized steel units stayed pristine for seven years despite storing damp gardening supplies inches away.\n\nPlacement matters more than you might think. Position metal shelving along the longest wall of your shed to maximize floor space, keeping the center clear for larger equipment. Avoid placing units directly against exterior walls where condensation can form—leave a two-inch gap for air circulation.\n\nHere’s a critical tip many overlook: always secure your shelving to wall studs using heavy-duty brackets or L-brackets. Even stable-looking units can topple when fully loaded. Use a stud finder to locate solid anchor points, and don’t rely on drywall anchors alone for shelves holding more than 100 pounds. This simple step prevents dangerous accidents and protects your stored items from a costly tumble.\n\n
Plastic and Resin Units for Chemical and Paint Storage
\n\nWhen you’re storing paint cans, fertilizers, motor oil, or any chemicals in your shed, plastic or resin shelving units are your best friend. These materials won’t rust, corrode, or stain when liquids inevitably drip or spill, making cleanup as simple as wiping with a damp cloth.\n\nUnlike wood shelving that can absorb spills and develop odors, or metal units that might react with certain chemicals, plastic units provide a completely non-reactive surface. This is especially important if you’re storing pool chemicals, lawn care products, or automotive fluids that could damage other materials over time.\n\nThe moisture resistance of plastic shelving also prevents the warping and degradation you’d see with wood in humid conditions. Many homeowners find these units perfect for positioning near shed doors where rain might blow in, or in corners where condensation tends to collect. Look for heavy-duty resin shelving with weight capacities of at least 200 pounds per shelf to handle those hefty paint and chemical containers safely. The ventilated shelf design common in plastic units also promotes air circulation, helping prevent moisture buildup around stored items.\n\n
DIY Wood Shelving When Custom Sizing Matters
\n\nSometimes off-the-shelf shelving just won’t cut it, especially when you’re dealing with awkward corners, sloped walls, or specific height requirements. Building your own wooden shelves is surprisingly straightforward and gives you complete control over dimensions.\n\nConsider DIY shelving when you have unusual wall angles, need to maximize vertical space in tight areas, or want shelves that fit precisely between existing structures. Sarah, a homeowner from Oregon, shared that custom shelves along her shed’s sloped ceiling recovered 18 square feet of previously wasted space.\n\nYou’ll need basic materials: 2×4 lumber for brackets, plywood or solid boards for shelving surfaces, wood screws, a level, and a drill. Most projects require minimal carpentry skills and can be completed in an afternoon.\n\nThe real advantage is problem-solving. That odd 23-inch gap between your workbench and window? Custom shelving fills it perfectly. Slanted rooflines become opportunities rather than obstacles. Plus, you can adjust shelf spacing as your storage needs evolve, adding or removing levels without buying entirely new systems. DIY solutions often cost 40-60% less than comparable commercial options while delivering exactly what your space needs.\n\n\n
Overhead Storage Systems You’re Probably Ignoring
\n\nLook up. No, really—when was the last time you considered your shed’s ceiling as prime storage real estate? Most of us walk right past this goldmine of space, letting our floors overflow while perfectly good square footage sits empty overhead.\n\nOverhead storage systems are game-changers for seasonal items and those bulky things you only need a few times a year. Think holiday decorations, camping gear, or winter sports equipment. By moving these items up and out of the way, you’ll reclaim valuable floor and wall space for everyday essentials.\n\nCeiling-mounted racks are the workhorses of overhead storage. These sturdy platforms can hold anywhere from 300 to 600 pounds, depending on the model and your ceiling joists. Installation is straightforward if you anchor them properly into joists—never just into drywall or thin plywood. A stud finder is your best friend here. Most homeowners report that installing a basic rack system takes about an hour and transforms their shed’s functionality overnight.\n\nFor bikes, kayaks, or canoes, pulley systems are brilliant. These let you hoist heavy items to the ceiling with minimal effort, and they’re surprisingly affordable. Just make sure you’re working with solid ceiling structure that can handle the weight.\n\nSafety considerations matter. Always check manufacturer weight limits and subtract 20 percent for a safety buffer. Space overhead racks at least 12 inches below your ceiling to maintain adequate clearance, and keep heavier items toward the center of racks rather than the edges.\n\nOne homeowner shared that adding overhead storage freed up enough floor space to finally park their lawnmower without playing Tetris every time. That’s the kind of real-world difference we’re talking about.\n\n
 \n
\n\n\n\n
Container and Bin Organization Strategies
\n\n
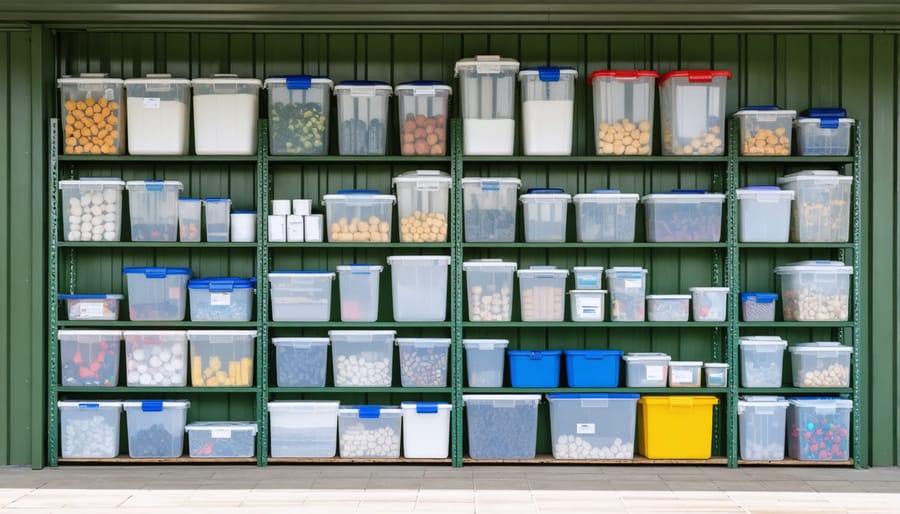
Clear Bins vs. Opaque: When to Use Each
\n\nChoosing between clear and opaque bins can dramatically improve your shed’s functionality. Clear containers are game-changers for items you grab regularly—think gardening gloves, extension cords, or sports equipment. Being able to spot what you need without opening every container saves precious time and frustration. One homeowner shared how switching to clear bins for her craft supplies cut her project prep time in half since she could instantly locate materials.\n\nHowever, opaque bins have their place too. They’re essential for protecting items vulnerable to sun damage, like pool chemicals, fertilizers, or anything that degrades with UV exposure. Opaque containers also create a cleaner, more uniform look if your shed has windows or you prefer a tidier visual appearance. Consider using them for seasonal decorations or items you access only once or twice yearly. The sweet spot? Use clear bins at eye level for everyday items and opaque bins on higher shelves for occasional-use or light-sensitive materials.\n\n
Labeling Systems That Actually Last
\n\nThe harsh reality of shed environments means your beautiful handwritten labels will fade, peel, or become unreadable within months. Temperature swings and humidity are tough on standard labeling methods, so choosing the right system from the start saves you from re-labeling everything next season.\n\nInvest in a thermal label maker with weatherproof tape designed for outdoor use. These labels resist moisture and UV exposure far better than standard paper labels. Apply them to clean, dry surfaces and press firmly for at least 30 seconds to ensure proper adhesion.\n\nFor budget-friendly durability, create your own weatherproof labels using a laminator and permanent markers. Write clearly on cardstock, laminate, then attach with outdoor-grade adhesive or zip ties. This method works especially well for larger bins and shelving units.\n\nColor-coding takes your labeling system to the next level. Assign colors by category: red for automotive supplies, blue for gardening tools, green for lawn care. Use colored electrical tape as borders around labels or on container lids for instant visual identification, even from across the shed. This simple addition means you’ll spend less time searching and more time actually using your organized space.\n\n
Stack-Friendly Containers That Maximize Vertical Space
\n\nThe secret to preventing a container avalanche? Choose stackable bins with secure, interlocking lids and stick to uniform sizes. When containers vary wildly in dimension, you’re building an unstable tower that’ll eventually come crashing down—usually when you’re reaching for something at the bottom.\n\nLook for bins with ridged lids designed to nestle into the container below. This simple feature creates stability that flat-topped containers just can’t match. Clear plastic bins are particularly helpful since you can identify contents without dismantling your entire stack.\n\nKeep your stacks to three or four containers high as a practical limit. Any taller, and accessing bottom bins becomes a frustrating workout. Label each container on at least two sides so you can spot what you need without spinning everything around.\n\nOne homeowner shared how switching from mismatched cardboard boxes to uniform stackable bins freed up nearly 40% of her shed floor space. She organized by category—gardening supplies in one stack, camping gear in another—making retrieval quick and painless. The investment paid off within months by ending her habit of buying duplicate items she couldn’t find.\n\n\n
Specialized Storage for Common Shed Items
\n\n
Long-Handled Tool Organization
\n\nLong-handled tools like rakes, shovels, and brooms are notorious shed space-eaters when left leaning against walls. The solution? Get them off the floor and onto the walls where they belong.\n\nWall-mounted tool racks are game-changers for vertical storage. Simple grip-style racks hold each tool handle securely and cost just a few dollars per unit. Install them at shoulder height for easy access—you’ll never deal with the domino effect of falling tools again. One homeowner shared that after installing wall racks, she reclaimed nearly four feet of floor space in her 8×10 shed.\n\nDon’t overlook those awkward corner spaces. Corner-mounted tool holders maximize dead zones perfectly, keeping multiple tools organized without eating into your main wall space. This works especially well in a tool workshop setup where every inch counts.\n\nFor budget-friendly DIY enthusiasts, PVC pipe organizers offer incredible value. Cut 4-inch diameter pipes into 6-8 inch sections, mount them horizontally to a board, and slide tool handles right in. This solution costs under twenty dollars and holds a dozen tools easily while adding a custom touch to your space.\n\n
 \n
\n\n\n
Small Hardware and Fastener Storage
\n\nSmall hardware items have an uncanny ability to disappear into chaos if you don’t give them proper homes. The solution lies in creating a multi-layered storage approach that keeps every screw, nail, and washer visible and accessible.\n\nStart with clear plastic drawer systems mounted on your workbench or wall. These shallow drawers let you see contents at a glance, eliminating the frustrating hunt through mystery containers. Label each drawer specifically—”wood screws 1-inch,” “finishing nails,” “washers”—so family members know exactly where items belong.\n\nFor smaller quantities, clear mason jars or baby food jars work wonderfully. Mount the lids underneath a shelf, then twist jars into place. This vintage approach keeps parts visible while maximizing vertical space. One homeowner shared that this system transformed her shed from “hardware graveyard to functional workspace in an afternoon.”\n\nCompartmented tackle boxes or hardware organizers with adjustable dividers offer portable solutions. You can carry needed parts to your project site without hauling your entire collection. The key is avoiding the dreaded junk drawer phenomenon by assigning every item a specific location and returning it immediately after use.\n\n
Extension Cord and Hose Management
\n\nNothing derails a simple yard project faster than spending 15 minutes untangling extension cords or wrestling with a kinked garden hose. Let’s fix that problem for good.\n\nWall-mounted hose reels are game-changers for keeping hoses neat and accessible. Mount them at waist height near your shed entrance so you can quickly wind up hoses after use. Look for reels with crank handles—they make rewinding effortless and prevent the arm fatigue that comes with manual wrapping.\n\nFor extension cords, simple wall-mounted hooks or cord organizers work beautifully. Install several hooks vertically and loop cords in figure-eight patterns to prevent tangling. Label each cord with its length using tape or tags so you grab the right one every time.\n\nIf floor space isn’t an issue, freestanding hose carts offer mobility advantages. One homeowner shared how her wheeled cart lets her move the entire setup to different areas without reinstalling hardware—perfect for renters or those who frequently rearrange.\n\nWhichever option you choose, keep these items off the floor. Elevated storage prevents moisture damage, rodent nesting, and the inevitable trip hazards that cluttered shed floors create.\n\n\n
Maintaining Your Organization System Year-Round
\n\nGetting your shed organized is an achievement worth celebrating, but the real challenge begins now: keeping it that way! The good news? Maintaining your system takes far less effort than creating it, especially when you build simple habits into your routine.\n\nStart with a 10-minute weekly check. Every Saturday morning or Sunday evening, do a quick walk-through. Hang up tools that have migrated to workbenches, return items to their labeled bins, and sweep out debris. This small time investment prevents the gradual slide back into chaos that catches most people off guard.\n\nSeasonal cleanouts are your secret weapon for long-term success. At the beginning of each season, spend 30 minutes removing items you no longer need. Before storing holiday decorations or swapping out seasonal equipment, ask yourself: “Did I actually use this last year?” If not, it’s time to donate or discard. This practice naturally prevents accumulation without requiring constant vigilance.\n\nImplement the “one in, one out” rule immediately. Bought a new rake? The old one goes. New storage bin arrives? Find a home for it before filling it. This simple principle keeps your shed’s capacity in check and forces intentional purchasing decisions.\n\nMake organization a family affair. When everyone who uses the shed understands the system, maintenance becomes shared responsibility. Show family members where items belong and why the system matters. Even young children can return garden toys to designated bins when expectations are clear.\n\nConsider setting up an inventory management system to track what you have. This prevents duplicate purchases and helps you stay aware of your shed’s contents without rummaging through everything. A sustained organizational system isn’t about perfection; it’s about consistency and having routines that fit your lifestyle.\n\n\nHere’s the truth about shed organization: it’s not a weekend project you complete and forget about. Think of it as an evolving system that grows and adapts with your needs. The garden tools you use constantly this spring might get tucked away come winter, while snow equipment moves to the front. Your shed organization should flex with these seasonal changes.\n\nThe good news? You don’t need to overhaul everything at once. Start with the area causing you the most frustration. Maybe it’s those tangled garden hoses or the pile of paint cans you can never find when you need them. Pick one system—pegboards for hand tools, overhead storage for seasonal items, or clear bins for small parts—and get it working smoothly before expanding to the next zone.\n\nRemember, every minute you invest in organization pays dividends down the road. An organized shed protects your investments from damage, prevents you from buying duplicates of things you already own, and saves countless hours of searching through clutter. That expensive lawn mower lasts longer when it’s properly stored, and those holiday decorations survive year after year when they’re not crushed under miscellaneous boxes.\n\nReady to reclaim your shed? Take thirty minutes this week to assess what you’re working with. Walk inside, snap a few photos, and identify your biggest pain points. That simple first step transforms overwhelm into an actionable plan. Your future self will thank you every time you walk into a space where everything has its place.