
The Easiest Way to Roof Your Shed (Even If You’ve Never Done It Before)
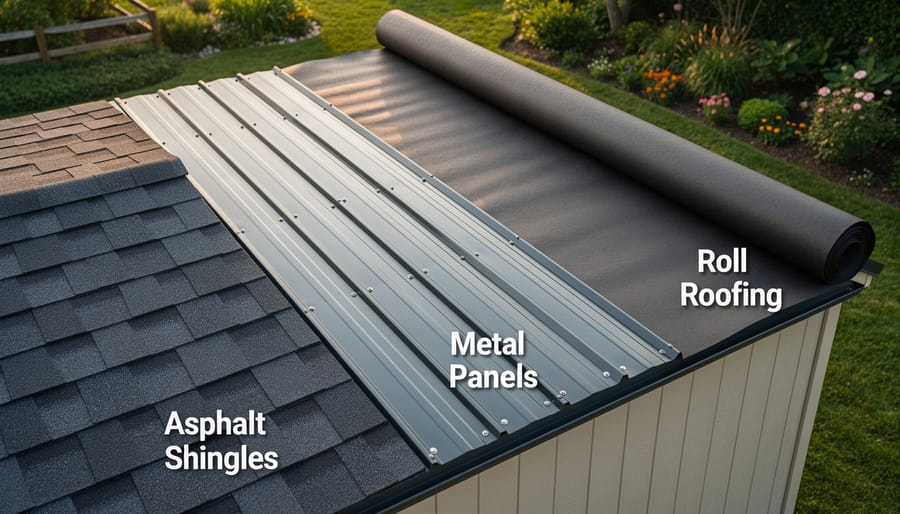
Choose roofing materials rated for beginners like corrugated metal panels or asphalt shingles, which install with basic tools and require minimal experience. Metal panels snap together with exposed fasteners you simply drill through, while shingles follow a straightforward overlap pattern that forgives minor imperfections.
Measure your shed roof carefully and add 10% extra material to account for cuts, overlaps, and mistakes that naturally happen during your first roofing project. This buffer prevents frustrating mid-project trips to the hardware store and gives you confidence to work at your own pace.
Start with proper roof deck preparation by ensuring your plywood sheathing is smooth, dry, and free of protruding nails. Lay down roofing felt or synthetic underlayment as your waterproof barrier, working from bottom to top with 6-inch overlaps at each seam.
You absolutely can roof your own shed, even if you’ve never tackled a roofing project before. The key difference between a frustrating experience and a rewarding weekend accomplishment lies in choosing the right materials for your skill level and understanding the logical sequence of steps. Thousands of homeowners complete their first shed roof each year with nothing more than determination, basic carpentry tools, and clear guidance.
This guide walks you through beginner-friendly roofing options, helps you avoid the most common mistakes that trip up first-timers, and breaks down each phase into manageable tasks. Whether you’re covering a small garden shed or a larger workshop, the fundamental techniques remain surprisingly straightforward once you understand the underlying principles of keeping water flowing away from your structure.
Why Shed Roofing Is Easier Than You Think
If you’ve been putting off roofing your shed because it feels overwhelming, here’s some good news: shed roofing is genuinely one of the most beginner-friendly construction projects you can tackle. Let me explain why this project is more accessible than you might think.
First, the scale works in your favor. Most sheds measure between 8×10 and 12×16 feet, meaning you’re working with manageable roof sections that don’t require massive material handling or complex coordination. You can typically complete the entire project in a weekend, unlike house roofing that takes professional crews several days.
The stakes are refreshingly lower, too. While you absolutely want to do quality work, a small mistake on your shed roof won’t compromise your family’s living space or cost thousands to repair. This makes it an ideal learning project where you can take your time and really understand each step without the pressure of a full-scale home renovation.
Materials designed for shed roofing are remarkably forgiving. Rolled roofing, for instance, goes down with basic tools and doesn’t require the precision cutting and alignment that asphalt shingles demand on a house. Even if you choose shingles, the smaller surface area means fewer cuts and less waste to worry about.
Here’s another advantage: most areas have minimal or no building code requirements for small shed roofs, especially if your structure is under a certain square footage. You won’t need permits or inspections in many cases, though it’s always smart to check your local regulations first.
The truth is, thousands of homeowners complete their first roofing project on a shed every year. With straightforward materials, clear instructions, and a manageable workspace, you’re setting yourself up for a confidence-building success.
Choosing the Right Roofing Material for Easy Installation
Asphalt Shingles: The DIY Standard
If you’re new to roofing projects, asphalt shingles are your best friend. They’re the most forgiving option for beginners, and here’s why: they’re affordable (typically $1-3 per square foot), widely available at any home improvement store, and mistakes won’t break the bank or require specialized tools to fix.
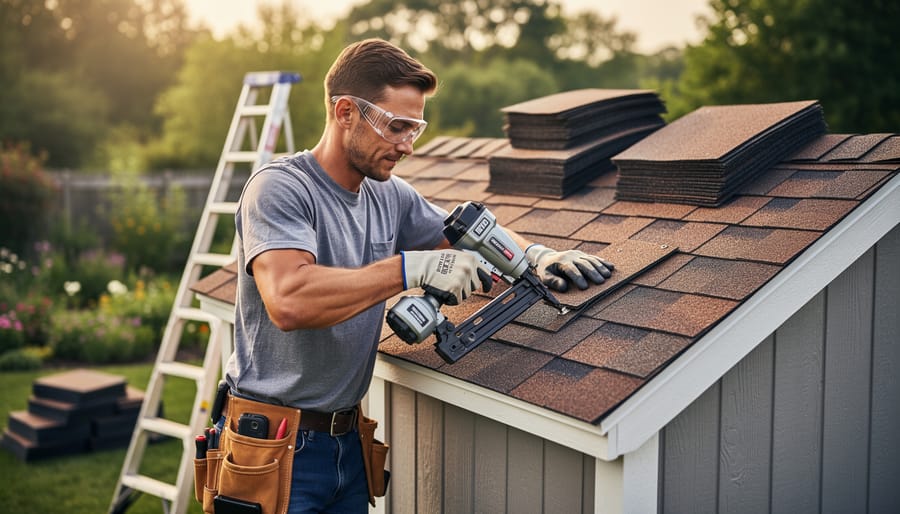
The installation process is wonderfully straightforward. You’ll need roofing felt, shingles, nails, and a hammer or nail gun. Start at the bottom edge of your shed roof and work your way up in overlapping rows. Each shingle has a visible tar line that shows you exactly where the next row should sit—it’s like roofing with built-in guidelines.
For an average 10×12 shed, expect to spend a full weekend on this project if you’re working solo. The first few rows might feel slow as you get the hang of alignment, but most DIYers find their rhythm quickly. One homeowner shared that after feeling nervous about his first roofing project, he was surprised how manageable it became once he completed the starter row.
The real beauty of asphalt shingles? They look professional even when installed by a first-timer, giving your shed that polished, complete appearance without requiring years of experience.
Metal Roofing Panels: Fast and Foolproof
Metal roofing panels are a fantastic choice if you want your shed roofing project to go smoothly and quickly. Corrugated metal sheets and standing seam panels are particularly popular among DIYers because they’re lightweight, durable, and surprisingly straightforward to work with.
The beauty of installing metal roofing lies in its speed. Large panels cover more area faster than individual shingles, meaning you can finish a basic shed roof in just a day or two. These panels also handle weather beautifully, resisting rot, insects, and fire while requiring virtually no maintenance.
For best results, start at the bottom edge of your roof and work upward. Overlap each panel by at least one corrugation (for corrugated metal) or follow the manufacturer’s guidelines for standing seam systems. Use special metal roofing screws with rubber washers to prevent leaks, and always pre-drill holes to avoid cracking the panels.
One homeowner shared that switching from traditional shingles to metal panels cut his installation time in half and gave him peace of mind knowing his shed would stay dry for decades. Just remember to wear gloves since metal edges can be sharp, and you’ll have a roof that’s both foolproof and long-lasting.
Roll Roofing: The Fastest Option
For smaller sheds with low-slope or nearly flat roofs, roll roofing offers the quickest path from bare wood to weatherproof protection. This mineral-surfaced material comes in long rolls that you simply unroll, overlap, and secure with roofing nails or adhesive. Many DIYers complete an 8×10 shed roof in just a few hours.
Roll roofing makes the most sense when you’re working with utility sheds, garden tool storage, or temporary structures where appearance isn’t your top priority. The installation process is wonderfully straightforward—no complicated cutting patterns or precise measurements required. You’ll appreciate how forgiving it is for beginners tackling their first roofing project.
However, it’s important to understand the tradeoffs. Roll roofing typically lasts 5-8 years compared to 15-20 for asphalt shingles, and it doesn’t offer the dimensional look that many homeowners prefer. Think of it as the practical choice when you need fast protection on a budget and don’t mind replacing it sooner. It’s perfect for that basic storage shed tucked behind your garage, but perhaps not ideal for a showcase shed visible from your home’s main entrance.
What to Avoid as a Beginner
While you’re building confidence with your shed roofing project, it’s smart to steer clear of materials that come with a steep learning curve. Cedar shakes and wood shingles might look beautiful, but they require precise installation techniques and special tools that can frustrate beginners. Clay or concrete tiles are another option best left for later—they’re heavy, need additional structural support, and demand professional-level expertise to install correctly. Metal standing seam roofs also fall into the advanced category, requiring specialized equipment and experience with waterproof seaming. Stick with beginner-friendly options like asphalt shingles or rolled roofing for your first project. You can always upgrade to those stunning premium materials once you’ve mastered the basics and feel ready for a bigger challenge.
Essential Tools You Actually Need (No Fancy Equipment Required)
Good news: you don’t need a contractor’s fully-loaded truck to tackle your shed roof. With just a handful of basic tools, most of which you might already own, you can get this job done without breaking the bank.
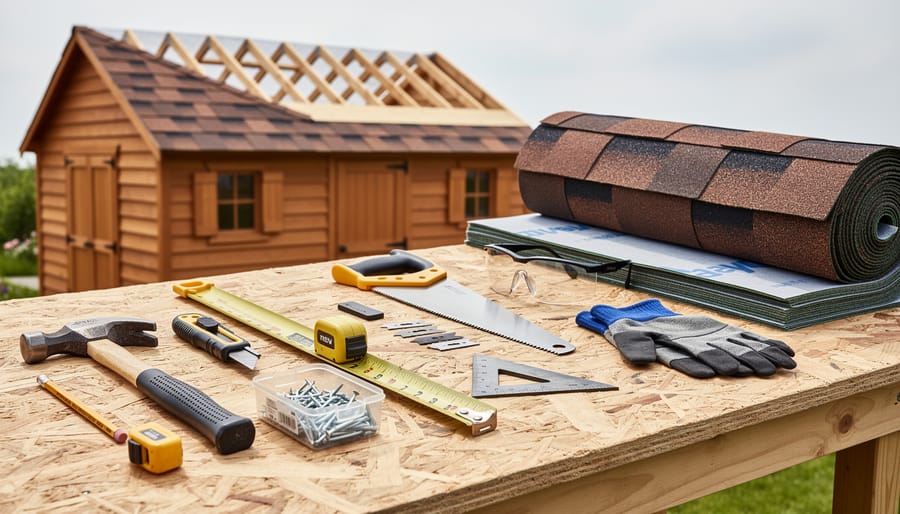
Here’s what you actually need. A sturdy tape measure and carpenter’s square will help you measure accurately and keep everything straight. You’ll want a utility knife with plenty of extra blades for cutting shingles or other roofing materials. A hammer is essential for nailing, though a roofing nailer makes the job faster if you can borrow one from a friend or rent it from your local hardware store for about twenty dollars a day.
A chalk line helps you mark straight guidelines across your roof, which keeps your rows looking professional. You’ll also need a pry bar for removing any old materials and a ladder tall enough to reach your shed roof comfortably. Safety matters, so grab a pair of work gloves and some non-slip shoes you don’t mind getting dirty.
What can you skip? That expensive pneumatic nail gun might seem appealing, but a regular hammer works perfectly fine for a small shed project. Many DIYers find hand-nailing gives them more control anyway. Similarly, while a circular saw is handy for cutting plywood, you can often have your lumber yard make those cuts for free when you purchase materials.
Consider borrowing items you’ll only use once, like that chalk line or a specific size ladder. Most neighbors or family members are happy to lend tools for a weekend project. Save your money for quality safety equipment and the roofing materials themselves.
One homeowner shared that she completed her entire eight-by-ten shed roof using tools she already had in her garage, spending less than thirty dollars on additional supplies. That’s the beauty of shed roofing – it’s genuinely achievable with basic equipment and a can-do attitude.
Preparing Your Shed Roof: The Steps That Make Everything Easier
Here’s the truth about roofing projects: most problems happen because someone skipped the prep work. I learned this the hard way on my first shed roof when a buckled board created a visible dip that telegraphed through my shingles. Don’t be that person! Taking time to prepare your roof deck properly will save you hours of frustration and ensure your finished roof looks professional.
Start by thoroughly inspecting your roof deck. Walk across it carefully, listening for creaks and feeling for soft spots. Any damaged, rotted, or warped boards need replacing before you install a single shingle. This step is non-negotiable. A friend of mine once told me he tried roofing over a questionable board to save time, only to have it fail six months later, requiring him to tear off new shingles to fix it. Make sure your deck is structurally sound, just like having a proper shed foundation matters for the entire building.
Next, consider waterproofing your roof deck before adding underlayment. This extra layer of protection creates insurance against moisture damage. Your underlayment comes next, typically roofing felt or synthetic material. Roll it out horizontally, starting at the bottom edge and working upward. Overlap each row by at least four inches, and secure it with staples or roofing nails. This creates a water-shedding barrier that protects your deck even if shingles fail.
Don’t skip the drip edge! This L-shaped metal flashing goes along your roof’s edges before you shingle. It directs water away from the fascia board and into your gutters, preventing rot. Install it along the eaves first, then up the rake edges, overlapping the underlayment on the rakes but sitting beneath it at the eaves.
These preparation steps might add a few hours to your project, but they’re the difference between a roof that lasts fifteen years and one that needs repairs in three. Take your time here, and everything that follows becomes significantly easier.
Step-by-Step: Installing Your Shed Roof the Easy Way
Starting Your First Row (Getting It Right From the Beginning)
Getting your first row right sets the stage for everything that follows, so take a deep breath—we’ll make this simple. Start by snapping a chalk line parallel to the eave, typically about a half-inch down from the edge. This creates your guide for that crucial starter course and ensures a consistent overhang that protects your shed walls from water damage.
Here’s a game-changer tip from seasoned DIYers: use a spacer block cut to your desired overhang width (usually between half an inch to one inch). This little helper keeps everything uniform as you work your way across. Simply butt it against the edge, align your shingle, and you’re golden.
For maintaining alignment across multiple rows, many homeowners swear by the vertical chalk line method. Every few feet, snap a vertical line from bottom to top. These reference points catch misalignment before it becomes a headache. One homeowner shared that this trick saved her entire project when she noticed a gradual drift halfway through—she simply recalibrated using her vertical guides. Remember, spending an extra ten minutes on setup prevents hours of frustration later.
Working Your Way Up
Once your first row is secure, you’re ready to establish your working rhythm. Here’s the pattern that makes roofing surprisingly manageable: each new shingle should overlap the previous row by about half its exposure, typically 5-6 inches depending on your material. Think of it like stacking bricks—you want the seams offset so water never has a straight path downward.
For nail placement, position them about three-quarters of an inch from each side edge and just below where the next row will cover them. Most beginners make the mistake of placing nails too high, which leaves them exposed to weather, or too low, where they won’t grip the shingle below. The sweet spot is typically 5-6 inches from the bottom edge.
Maintaining consistent exposure is where many DIYers stumble. Here’s a game-changer: snap a chalk line across your roof before laying each row. It takes an extra minute but keeps everything straight and prevents that frustrating wavy appearance that screams “amateur job.”
Common pitfalls to sidestep: don’t overdrive your nails flush with the surface—they should be snug but not crushing the shingle. Also, work your way up methodically rather than jumping around. Your shed will thank you for the patience, and honestly, the repetitive pattern becomes almost meditative once you find your groove.
Capping the Ridge and Finishing Touches
You’re almost there! The ridge cap is your shed’s crown and its final defense against rain and snow. This is easier than you might think, and getting it right ensures all your hard work stays protected.
Start by cutting ridge cap shingles from standard three-tab shingles (just cut along the perforations) or purchase pre-made ridge caps. Begin at one end of the ridge and work toward the other, overlapping each cap by about five inches. Secure each piece with one nail on each side, about an inch from the edge and five and a half inches from the exposed end. This placement ensures the next cap will cover your nail heads completely.
Here’s a helpful tip from experienced DIYers: on windy days, the last cap can lift more easily, so add a dab of roofing cement under the final shingle for extra hold.
Before calling it done, conduct a final walkthrough. Check that all nail heads are covered and sealed. Walk the perimeter and look for any lifted edges or gaps. Run your hand gently along seams to feel for anything that might catch wind. These small inspections now prevent big headaches later.
Stand back and admire your work! You’ve just completed a roofing project that many people assume requires professional help. Your shed is now weathertight and ready to protect your belongings for years to come.
Common Mistakes That Make Shed Roofing Harder (And How to Avoid Them)
Even experienced DIYers can stumble when roofing a shed. Let’s look at the most common pitfalls and how you can sidestep them for a smooth project.
Working in the wrong weather is mistake number one. Lisa from Portland learned this the hard way: “I rushed to finish on a cloudy Saturday, and it started raining halfway through. The moisture trapped under my shingles caused problems within months.” The fix is simple but crucial. Check your weather forecast for at least 48 hours of dry conditions. Roofing materials need dry surfaces to bond properly, and wet wood won’t seal correctly. Temperature matters too. Most roofing adhesives and sealants work best between 50-85 degrees Fahrenheit.
Improper nail placement ranks second on the mistake list. Nails placed too high on shingles won’t hold them down properly in wind. Too low, and they’ll be visible and vulnerable to leaks. The sweet spot is typically about 1 inch below the adhesive strip on asphalt shingles. Use a chalk line to keep your rows straight, and don’t overdrive nails. They should be flush with the shingle surface, not sunk in.
Skipping ventilation planning seems harmless until condensation and heat buildup damage your shed’s contents and structure. Even basic sheds benefit from ridge vents or gable vents. This ties directly into your shed insulation strategy since proper airflow prevents moisture problems that insulation alone can’t solve.
Finally, rushing the job creates compounding errors. Mike from Texas says, “I tried finishing in one day and ended up with crooked rows and gaps. Redoing sections took longer than doing it right initially.” Give yourself adequate time. A typical 10×12 shed roof takes most DIYers a full weekend when done properly.
When to Consider Professional Help
Knowing when to call in a professional isn’t about admitting defeat—it’s about making smart decisions that save you time, money, and potential headaches. Let’s look at situations where hiring help truly makes sense.
If your shed roof has a steep pitch (anything over a 6/12 slope), safety becomes a serious concern. Working on steep angles requires specialized equipment and experience that most DIYers simply don’t have. Similarly, sheds larger than 12×16 feet involve hefty materials and extended workdays that can quickly become overwhelming.
Physical limitations deserve honest consideration too. Roofing requires climbing ladders repeatedly, lifting materials overhead, and maintaining balance on uneven surfaces. There’s absolutely no shame in recognizing these challenges—your safety matters more than any project.
Time constraints often get overlooked. What seems like a weekend project can stretch into weeks if you’re juggling work and family commitments. A professional crew can complete in one day what might take you several weekends, protecting your shed from weather exposure during construction.
Consider your comfort level with heights and power tools. If you feel anxious working above ground or uncertain about using circular saws, that stress isn’t worth it.
The good news? Many roofing contractors offer partial services. They might handle the tear-off and structural work while you finish the easier cosmetic elements, giving you cost savings and valuable learning experience. Learning from professional roofing techniques during installation can build your confidence for future projects.
You’ve made it through the entire roofing process, and here’s the exciting truth: roofing your shed is absolutely within your reach as a DIY project. What might have seemed overwhelming at first becomes straightforward when you break it down into manageable steps and approach each one methodically.
The key to success lies in your preparation. Take the time to gather quality materials, check your measurements twice, and don’t rush through the planning phase. Once you’ve got everything lined up, the actual installation follows a logical sequence that builds your confidence with each completed step. Many homeowners who’ve tackled this project share that the anticipation was actually more stressful than the work itself.
Remember, every expert DIYer was once a beginner standing exactly where you are now. The difference is they took that first step, worked carefully through the process, and discovered they were more capable than they initially believed. Your shed roof doesn’t need to be perfect to be perfectly functional.
When you step back and admire your finished roof, you’ll feel a genuine sense of accomplishment. More importantly, you’ve created a protective barrier that will safeguard your tools, equipment, and stored items for many years to come. A well-installed roof means your investment in that shed pays dividends through reliable protection from the elements. So gather your materials, set aside a weekend, and transform your shed into the weatherproof storage solution you need. You’ve got this.
Looking for a storage sheds?
Browse our full range of storage sheds from authorized dealer brands. Free shipping to the continental US.