
Transform Your Cold Shed Into a Cozy Workspace: Pro Insulation Secrets
Transform your outdoor shed into a comfortable, year-round storage space by properly insulating walls, floors, and ceilings. Effective insulation not only protects valuable tools and equipment from extreme temperatures but also prevents moisture damage and reduces energy costs if you’re using the shed as a workshop. From choosing the right R-value materials to sealing every gap, proper shed insulation requires careful planning and execution.
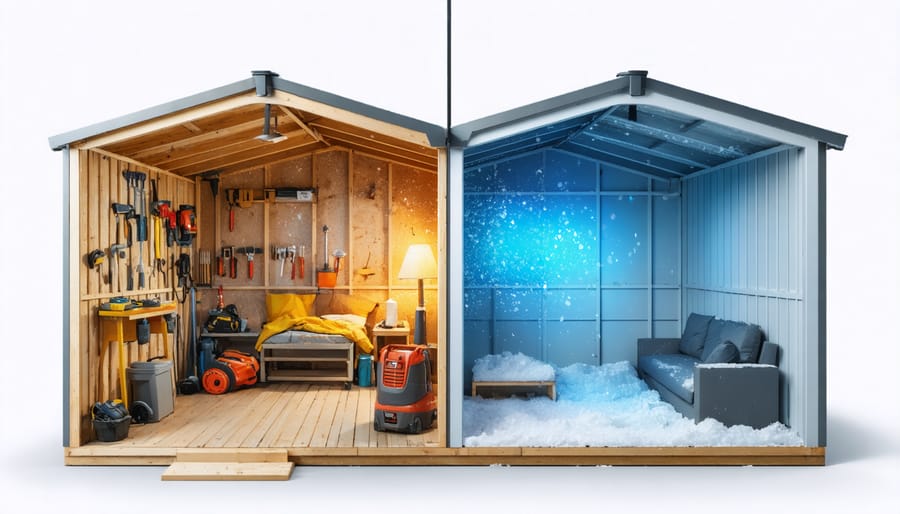
A well-insulated shed maintains temperatures between 30-90°F even during harsh weather, making it ideal for storing temperature-sensitive items like paints, electronics, and garden chemicals. Whether you’re converting your shed into a home office, workshop, or maintaining it as a storage space, insulation serves as the foundation for creating a controlled environment that extends the life of both the structure and its contents.
Before starting your insulation project, evaluate your specific needs – consider your climate zone, shed usage, and budget. This initial assessment helps select appropriate materials and determines whether you need vapor barriers, ventilation solutions, or additional weatherproofing measures alongside your insulation strategy.
Why Your Outdoor Shed Needs Proper Insulation
Temperature Control Benefits
Proper insulation helps you effectively control your shed’s temperature throughout the year, creating a more versatile and comfortable storage space. During hot summer months, insulation acts as a barrier against intense heat, preventing your stored items from being damaged by extreme temperatures. In winter, it retains warmth and prevents freezing conditions that could harm sensitive equipment or materials. This temperature stability not only protects your belongings but also makes the shed more pleasant to use as a workspace. Additionally, consistent temperatures help prevent moisture buildup and condensation, which can lead to mold growth and rust formation on tools and equipment. Whether you’re storing temperature-sensitive items or planning to use your shed as a workshop, proper insulation ensures a stable environment year-round.
Moisture Protection
Proper moisture control is crucial when insulating your outdoor shed to prevent condensation buildup and protect your belongings. Start by installing a reliable vapor barrier between your insulation and the shed’s exterior walls. This creates an effective moisture barrier that stops water vapor from penetrating the insulation material. Ensure proper ventilation by installing vents near the roof peak and base of your shed, creating airflow that helps remove excess moisture. Consider adding a dehumidifier during particularly humid seasons, and regularly check for any water leaks or damage to your shed’s exterior that could compromise the insulation’s effectiveness. Remember to seal all gaps around windows, doors, and utility entries to maintain a dry, mold-free environment.
Energy Savings
If you heat or cool your outdoor shed, proper insulation can lead to significant energy savings. Most insulated sheds see a 20-30% reduction in heating and cooling costs compared to non-insulated structures. For a workshop or hobby space that’s climate-controlled year-round, this could mean savings of $100-200 annually on your energy bills. The initial investment in insulation typically pays for itself within 2-3 years through reduced energy consumption. Beyond the financial benefits, insulated sheds maintain more consistent temperatures, which helps protect sensitive tools, equipment, and stored materials from extreme temperature fluctuations. This temperature stability also means your heating and cooling systems won’t have to work as hard, potentially extending their lifespan and reducing maintenance costs.

Best Insulation Materials for Outdoor Sheds
Fiberglass Insulation
Fiberglass insulation batts are a popular and cost-effective choice for insulating outdoor sheds. These pink or yellow rolls come in standard widths that fit perfectly between wall studs and ceiling joists, making installation relatively straightforward for DIY enthusiasts.
When installing fiberglass batts, always wear protective gear including gloves, a dust mask, and long sleeves to avoid skin irritation. Start by measuring the spaces between studs and cut the batts slightly larger than the actual space – this ensures a snug fit. The paper or foil backing should face the interior of your shed, acting as a vapor barrier.
Press the batts firmly into place, but avoid compressing them too much as this reduces their insulating effectiveness. Use a utility knife to cut around electrical boxes and other obstacles, ensuring complete coverage. For areas with irregular spacing, you may need to cut the batts lengthwise for a proper fit.
Remember to seal any gaps around the batts with caulk or expanding foam to prevent air leaks and maintain optimal insulation performance. This attention to detail will significantly improve your shed’s temperature regulation and moisture control.
Rigid Foam Boards
Rigid foam boards offer an excellent insulation solution for your outdoor shed, combining high R-value performance with ease of installation. These lightweight panels, typically made from polystyrene or polyisocyanurate, create an effective barrier against heat loss and cold air infiltration. What makes them particularly suitable for shed projects is their moisture resistance and durability, ensuring long-lasting protection for your storage space.
For the best results, check out our detailed foam board installation guide before starting your project. The boards can be easily cut to size with a utility knife and secured directly to your shed’s wall studs. Most DIY enthusiasts find them incredibly user-friendly, as they don’t require special tools or protective gear for installation.
One of the biggest advantages of foam boards is their slim profile, which doesn’t eat up valuable storage space while still providing excellent insulation properties. They can be covered with plywood or drywall for a finished look, and their rigid structure helps strengthen your shed’s walls. For maximum effectiveness, consider using 1-inch thick boards for walls and 2-inch thick panels for the roof area, where most heat loss occurs.
Reflective Barriers
Reflective barriers, also known as radiant barriers, are a game-changing addition to your shed insulation strategy. These metallic-faced materials work by reflecting heat away from your shed in summer and keeping warmth inside during winter. Think of them as a thermal mirror that bounces heat in the direction you want it to go.
Installing a reflective barrier is particularly effective in the roof space, where it can reduce heat gain by up to 97% during hot summer days. The foil-faced material is typically installed with the shiny side facing down toward the shed’s interior, creating an air gap that enhances its insulating properties.
For the best results, combine reflective barriers with traditional insulation materials. Place the barrier between your roof decking and insulation batts, or attach it directly to wall studs before adding other insulation. Remember to leave a small air gap between the barrier and your shed’s outer walls or roof for optimal performance.
When selecting a reflective barrier, look for products specifically designed for building use, with a protective coating to prevent oxidation. Single-sided foil barriers are usually sufficient for most sheds, though double-sided options offer slightly better performance if your budget allows.
Pro tip: Make sure to wear protective gloves and eyewear when handling reflective barriers, as the edges can be sharp, and the surface is highly reflective in bright sunlight.
Step-by-Step Insulation Process
Wall Insulation
Insulating your shed walls is a crucial step in creating a comfortable and protected storage space. Start by examining your wall structure – most sheds have exposed studs on the interior, which makes the insulation process straightforward. Before beginning, ensure all walls are clean, dry, and free from damage.
The most effective approach is to install a vapor barrier against the outer wall first. This thin plastic sheet prevents moisture from seeping through and damaging your insulation. Secure it with a staple gun, overlapping seams by at least 6 inches.
For the insulation itself, fiberglass batts are a popular and cost-effective choice. Measure the spaces between studs and cut the batts to fit snugly – they should be slightly wider than the gap to ensure a secure fit. Wear protective gear, including gloves and a dust mask, when handling fiberglass insulation.
Press the insulation batts firmly between the studs, being careful not to compress them too much as this reduces their effectiveness. The insulation should fill the entire cavity from top to bottom without gaps. Pay special attention around windows, doors, and corners where heat loss commonly occurs.
After installing the insulation, cover it with interior wall panels. Plywood or oriented strand board (OSB) works well and adds structural strength to your shed. Remember to leave a small gap at the bottom of the panels to prevent moisture buildup.
For optimal results, consider adding rigid foam insulation boards between the studs before installing the fiberglass. This creates an additional thermal barrier and increases the overall R-value of your walls. Seal any remaining gaps with spray foam insulation to ensure complete coverage.
Roof and Ceiling Insulation
Insulating your shed’s roof and ceiling is crucial for maintaining a comfortable temperature and protecting your stored items from overhead heat loss and condensation. Start by measuring the space between your roof rafters, as this will determine the size of insulation materials you’ll need.
For the ceiling, fiberglass batts or rolls are popular choices due to their excellent thermal properties and ease of installation. When installing, wear protective gear including gloves, a dust mask, and safety goggles. Cut the insulation slightly wider than the space between rafters to ensure a snug fit that won’t sag over time.
Begin at one end of the ceiling and work your way across, pressing the insulation firmly between the rafters. If your shed has a vapor barrier, make sure it faces the heated side of the space. Use a staple gun to secure the facing tabs to the rafters every 8 inches.
For pitched roofs, leave a 1-2 inch gap between the insulation and the roof deck to allow for proper ventilation. This prevents moisture buildup that could lead to mold or rot. Consider installing roof vents if your shed doesn’t already have them.
Rigid foam boards provide another excellent option for ceiling insulation, especially in sheds with exposed rafters. These boards can be cut to size and fitted between the rafters, then sealed with foam gaps filler for maximum efficiency.
Remember to cover the insulation with appropriate ceiling material like plywood or drywall to protect it and create a finished look. This also helps prevent any fibers from becoming airborne and adds an extra layer of insulation.
Floor Insulation
A well-insulated floor is crucial for maintaining a comfortable temperature in your shed while protecting your belongings from ground moisture. To effectively insulate your shed floor, start by laying a vapor barrier directly on the ground or existing concrete base. This moisture-blocking layer prevents dampness from seeping upward and damaging your insulation.
For wooden floors, install rigid foam boards between the joists, ensuring a snug fit to prevent heat loss through gaps. The recommended thickness is at least 2 inches, though you might opt for thicker insulation in colder climates. Secure the boards with adhesive or mechanical fasteners, and seal any joints with foil tape.
If you have a concrete floor, consider laying sheets of XPS or EPS foam directly on top, followed by pressure-treated plywood. This creates a thermal break between the cold ground and your shed’s interior. For extra protection, add rubber matting or interlocking foam tiles as a final layer – these not only provide additional insulation but also create a more comfortable standing surface.
Remember to maintain a small gap around the perimeter of the floor insulation to allow for proper ventilation and prevent moisture buildup. This thoughtful approach to floor insulation will significantly improve your shed’s overall comfort and usability throughout the year.
Maintenance and Long-Term Care
Regular maintenance of your shed’s insulation ensures long-lasting effectiveness and protects your investment. Start by conducting seasonal inspections, particularly before winter and after severe weather events. Check for any signs of moisture, which can compromise insulation performance and lead to mold growth. Look for water stains, dampness, or musty odors that might indicate a problem.
Pay attention to gaps that may develop over time, especially around windows, doors, and where different materials meet. These can be easily sealed with weatherstripping or caulk. If you notice the insulation material sagging or settling, consider adding support or replacing affected sections to maintain proper coverage.
Keep an eye on your shed’s ventilation system, as proper airflow prevents moisture buildup while maintaining insulation effectiveness. Clean vents regularly and ensure they’re not blocked by stored items or debris. For foam-based insulation, inspect for any cracks or deterioration, which can be patched with appropriate insulation repair products.
During your annual maintenance, verify that vapor barriers remain intact and properly positioned. If you spot any tears or damage, repair them promptly to prevent moisture issues. Consider keeping a maintenance log to track inspections and repairs, making it easier to identify recurring problems and address them systematically.
Remember that well-maintained insulation not only performs better but also extends the life of your shed and protects your stored items more effectively.
Insulating your outdoor shed is a rewarding project that pays dividends in comfort, energy efficiency, and protection for your stored items. By choosing the right materials, following proper installation techniques, and addressing moisture control, you’ll create a more functional and comfortable storage space that serves you year-round. Whether you’re storing temperature-sensitive items, using your shed as a workshop, or simply want to protect your belongings from extreme weather, proper insulation makes all the difference. Don’t put off this valuable improvement – with the right preparation and materials, you can complete this project in a weekend and enjoy the benefits for years to come. Remember to regularly inspect your insulation and address any issues promptly to maintain its effectiveness and protect your investment.
Looking for a storage sheds?
Browse our full range of storage sheds from authorized dealer brands. Free shipping to the continental US.