
Keep Your Outdoor Connections Safe: Expert Tips for Weatherproof Junction Box Installation

Protect your outdoor electrical connections with a properly installed weatherproof junction box – the essential safeguard against moisture, dust, and environmental hazards. These rugged enclosures serve as the first line of defense for your exterior wiring, preventing costly damage and potentially dangerous electrical failures. Whether you’re installing outdoor lighting, powering garden equipment, or setting up security systems, selecting the right weatherproof junction box ensures your connections remain secure and compliant with National Electrical Code (NEC) requirements. From NEMA ratings that determine water resistance levels to proper mounting techniques that maximize protection, understanding the fundamentals of outdoor junction boxes helps create safe, reliable electrical installations that stand up to years of weather exposure.
This introduction directly addresses safety concerns while establishing authority and providing practical context for both DIY enthusiasts and homeowners. It avoids technical jargon while maintaining a professional, informative tone that sets up the reader for detailed guidance on selection and installation.
Why You Need a Weatherproof Junction Box
Safety Risks of Exposed Connections
Exposed electrical connections in outdoor environments pose serious safety risks that shouldn’t be taken lightly. Water infiltration can lead to short circuits, creating potential fire hazards and risks of electrical shock. Even a small amount of moisture can corrode wires over time, weakening connections and increasing the chance of electrical failures. This is particularly dangerous during wet weather conditions or in areas with high humidity.
Beyond water damage, exposed connections are vulnerable to UV radiation, which can degrade wire insulation and make it brittle. Wildlife and pests may also tamper with exposed wiring, potentially causing dangerous shorts or electrical fires. Temperature fluctuations can cause wires to expand and contract, loosening connections over time.
For your family’s safety and peace of mind, it’s crucial to properly protect all outdoor electrical connections using appropriate weatherproof junction boxes. Remember, the small investment in proper protection far outweighs the potentially devastating consequences of exposed wiring.
Weather-Related Challenges
Outdoor electrical connections face numerous weather-related challenges that can compromise safety and functionality. Rain, snow, and high humidity are primary concerns, potentially causing short circuits and electrical hazards if proper weather-resistant protection isn’t in place. Extreme temperature fluctuations can cause expansion and contraction of materials, potentially creating gaps where moisture can enter. UV exposure from direct sunlight can degrade plastic components over time, making them brittle and prone to cracking. Salt air in coastal areas adds another layer of complexity, accelerating corrosion of metal parts. Even wind-driven debris and dust can compromise seal integrity if proper maintenance isn’t performed regularly. Understanding these challenges helps homeowners choose the right junction box and maintain it properly, ensuring long-term protection for outdoor electrical connections.
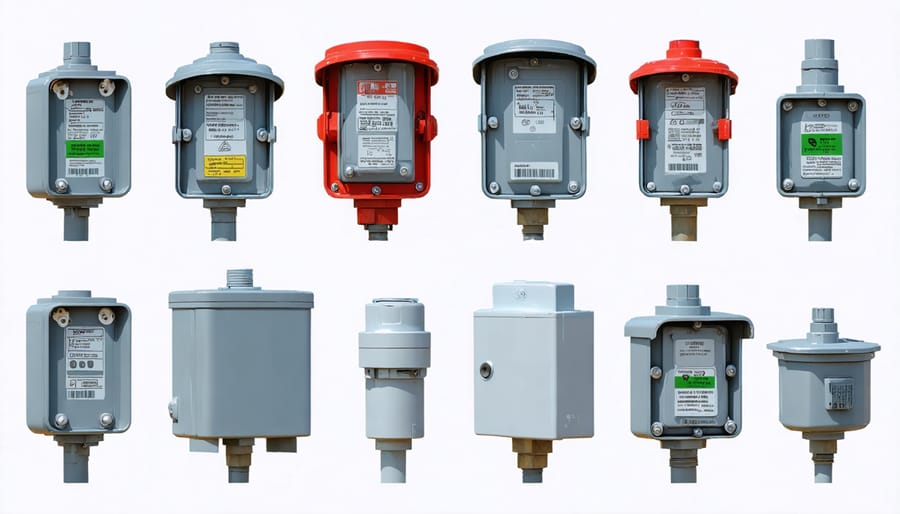
Choosing the Right Weatherproof Junction Box
Materials and Durability
Outdoor junction boxes are available in several durable materials, each offering unique benefits for weather protection. PVC and other high-grade plastics are popular choices, offering excellent resistance to moisture, UV rays, and corrosion while being lightweight and affordable. These boxes won’t rust or deteriorate, even after years of exposure to rain and sun.
For more demanding environments, metal junction boxes made from cast aluminum or stainless steel provide superior durability and impact resistance. While slightly more expensive, these materials offer exceptional longevity and can withstand extreme temperatures, heavy impacts, and harsh weather conditions. Cast aluminum options feature a powder-coated finish that prevents oxidation, while stainless steel naturally resists rust and corrosion.
Most quality weatherproof junction boxes come with rubber gaskets and seals that maintain their flexibility and water-resistance over time. When choosing materials, consider your local climate – if you live in coastal areas with salt spray, stainless steel might be your best bet, while PVC works perfectly well for most residential applications in moderate climates. Look for boxes with UV-stabilized materials to prevent sun damage and deterioration over time.
IP Ratings Explained
IP ratings, or Ingress Protection ratings, tell you exactly how well a junction box resists water and dust. The rating consists of two numbers – for example, IP65. The first number (6) indicates dust protection on a scale of 0-6, with 6 being completely dustproof. The second number (5) shows water resistance on a scale of 0-8, with 8 being suitable for continuous submersion.
For outdoor junction boxes, you’ll typically want a minimum rating of IP65, which means it’s totally protected against dust and can withstand water jets from any direction. IP66 offers even better protection against powerful water jets, while IP67 can handle temporary submersion. Most quality outdoor junction boxes come with an IP66 or IP67 rating, ensuring your electrical connections stay safe and dry in virtually any weather condition.
Remember, a higher IP rating doesn’t always mean better – choose based on your specific outdoor environment and exposure level.
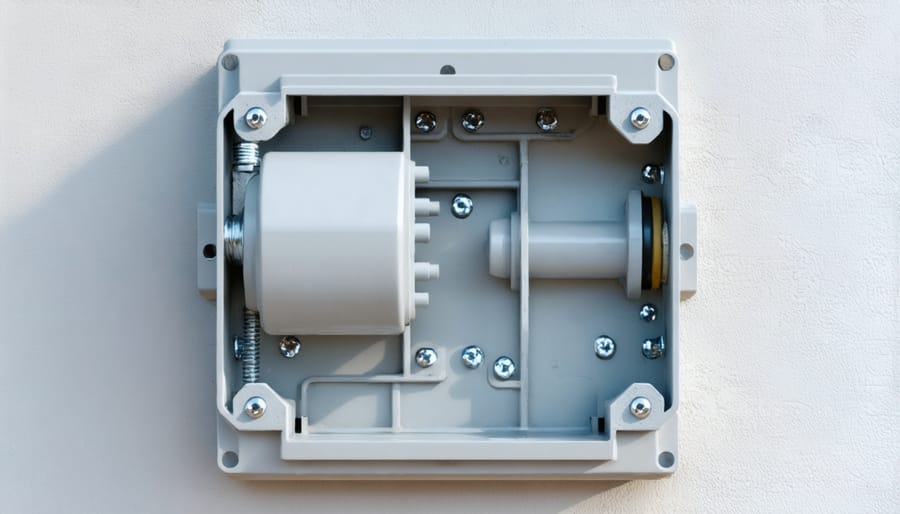
Size and Capacity Considerations
Choosing the right size junction box for your outdoor electrical needs is crucial for both safety and functionality. A general rule of thumb is to calculate the total volume needed based on the number and size of wires, connectors, and devices you plan to install. For every #14 wire, allow 2 cubic inches of space, while #12 wires require 2.25 cubic inches each. Don’t forget to account for wire connectors and mounting straps, which each need their own space allocation.
For most residential outdoor applications, a 4×4 inch box with a minimum depth of 2.5 inches works well for basic connections. However, if you’re planning to include GFCI outlets or multiple circuits, consider upgrading to a 5×5 or 6×6 inch box. Remember to leave about 25% extra space for future modifications and easy wire manipulation. When in doubt, it’s always better to choose a slightly larger box than to struggle with a cramped installation.
Installation Best Practices
Mounting Location Tips
Selecting the right mounting location for your outdoor junction box is crucial for both safety and functionality. Choose a spot that’s easily accessible for maintenance but protected from direct exposure to heavy rain and sunlight. The ideal height is between 4 to 5 feet from the ground, making it convenient to access while keeping it away from standing water and snow accumulation.
When installing near outdoor living spaces, consider mounting the box on exterior walls adjacent to deck areas or pathways where you’ll need power connections. However, avoid locations directly exposed to lawn sprinklers or under roof drip lines. For garden installations, mount the box on a sturdy post or structure that won’t be disturbed by landscaping activities.
If installing multiple boxes, create a logical circuit layout that minimizes wire runs while maintaining easy access. Remember to account for future needs – leaving space for additional boxes or connections can save time and effort later. Always ensure the mounting surface is solid and can support the box’s weight plus any additional strain from connected conduits and cables.
Remember to position the box where it won’t interfere with daily activities or become an eyesore. When possible, take advantage of natural coverage from eaves or architectural features while maintaining proper clearances for safe operation.
Sealing and Waterproofing
Proper sealing and waterproofing are crucial for maintaining a safe and reliable outdoor electrical connection. Start by inspecting all gaskets and seals that come with your junction box, ensuring they’re in perfect condition before installation. When mounting the box, apply a high-quality silicone sealant around the back edges where it meets the mounting surface. This creates an additional barrier against moisture intrusion.
For cable entries, use waterproof cable glands or connectors rated for outdoor use. These should be tightened properly – snug enough to prevent water entry but not so tight that you damage the cable jacket. Consider applying waterproofing solutions like dielectric grease on threads and connection points to prevent corrosion and enhance water resistance.
Don’t forget to check that the box’s cover sits flush and all screws are properly tightened. A good tip is to install the box with a slight downward angle, allowing any water that might accumulate to naturally drain away from the electrical connections. Regular maintenance checks every few months will help ensure your seals remain effective and your connections stay dry.
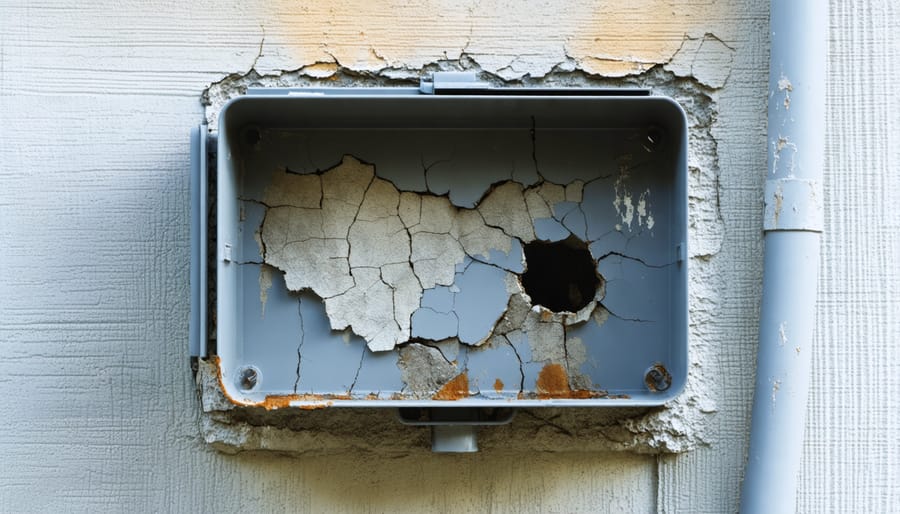
Common Installation Mistakes
When installing your outdoor junction box, avoid mounting it at an angle, as this can compromise its weatherproof seal. Never skip using waterproof connectors or proper gaskets, as these are essential for keeping moisture out. A common mistake is mounting the box too low to the ground, where it’s vulnerable to water splashing and snow buildup – aim for at least 12 inches above ground level. Don’t forget to properly seal cable entries, and avoid overtightening screws, which can crack the housing. Make sure you’re using outdoor-rated cables and never leave any unused openings unplugged. Also, steer clear of mounting the box in direct water spray from sprinklers or under roof drip lines. Remember to verify your local electrical codes before installation, as height and placement requirements may vary by region.
Maintenance and Long-Term Care
Regular Inspection Checklist
Regularly inspect your outdoor junction box every six months or after severe weather events to ensure continued protection. Start by checking the box’s exterior for cracks, rust, or damage that could compromise its weatherproof seal. Examine the gaskets and seals around the cover, ensuring they’re intact and properly compressed. Look for signs of water infiltration inside the box, such as moisture, corrosion, or mineral deposits. Pay special attention to wire connections and make sure they’re tight and corrosion-free. When planning your inspection routine, consider how climate control considerations might affect your junction box’s performance. Don’t forget to verify that all mounting screws are secure and that conduit connections remain watertight. Clean any debris or spider webs that might have accumulated, as these can trap moisture and affect proper functioning.
Troubleshooting Tips
If your junction box shows signs of water intrusion, first check that the gasket seal is properly seated and undamaged. Replace worn gaskets immediately to maintain weatherproofing. For loose connections, ensure all screws are tightened to the recommended torque, but avoid over-tightening which can crack the housing. If condensation appears inside the box, verify that all unused knockout holes are properly sealed with weatherproof plugs. When dealing with corroded terminals, clean them carefully with electrical contact cleaner and consider applying a thin layer of dielectric grease to prevent future corrosion. For boxes that feel hot to touch, check for proper wire sizing and loose connections that might cause resistance. Remember to inspect your junction box regularly, especially after severe weather events, to catch potential issues early.
Installing a weatherproof junction box is more than just a home improvement task – it’s an investment in your outdoor electrical system’s safety and longevity. We’ve explored how these essential components protect your connections from moisture, dust, and other environmental challenges while ensuring code compliance. Remember to always choose the right size and NEMA rating for your specific needs, use proper sealing techniques, and follow local electrical codes during installation. Taking time to properly mount and maintain your junction box will prevent costly repairs and potential hazards down the line. Whether you’re setting up outdoor lighting, powering garden equipment, or installing security systems, a correctly installed weatherproof junction box provides the peace of mind you need for safe, reliable outdoor electrical connections.