
How to Choose Galvanized Carport Parts: A Buying Guide for Structure and Electrical Components
Galvanized carport parts encompass everything from structural beams and roof panels to anchoring systems, trim, and electrical accessories that extend your carport’s functionality and lifespan. Whether you’re replacing a corroded post, expanding your existing structure, or adding lighting for nighttime access, understanding the full range of galvanized components available helps you choose parts that will withstand weather extremes for decades.
Key Takeaway: Galvanized carport parts include both structural elements (posts, panels, braces, anchors) and functional accessories (electrical boxes, lighting mounts), all treated with zinc coating to resist rust and corrosion for 20-30 years or more with minimal maintenance.
The zinc coating that defines galvanized steel creates a sacrificial barrier against moisture, salt, and temperature swings. This protective layer makes galvanized parts the standard for metal carports across climates, from coastal humidity to desert heat. But not all galvanized components are created equal, and homeowners often discover this the hard way after purchasing mismatched gauge steel or undersized anchors that fail during the first windstorm.
Most carport owners need parts for one of three reasons: repairing damage from accidents or severe weather, upgrading their structure with side panels or enclosed sections, or adding conveniences like electrical outlets and overhead lighting. Each scenario requires different knowledge about compatibility, load ratings, and local building codes. A replacement ridge cap demands attention to panel overlap and fastener spacing. An electrical box mount needs proper weatherproofing and grounding. Getting these details right the first time saves you from costly do-overs and potential safety hazards.
This guide walks you through the complete ecosystem of galvanized carport parts, helping you identify quality components, match specifications to your existing structure, and avoid the common mistakes that turn straightforward upgrades into frustrating projects.
Understanding Galvanized Carport Parts: What You’re Actually Buying

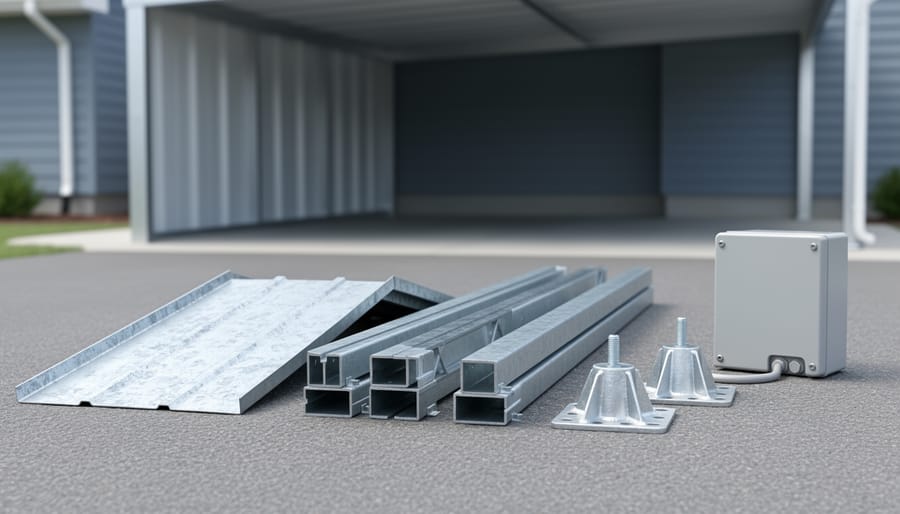
Structural Galvanized Parts
The backbone of any metal carport starts with its structural framework. Posts form the vertical supports, typically ranging from 2.5 to 3 inches in diameter and available in 12-gauge or 14-gauge steel. Heavier 12-gauge posts handle higher snow and wind loads, while 14-gauge works for lighter-duty applications in mild climates. Horizontal beams and purlins connect these posts, creating the frame that supports the roof, most measure 2 to 2.5 inches and come in matching gauges to ensure consistent strength throughout the structure.
Roof panels cap the framework, usually corrugated or ribbed galvanized sheets in 26 to 29 gauge. Thicker 26-gauge panels resist denting and last longer, though 29-gauge suits budget-conscious projects in protected locations. Gable trim and ridge caps finish the roofline, sealing edges against water intrusion while giving the carport a polished look.
Anchoring systems secure everything to the ground. Options include auger-style anchors that screw into soil, concrete anchors with expansion bolts, or asphalt anchors with driven spikes. Your choice depends on surface type and local building codes, which often specify anchor strength requirements based on wind zone ratings.
Electrical and Lighting Accessories
Adding electrical and lighting to your carport requires components designed specifically for metal structures. Standard indoor electrical boxes and mounting hardware won’t cut it, you need weatherproof parts that properly bond with galvanized metal and withstand outdoor conditions year-round.
The essential electrical accessories for metal carports include:
- Weatherproof conduit rated for outdoor exposure and UV resistance
- NEMA-rated junction boxes with gasketed covers to prevent moisture intrusion
- Metal-compatible mounting brackets that don’t compromise the galvanized coating
- Grounding hardware and bonding jumpers sized for your electrical load
- Rubber grommets and weather seals for wire entry points through metal panels
When selecting these components, look for outdoor ratings (typically NEMA 3R or higher) and verify they’re compatible with galvanized surfaces. Many homeowners make the mistake of using standard residential boxes meant for wood-framed structures, which creates both safety hazards and code violations. Wire management clips designed for metal roofing help keep your installation neat while preventing chafing against sharp edges. Most importantly, proper grounding isn’t optional with metal carports, it’s a critical safety requirement that protects against electrical faults and lightning strikes.
Key Buying Factors for Galvanized Carport Parts
Coating Quality and Durability
Not all galvanized coatings perform equally. Hot-dip galvanizing, where steel parts are submerged in molten zinc, creates a thick, uniform coating that forms a metallurgical bond with the base metal. This process produces the most durable finish for both carport framework components and metal electrical housings. According to hot-dip galvanizing lifespan estimates properly applied coatings can protect steel for decades, even in harsh environments.
Electroplated galvanizing applies a much thinner zinc layer through an electrical process. While cheaper, it offers minimal corrosion protection and wears through quickly on high-stress components like posts or anchor plates. You’ll find electroplating on budget-grade trim pieces and some electrical boxes, but it’s unsuitable for structural parts or exposed mounting hardware.
Coating thickness matters significantly. Look for minimum zinc coating weights of G90 (0.90 oz per square foot) for structural parts and G60 for lighter accessories. Thicker coatings cost more upfront but eliminate the expense and hassle of premature rust damage. Check manufacturer specifications before buying, vague claims like “galvanized finish” without coating details usually signal thin electroplating rather than robust hot-dip protection.
Compatibility with Your Carport Design
When replacing or adding parts to your carport, compatibility determines whether your project succeeds or turns into an expensive headache. Start by identifying your carport’s manufacturer and model, most structural components are manufacturer-specific, with proprietary spacing, bolt patterns, and connection methods. Even if two posts look similar, a 10-foot post from one brand may not align with the roof beam mounting holes from another.
For structural parts, verify three critical measurements: tube gauge thickness, center-to-center spacing of existing posts, and roof panel profile. A 14-gauge replacement post won’t safely support loads designed for 12-gauge framing, and mismatched spacing creates weak joints that concentrate stress. Check your carport’s original specifications or measure existing components before ordering.
Electrical components require different compatibility considerations. Mounting brackets for lights or junction boxes must accommodate your roof panel’s corrugation profile, flat-mount hardware won’t secure properly to ribbed panels. Grounding your electrical system to the metal framework is code-required in most areas, so plan for grounding lugs, clips, or straps that connect to the galvanized steel without compromising the protective coating. Standard indoor electrical boxes won’t fit metal studs; you’ll need surface-mount or pancake boxes designed for metal structures, with proper standoff spacing to prevent direct metal-to-wiring contact.
Weather Rating and Local Climate Needs
Your carport’s structural gauge requirements depend heavily on where you live. Areas with heavy snow loads typically require 12-gauge or 14-gauge steel for roof purlins and framing, while regions with minimal snow can use lighter 14-gauge or 16-gauge components. Wind ratings matter too, coastal areas and open plains need heavier structural members and additional bracing to meet wind load requirements, often calling for certified engineering and reinforced anchor systems. If you’re in a high-wind zone, expect to invest in thicker gauge posts and proper ground anchoring rated for your local wind speeds.
Note: Always verify your local building codes before purchasing, they specify both minimum structural gauges for snow and wind loads and required standards for outdoor electrical installations on metal structures.
Electrical components need appropriate weather ratings for your climate. Look for NEMA 3R or higher ratings on junction boxes and covers for outdoor carport use, these handle rain and ice formation. Coastal environments demand even better protection due to salt air corrosion; consider NEMA 4X rated stainless or heavily coated electrical boxes, and verify that mounting hardware and conduit are truly corrosion-resistant. UV resistance matters for any exposed wiring, conduit, or fixture housings, cheap plastic boxes crack and fade within a few years under constant sun exposure. Inland areas with extreme temperature swings need components rated for the full temperature range, as metal carports amplify heat in summer and cold in winter, potentially degrading inadequate electrical materials.
Budget vs. Long-Term Value
Replacement parts often cost less individually than complete kits, but buying piecemeal for extensive repairs or upgrades typically ends up more expensive than bundled solutions. For structural components, investing in heavier gauge materials upfront makes sense in harsh climates or high-wind areas, thinner metal saves money initially but may require earlier replacement or reinforcement. Quality galvanized coating adds to the price but dramatically extends lifespan, reducing long-term maintenance costs and future part replacements.
For electrical accessories, choosing outdoor-rated, properly weatherproofed components costs more than repurposing indoor hardware, but prevents corrosion failures and unsafe conditions that require expensive rework. Calculate total ownership cost over ten years rather than focusing solely on purchase price. Cheap parts that fail within three years ultimately cost more than quality components lasting decades, especially when you factor in labor for reinstallation and potential damage from failures.
Types of Galvanized Parts Compared: What Each Component Does
Replacement Structural Components
Most homeowners need replacement structural components for one of three reasons: repairing damage from storms or accidents, extending an existing carport to accommodate additional vehicles, or upgrading from a lighter-gauge structure that’s proving inadequate for local weather conditions.
Individual posts and vertical supports are the most commonly replaced structural parts. A damaged corner post from vehicle impact or rust-through at ground level usually requires replacing just that single piece rather than dismantling the entire frame. When buying replacement posts, measure the existing diameter and wall thickness carefully, most residential carports use 2-3/8″ or 2-1/2″ round posts in 14-gauge or 12-gauge steel. Trying to substitute a thinner gauge creates structural weak points and makes proper connection difficult.
Roof panels and beams become necessary when expanding a carport’s footprint or repairing sections damaged by fallen branches or heavy snow loads. Complete frame sections, which include posts, beams, and bracing already welded together, simplify expansion projects but cost more than buying individual pieces. They’re worth considering if you’re adding a full bay to your carport, since the pre-assembled structure ensures proper angles and connections.
Purlins and horizontal bracing often need replacement after years of exposure, especially in coastal areas where salt accelerates corrosion. These secondary structural members support the roof panels and maintain frame rigidity. Match the gauge to your existing framework, mixing 14-gauge purlins with 12-gauge posts creates uneven load distribution.
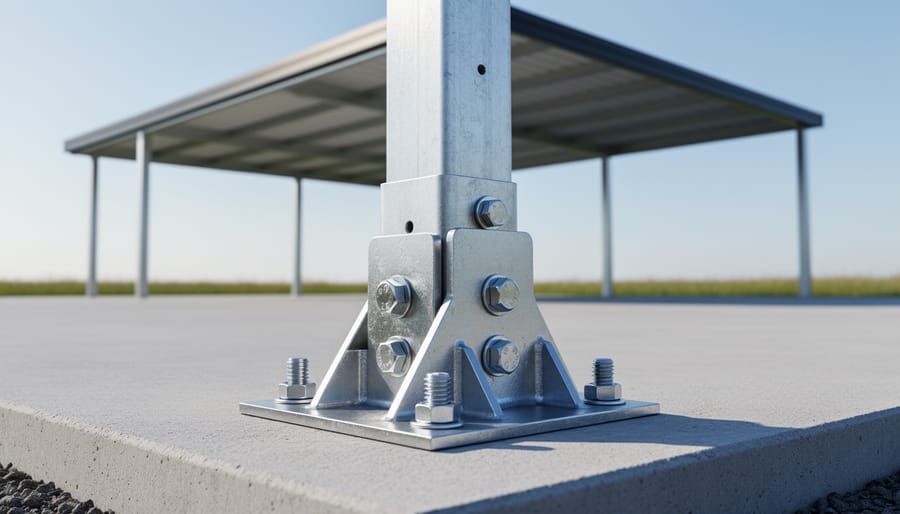
Anchoring and Foundation Hardware
Anchoring your carport properly prevents wind damage and structural failure. Ground anchors work by screwing or driving into soil, they’re best for softer ground and temporary installations, though they’re less secure in loose or sandy soil. Concrete anchors bolt directly into poured concrete footings and provide the strongest hold, making them essential for high-wind areas or permanent installations. Tie-down kits use cables or straps connected to auger anchors or concrete blocks, offering flexibility for situations where you can’t pour footings. Mounting plates distribute the load across a wider surface area and work well when attaching carport legs to existing concrete pads. Choose based on your ground type and local wind loads: coastal regions and areas with frequent storms need concrete anchors or heavy-duty auger systems, while calmer climates can use standard ground anchors. Always check local building codes for required anchoring methods, many jurisdictions specify minimum anchor ratings based on wind zone classifications.
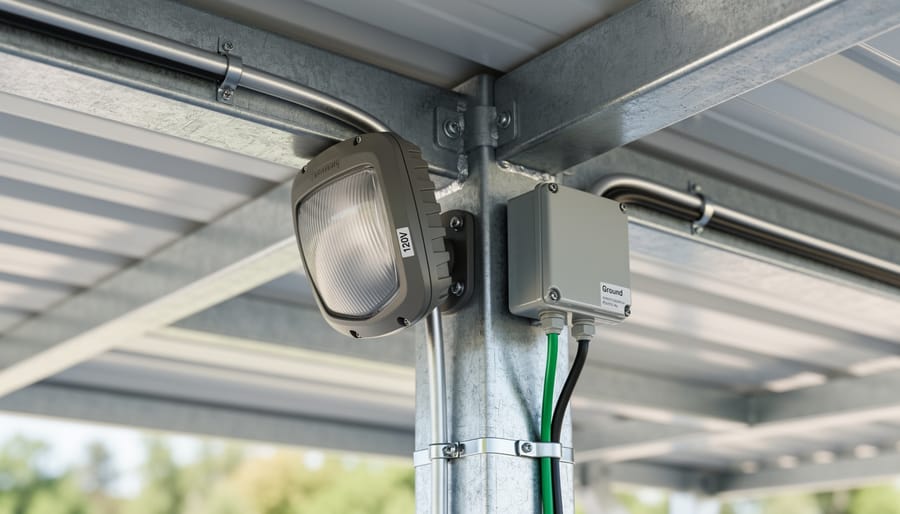
Electrical Mounting and Protection Accessories
Adding electrical components to a galvanized carport requires specialized hardware that works safely with metal structures. Surface-mount electrical boxes designed for outdoor use attach directly to metal framing without penetrating the galvanized coating extensively. Look for weatherproof boxes with gasket seals rated at minimum NEMA 3R for rain protection, NEMA 4 or 4X if you’re near salt air.
Metal-compatible mounting brackets secure light fixtures and junction boxes to carport posts or roof panels using self-tapping screws or pre-drilled holes. These brackets often include rubber or neoprene backing to prevent direct metal-to-metal contact that could wear through coatings. Galvanized or stainless steel conduit straps keep wiring organized along beams while maintaining the structure’s corrosion resistance.
Grounding accessories are critical. Your carport’s galvanized frame must connect to your electrical system’s ground. Grounding lugs, bonding straps, and grounding clips create secure metal-to-metal contact for safety. Some mount with set screws that bite through the galvanized layer to reach bare steel; others use star washers under bolts.
Choose components rated for your local climate. Coastal installations need marine-grade materials. All hardware should resist UV exposure and temperature swings without cracking or corroding faster than the carport itself.
Trim, Flashing, and Finishing Parts
Trim and flashing pieces complete your carport and protect vulnerable points where water can penetrate. Ridge caps cover the peak where roof panels meet, preventing rain from entering the seam. Gable trim seals the triangular ends of pitched roofs, while eave trim finishes the lower edges and channels water away from the framework.
Flashing goes around posts where they meet the roof, creating watertight seals that prevent rust and structural damage. Corner trim covers exposed edges on panels and enhances the finished appearance. These pieces typically come in standard lengths that you can cut to fit, with pre-drilled holes for screw attachment.
Quality trim uses the same gauge galvanized steel as your roof panels, ensuring consistent expansion rates and corrosion resistance. Matching the finish prevents visual mismatches and ensures all components weather uniformly. While these parts represent a small fraction of your total cost, skipping them leads to leaks, premature rust, and expensive repairs down the line.
Recommendations: Getting the Right Parts for Your Project
For Adding Lighting to an Existing Carport
Adding lighting to your metal carport requires components specifically designed for outdoor use on galvanized structures. Start with a weatherproof electrical box rated NEMA 3R or higher, which handles moisture and temperature swings without corroding the galvanized surface. Mount it using non-penetrating brackets or compression fittings that won’t compromise your roof’s coating, drilling directly through panels creates rust points unless you properly seal and paint each penetration.
For a straightforward lighting installation, you’ll need:
- Outdoor-rated electrical box with weatherproof cover (NEMA 3R minimum)
- Metal conduit or liquid-tight flexible conduit for wire protection
- Mounting brackets compatible with corrugated or ribbed metal panels
- Grounding wire and approved grounding clamps for metal structure connection
- Exterior-rated LED fixtures designed for surface mounting
The grounding component is critical and often overlooked. Your carport’s metal frame must be properly grounded to prevent electrical hazards, which means using listed grounding clamps that create solid metal-to-metal contact without cutting through the galvanization. Most home centers carry these near the electrical conduit supplies. Run your wiring through conduit rather than exposed, it protects against physical damage and UV degradation while meeting code requirements for metal building installations. Choose LED fixtures with integrated mounting plates that spread the load across multiple panel ribs instead of single-point attachments that can tear loose in wind.
For Replacing Damaged Structural Parts
When a post bends, a panel dents, or a beam rusts through, matching the exact specifications prevents weak spots and installation headaches. Start by identifying the gauge thickness of your existing parts, most carport frames use 14-gauge or 12-gauge tubing, with dimensions like 2″ square or 2.5″ round posts being common. Measure carefully and check any labels or documentation from your original carport manufacturer, as mixing gauges or slightly different dimensions creates gaps or overly tight fits that compromise stability.
Source replacement parts directly from your carport manufacturer first, especially if your structure is less than a few years old. They can supply exact-match components that integrate seamlessly. If the original manufacturer is unavailable or your carport is older, reputable metal building suppliers and agricultural supply stores often stock standard-size galvanized tubing, posts, and panels. Bring measurements and photos to ensure compatibility.
Consider upgrading to heavier 12-gauge components if you’re replacing parts in high-wind areas or regions with heavy snow loads, particularly for load-bearing posts and roof beams. The added strength costs modestly more but significantly improves durability and peace of mind, especially if the original damage resulted from weather stress rather than accidental impact.
For Building or Expanding a Carport
When building or expanding a carport, complete kits offer convenience and guaranteed compatibility, but individual parts give you flexibility to customize dimensions and quality levels. If you’re adding lighting or power, plan the electrical layout during construction rather than retrofitting later, it’s far easier to install conduit runs, junction boxes, and mounting brackets while the framework is going up.
Check that your structural gauge matches local snow and wind requirements, and verify that any electrical accessories you plan to add are rated for outdoor use and compatible with metal structures. Consider where you might want lights, outlets, or security features in the future, and run conduit to those locations now even if you’re not wiring them immediately. This saves cutting into finished roofing or drilling through galvanized panels later.
Order all components from the same manufacturer when possible to ensure bolt patterns, gauges, and finishes match. Mixing brands can create assembly headaches and leave you short on hardware.
Common Mistakes to Avoid When Buying Galvanized Carport Parts
Mixing Incompatible Gauges and Dimensions
Mixing metal gauges or dimensions creates immediate structural problems. A 12-gauge beam won’t properly support a 14-gauge roof panel, the mismatch allows flex and movement that damages both components over time. Post diameters must match bracket openings exactly; forcing a 2.5-inch post into a 2.375-inch bracket compromises the galvanized coating and creates gaps where water enters.
Before ordering replacement parts, measure existing components with calipers rather than estimating by eye. Check your carport’s original specifications or manufacturer documentation for gauge ratings. When extending a carport, match the gauge of your current framework rather than assuming “close enough” will work. Most failures happen at connection points where incompatible parts meet. If you’re replacing a damaged section, bring measurements and photos to your supplier to ensure exact matches. Mixing gauges voids most warranties and creates liability issues if the structure fails.
Overlooking Local Code Requirements
Before ordering any galvanized carport parts, check your local building department’s requirements, municipalities often have specific codes for wind ratings, snow load capacities, and foundation anchoring that vary widely by region. Structural components must meet minimum gauge specifications and anchoring standards for your area’s weather conditions. Electrical work on metal structures requires additional attention: most jurisdictions require proper grounding, specific conduit types, and GFIP protection for outdoor installations. Many homeowners discover code violations only during final inspection, leading to expensive teardowns and part replacements. A quick call to your building department before purchasing saves the headache of buying incompatible components twice, and some jurisdictions offer free plan review that catches issues early. Even if you’re replacing a single damaged post or adding a light fixture, verify whether your project requires a permit, the answer often depends on the scope and structural nature of the work.
Choosing the Wrong Electrical Components for Metal Structures
Homeowners often grab standard indoor electrical boxes or hardware from their garage without realizing metal carports require specialized outdoor-rated components. Using indoor boxes outdoors leads to rust and electrical hazards within months. The biggest mistake is inadequate grounding, metal structures must be properly bonded to prevent shock risk, which means using grounding clips and ensuring all electrical components connect securely to the galvanized frame. Another common error is drilling mounting holes that strip away the protective zinc coating, creating rust points. Choose surface-mount weatherproof boxes designed for metal structures, use stainless steel or coated fasteners that won’t corrode, and apply touch-up galvanizing spray to any drilled holes. For conduit, select UV-resistant PVC or galvanized metal conduit with proper weatherproof fittings, never use thin-wall EMT conduit meant for indoor use. When mounting lights or outlets, look for NEMA 3R or higher rated enclosures with rubber gaskets that seal against the metal surface.
Ignoring Long-Term Maintenance Needs
The cheapest galvanized parts may seem appealing initially, but thin coatings and lightweight gauges often require replacement within a few years, especially in harsh climates. Investing in thicker galvanization and heavier-gauge structural components reduces long-term maintenance costs and protects your investment. Consider accessibility too, choosing parts that allow easy inspection and occasional re-coating of connection points prevents minor issues from becoming expensive repairs. Planning for future expansion by selecting modular, widely-available components means you won’t struggle to find compatible parts later.
Frequently Asked Questions About Galvanized Carport Parts
Can I mix galvanized and non-galvanized parts on my carport?
It’s not recommended. Mixing galvanized and non-galvanized metal components can cause galvanic corrosion where the metals touch, significantly reducing the lifespan of both parts and creating weak points in your structure.
How do I safely add electricity to a metal carport?
Use outdoor-rated electrical boxes and proper grounding throughout. All metal conduit and junction boxes must be bonded to the carport frame, and you’ll need weatherproof covers rated for outdoor exposure. If you’re not confident working with electrical systems, hire a licensed electrician familiar with metal structure requirements.
What gauge galvanized steel do I need for my area?
This depends on your local snow and wind loads. Light-duty areas can use 14-gauge steel, while regions with heavy snow or high winds typically require 12-gauge or heavier. Check your local building codes for specific requirements, as they account for your area’s weather patterns.
How long do galvanized carport parts last?
Quality hot-dip galvanized parts typically last 20-30 years in most climates, while electroplated components may only last 5-10 years. Coastal areas with salt exposure will see shorter lifespans, while dry inland climates can extend these estimates.
Do I need special mounting hardware for carport lights?
Yes. Standard indoor mounting brackets won’t work safely on metal roofing. You need specialized mounting brackets designed for corrugated or ribbed metal panels, along with properly sealed penetrations to prevent leaks and ensure the fixtures are securely grounded to the structure.
Beyond these common questions, homeowners often wonder about compatibility when purchasing replacement parts years after their original carport installation. If you can’t find exact matches for your carport’s manufacturer or model, focus on matching the gauge thickness and dimensions rather than brand names. Most galvanized structural components follow standard sizing, making cross-brand compatibility feasible as long as the measurements align.
Warranty coverage is another practical concern worth clarifying before you buy. Structural galvanized parts often come with corrosion warranties ranging from 10 to 20 years, but these typically cover only coating failure, not damage from installation errors or physical impacts. Electrical accessories generally have shorter warranty periods and may exclude outdoor exposure damage. Read the fine print before assuming long-term protection, and keep your receipts in case you need to file a claim.
Choosing the right galvanized carport parts, from structural posts and roof panels to electrical accessories and lighting hardware, makes the difference between a carport that lasts decades and one that requires constant repairs. Quality galvanized components protect your investment from rust and weather damage, while proper electrical parts ensure safe, code-compliant lighting installations that work with metal structures.
Don’t approach carport parts shopping as separate decisions. Whether you’re replacing a damaged beam, adding anchors for wind resistance, or installing outdoor lighting, think about how each component fits into the complete system. That structural framework needs solid anchoring. Those lights need weatherproof boxes and proper grounding. The roof panels need compatible trim to shed water correctly.
Take time to verify compatibility, check your local building codes, and choose parts rated for your climate. Cutting corners on coating quality or electrical safety creates problems you’ll regret later. But when you select the right galvanized parts upfront, matching gauges, using outdoor-rated electrical components, planning for both structure and function, you build a carport that serves you reliably for years. That thoughtful approach saves money and headaches while adding real value to your property.