
Perfect Garden Shed Base: Stop Your Building from Sinking and Shifting
Transform your backyard space with proper shed foundation preparation – a critical first step that determines your storage solution’s stability and year-round shed maintenance success. Survey your chosen location for optimal drainage, ensuring the ground slopes away from the intended site at a minimum grade of 1 inch per 8 feet. Clear vegetation, rocks, and debris from an area extending 2 feet beyond your planned shed footprint, then test soil composition by conducting a simple compression test – properly compacted soil should resist a standard garden fork’s penetration after the first 2 inches.
Select your foundation type based on local building codes and soil conditions: concrete slab foundations offer maximum stability for larger sheds, while gravel beds provide excellent drainage and cost-effective support for smaller structures. Level the site using string lines and stakes, maintaining less than 1/2 inch variation across the entire surface to prevent future structural issues and ensure your shed stands true for years to come.
Site Selection and Assessment
Ground Level Assessment
Before laying any foundation, it’s crucial to thoroughly assess your ground conditions. Start by removing grass, weeds, and debris from the intended shed location. Using a long spirit level and straight piece of lumber, check the ground’s slope in multiple directions. Pay special attention to how water flows during rainfall – this insight is essential for proper drainage and waterproofing.
Mark out your shed’s footprint using stakes and string, ensuring your measurements are accurate and corners are square. Within this area, look for soft spots by walking the perimeter and noting any areas where the ground feels spongy or unstable. These spots might indicate underground water issues or poor soil composition.
For precise leveling, place a stake at each corner and use a string level between them. Measure the height difference between the highest and lowest points – this will determine how much fill material you’ll need. Remember, your goal is to create a surface that’s perfectly level or has a slight slope (about 1 inch per 8 feet) away from your home’s foundation to prevent water pooling.
Soil Type Evaluation
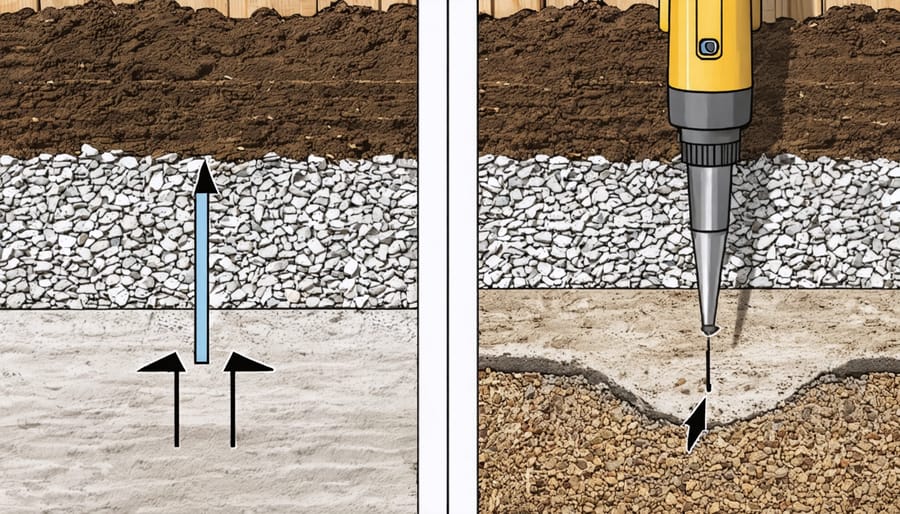
Before laying your shed foundation, it’s crucial to understand what type of soil you’re working with, as different soils behave differently under pressure and moisture. Clay soil, while common in many gardens, tends to expand when wet and contract when dry, which can cause foundation movement over time. Sandy soil, on the other hand, provides excellent drainage but might not offer the stability needed for heavier structures.
The ideal soil type for a shed foundation is well-draining loam, which offers a balanced mix of sand, silt, and clay. To test your soil, grab a handful when it’s damp and squeeze it. If it holds its shape but crumbles easily when poked, you’ve got loam. If it stays in a firm ball, you’re dealing with clay, and if it falls apart immediately, you’ve got sandy soil.
For clay soil, you’ll need additional drainage solutions and possibly a deeper foundation. Sandy soil might require more compaction and a wider foundation base. If you’re unsure about your soil type or its stability, it’s worth consulting a local landscaper or conducting a proper soil test. This small investment in understanding your ground conditions can prevent major headaches down the line.
Ground Preparation Steps
Clearing and Excavation
Before you can lay your shed foundation, you’ll need to clear and prepare the site properly. Start by removing all vegetation from the area, including grass, weeds, and any small shrubs. For grass removal, use a spade to cut the turf into manageable strips, which you can roll up and relocate to other parts of your garden.
Once the vegetation is cleared, mark out your shed’s footprint, adding an extra 2 feet on all sides to give yourself plenty of working space. Use wooden stakes and string to create a perfect rectangle, and check that your corners are square using the 3-4-5 triangle method.
Next comes the excavation phase. Dig down approximately 4-6 inches, ensuring the bottom is level. If your yard has a slight slope, you may need to dig deeper on the higher end to achieve a level surface. Remove any large rocks, roots, or debris you encounter during excavation.
As you dig, use a level tool to check that the ground is even. Pay special attention to the corners, as these will be crucial support points for your shed. If you hit any utility lines while digging, stop immediately and contact your local utility company.
After excavation, compact the soil using a plate compactor or hand tamper. This step is crucial for preventing future settling issues. The ground should feel firm and stable under foot pressure.
Base Material Selection
Selecting the right base materials for your garden shed is crucial for its long-term stability and durability. A proper foundation starts with a layer of hardcore material, typically consisting of crushed stone or gravel with sizes ranging from 20-40mm. This material provides excellent drainage and creates a solid base that prevents water accumulation under your shed.
For the best results, opt for MOT Type 1 aggregate, which is a mixture of crushed rocks in varying sizes. This material compacts exceptionally well and creates a stable surface that won’t shift over time. If MOT Type 1 isn’t available, clean crushed stone or sharp sand can serve as alternatives, though they may require more frequent maintenance.
Above the hardcore layer, you’ll need a secondary material to create a smooth, level surface. Sharp sand is ideal for this purpose, as it’s easy to work with and allows for precise leveling. Alternatively, you can use all-in-one ballast, which combines sand and small stones, providing both stability and excellent drainage properties.
For added protection against moisture and weeds, consider laying a heavy-duty weed membrane beneath your base materials. This fabric allows water to drain while preventing vegetation growth and keeping your base materials separate from the soil beneath.
Pro tip: Calculate your material quantities carefully – you’ll need approximately 4-6 inches (100-150mm) depth of hardcore plus an additional 1-2 inches (25-50mm) of sharp sand for leveling. For a typical 8×6 foot shed, this usually amounts to about 1 ton of hardcore and 0.5 ton of sharp sand.
Remember that investing in quality base materials might cost more initially but will save you money and effort in the long run by preventing common issues like subsidence and uneven floors. Always source your materials from reputable suppliers who can verify the grade and quality of their products.
Compaction and Leveling
Once you’ve prepared your base material, proper compaction and leveling are crucial steps that can make or break your shed’s longevity. Start by using a plate compactor, working in a systematic pattern from the outer edges toward the center. Make multiple passes over the entire area, ensuring each section receives equal treatment. For smaller areas, a hand tamper can work effectively, though it requires more physical effort.
As you compact, regularly check for low spots using a long spirit level or string line. Add small amounts of base material to any dips you find, then compact these areas again. The goal is to achieve a surface that’s not only firm but also perfectly level – your shed’s future depends on it!
A good tip is to use a long straight edge (like a piece of lumber) and place it across different sections of your base. Look for gaps underneath the straight edge, which indicate low spots, or areas where the straight edge rocks, showing high spots. Address these variations immediately by either adding material or scraping away excess.
For best results, compact your base in layers rather than trying to compact one thick layer. Aim for layers about 2-3 inches thick, compacting each one before adding the next. This method ensures thorough compaction throughout the entire base depth.
Test the firmness of your compacted base by walking across it. Your footprints should barely be visible, and the surface should feel solid under your feet. If you notice any soft spots or significant indentations, those areas need additional compaction.
Remember to maintain a slight slope (about 1 inch per 8 feet) away from where your shed will sit to ensure proper drainage. This subtle grade won’t affect your shed’s stability but will prevent water from pooling underneath it.
Foundation Options
Concrete Base Options
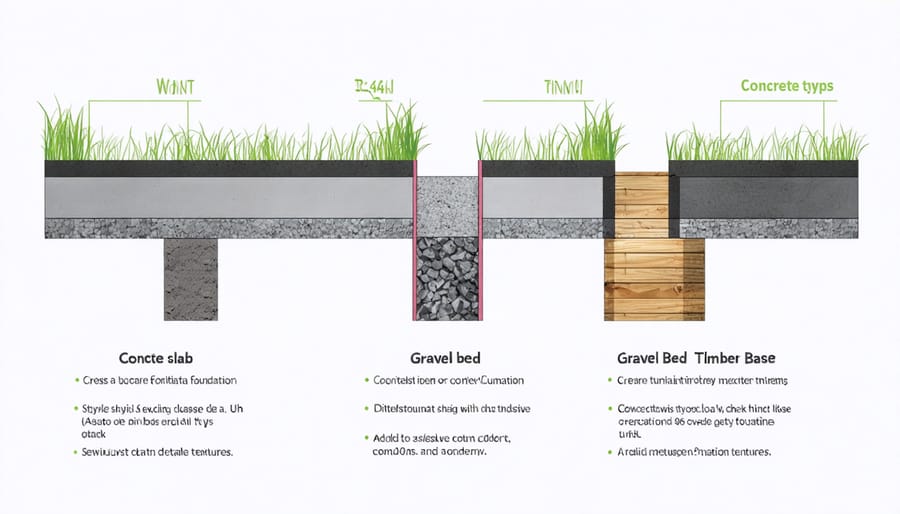
When it comes to concrete foundations for your garden shed, you have two main options: a concrete slab or pier foundations. Each has its benefits, and choosing the right one depends on your specific needs and local conditions.
A concrete slab provides a solid, uniform base that spans the entire footprint of your shed. This option is ideal for larger sheds and offers excellent stability and moisture protection. To create a proper slab, you’ll need to pour a 4-6 inch thick concrete pad with reinforcing mesh or rebar. The edges should be thickened to about 8 inches for added strength. Remember to include a slight slope (about 1 inch per 8 feet) for water drainage.
Pier foundations, on the other hand, consist of individual concrete footings that support your shed at key points. These are particularly useful in areas with uneven terrain or where you want to minimize site disruption. Typically, piers are placed at each corner and at regular intervals along the sides, depending on your shed’s size. Each pier should extend below the frost line in your area to prevent frost heave damage.
Both foundation types require proper site preparation, including removing topsoil and creating a level surface. For slabs, you’ll need a 4-inch base of compacted gravel, while piers require precise positioning and careful leveling. If you’re in an area with heavy rainfall, consider adding a French drain around either foundation type to manage water runoff effectively.
Remember to check local building codes before starting, as they may specify minimum requirements for foundation depth and construction methods.
Alternative Foundation Types
While concrete bases are popular, several alternative foundation types can provide excellent support for your garden shed while potentially saving time and money. Let’s explore these options to help you make an informed choice.
Gravel beds offer a cost-effective and well-draining foundation solution. Start by excavating the area to a depth of 4-6 inches, laying down landscape fabric to prevent weed growth, and filling with crushed stone or gravel. Ensure the gravel is thoroughly compacted and leveled. This option works particularly well in areas with good natural drainage and can be part of your essential shed maintenance practices to prevent water damage.
Paving slabs present another reliable alternative, offering a solid, level surface that’s easier to install than concrete. Choose heavy-duty slabs at least 2 inches thick and lay them on a bed of sharp sand or fine gravel. Space the slabs evenly to create a stable grid pattern, ensuring each slab is perfectly level with its neighbors. This foundation type is ideal for smaller sheds and provides excellent moisture protection.
Timber bases combine affordability with versatility and are perfect for slightly uneven ground. Construct a frame using pressure-treated lumber, with joists spaced 16 inches apart for optimal support. Raise the frame slightly off the ground using concrete blocks or post supports to prevent wood rot and improve airflow. Add cross-bracing for additional stability, and cover with treated decking boards or plywood sheeting.
Each foundation type has its merits, and your choice should depend on factors like local soil conditions, shed size, and budget considerations.
Taking the time to properly prepare your shed’s foundation is an investment that pays dividends for years to come. By following the essential steps we’ve outlined – from initial site assessment to selecting the right foundation materials and ensuring proper drainage – you’re setting yourself up for long-term success with your garden storage solution.
Remember that a well-prepared foundation not only extends your shed’s lifespan but also prevents costly issues like structural damage, water infiltration, and uneven settling. The effort you put into leveling, creating proper drainage, and installing a suitable base will protect your investment and keep your stored items safe and dry.
Regular monitoring your shed’s condition will help you catch any potential issues early, but starting with proper ground preparation means you’ll have fewer problems to monitor in the first place. Think of it as building a solid foundation not just for your shed, but for years of worry-free storage and garden organization.
Whether you’ve chosen a concrete base, gravel foundation, or paving slabs, the key is in the attention to detail during preparation. Your future self will thank you for the time and care invested today in creating a stable, level, and well-draining foundation for your garden shed.