
Save Your Shed: Expert Wood Rot Treatment That Actually Works
Identify wood rot immediately by pressing a screwdriver against suspicious areas – soft, spongy sections indicate active decay requiring urgent attention. Stop rot progression within 24 hours by removing all visibly affected wood and at least 3 inches beyond the damage to reach healthy material. Apply a professional-grade borate treatment to remaining wood surfaces, penetrating deep into the fibers to kill existing fungal growth and prevent future infestations. Modern wood treatments combine powerful fungicides with water-resistant sealants, offering dual protection against both existing decay and future moisture damage.
Wood rot threatens structural integrity silently, but catching it early transforms a potential catastrophe into a manageable repair. Whether dealing with dry rot in support beams or wet rot in exterior trim, proper treatment requires both immediate intervention and long-term prevention strategies. This guide walks through proven techniques to identify, treat, and permanently protect your wooden structures from decay, helping you save thousands in potential replacement costs while preserving your home’s value and safety.
Identifying Wood Rot in Your Shed
Common Signs of Wood Rot
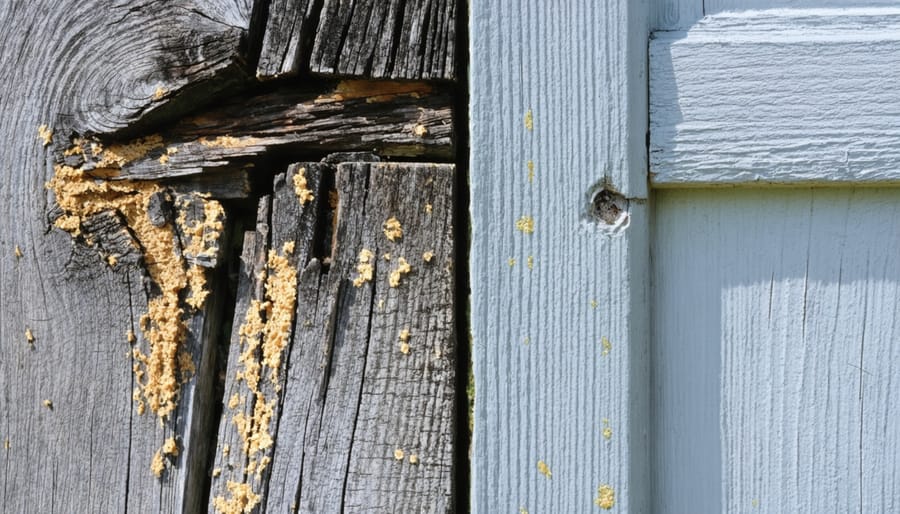
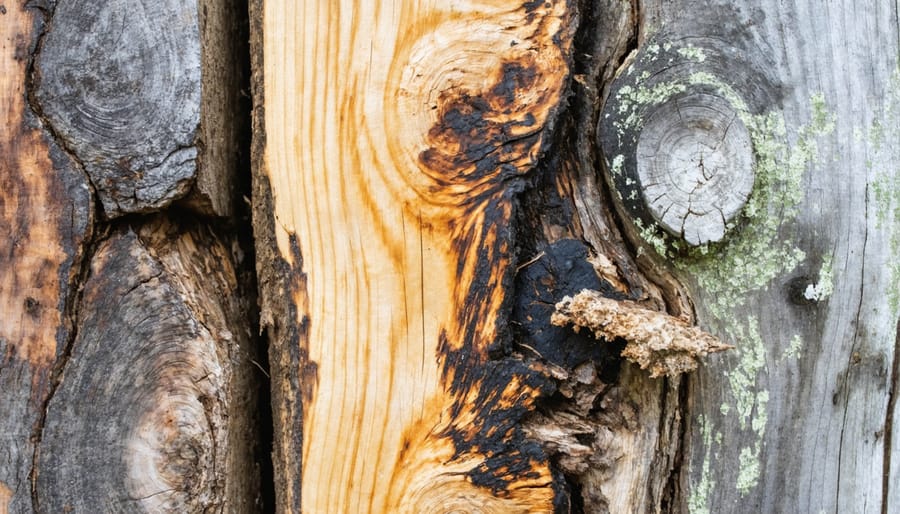
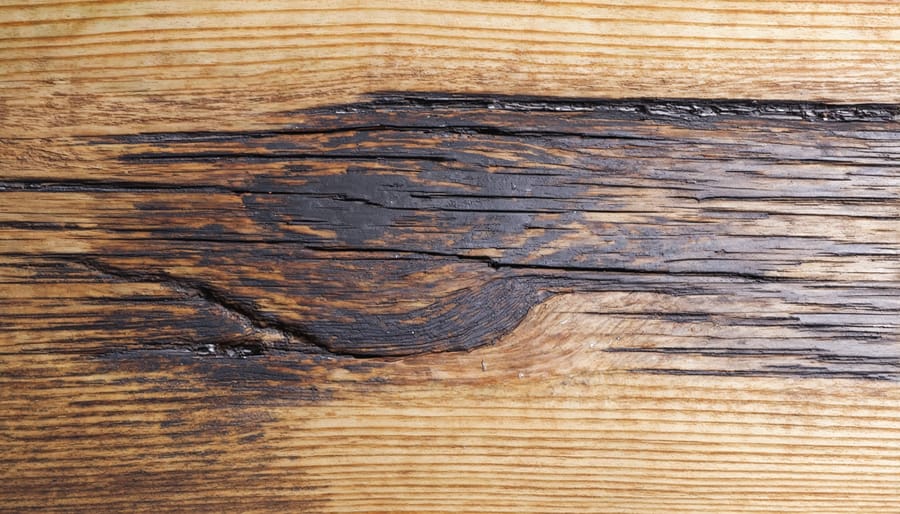
Catching wood rot early is crucial when monitoring your shed for problems. The most obvious sign is soft, spongy wood that gives way when pressed with a screwdriver. Look for discolored areas, particularly those that appear darker than surrounding wood, as this often indicates moisture damage. A musty, damp smell is another telltale indicator that rot might be present.
Watch for paint that’s bubbling or peeling, as this can signal moisture trapped beneath the surface. Cracks or splits in the wood, especially those that appear alongside discoloration, warrant immediate attention. In advanced cases, you might notice visible fungal growth, which appears as white or gray fuzzy patches.
Pay special attention to areas where wood meets the ground, around windows and doors, and beneath roof edges. These moisture-prone spots are particularly susceptible to rot. If you spot small holes or sawdust-like material, this could indicate that insects have already found their way into weakened wood, potentially accelerating the deterioration process.
Remember, catching these signs early can save you significant time and money in repairs later on.
Assessing Damage Severity
Before treating wood rot, it’s crucial to determine just how deep the damage goes. Start by gently pressing a screwdriver or similar tool into the suspicious area – if it sinks in easily, you’ve confirmed the presence of rot. Pay special attention to areas where multiple pieces of wood meet, as these joints are particularly vulnerable to moisture damage.
To assess the severity, tap the affected area with a hammer. A hollow sound typically indicates more extensive internal decay, while a solid thud suggests the damage might be more superficial. You can also try poking the wood from different angles – if the rot is limited to the surface, you’ll hit solid wood quickly.
For a more thorough check, use a moisture meter if you have one. Readings above 20% suggest active rot conditions. Remember that visible rot often hints at hidden damage, so inspect surrounding areas carefully. If the wood serves a structural purpose or the rot extends deep into the material, it’s best to consult a professional, as these issues can compromise your shed’s integrity and safety.
Effective Treatment Methods
Surface Rot Treatment
When you catch wood rot early, treating surface-level decay is relatively straightforward and can prevent more serious damage. Start by removing any loose or visibly rotted wood using a chisel or screwdriver, being careful not to damage the healthy wood underneath. Once you’ve cleared away the damaged material, thoroughly clean the area with a wire brush and let it dry completely.
Next, apply a liquid wood hardener to strengthen any remaining soft wood. This penetrating solution soaks into the wood fibers, creating a solid foundation for repair. Allow the hardener to cure according to the manufacturer’s instructions, typically 2-4 hours.
After the hardener sets, fill the affected area with an epoxy wood filler. Choose a product specifically designed for exterior use if you’re treating outdoor structures. Apply the filler in thin layers, building it up gradually until it’s slightly higher than the surrounding surface. Once the filler has completely cured, sand it smooth to match the surrounding wood.
Finally, seal the repaired area with an appropriate wood preservative or exterior paint to prevent future moisture penetration. For added protection, consider applying a water-repellent sealer around the entire affected zone, extending several inches beyond the repair area.
Remember that surface rot treatment works best when caught early. If the rot extends deeper than ¼ inch or covers a large area, you may need to consider more extensive repairs or professional help.
Deep Rot Restoration
When wood rot has penetrated deeply into the material, you’ll need to take more aggressive measures to restore the affected area. Start by removing all compromised wood until you reach solid, healthy material. Use a chisel and hammer to carefully chip away the rotted sections, ensuring you don’t damage the surrounding good wood.
For extensive damage, you may need to cut out the entire affected section and replace it with new lumber. Choose pressure-treated wood for replacements, especially in areas prone to moisture exposure. Before installing the new piece, treat the surrounding wood with a fungicide to prevent rot from spreading.
If you’re dealing with structural elements, it’s crucial to provide temporary support before removing any damaged sections. Use wood epoxy products specifically designed for deep rot repair to fill smaller voids and strengthen weakened areas. These two-part epoxy systems can restore the wood’s structural integrity while maintaining its appearance.
For successful restoration, ensure the area is completely dry before beginning repairs. Use a moisture meter to confirm the wood’s moisture content is below 15%. After completing the repair, apply a water-resistant sealer to protect against future moisture infiltration. While DIY repairs are possible for minor to moderate rot, always consult a professional when dealing with load-bearing elements or if you’re unsure about the extent of the damage.
Wood Hardeners and Epoxy Solutions
Wood hardeners and epoxy solutions are highly effective treatments for addressing wood rot, especially in cases where the damage isn’t severe enough to require complete replacement. These products work by penetrating the wood fibers and creating a solid, durable surface that helps prevent further decay.
For smaller areas of rot, liquid wood hardener is an excellent first step. Simply brush or pour the hardener into the affected area, allowing it to soak deeply into the wood. The hardener strengthens weakened wood fibers and creates a stable surface for further treatment. Most hardeners dry within a few hours, though it’s best to allow 24 hours for complete curing.
Epoxy solutions come in two main forms: liquid epoxy and epoxy putty. Liquid epoxy is perfect for filling larger voids and strengthening structural elements. After applying wood hardener, mix the epoxy according to manufacturer instructions and pour it into the affected area. Epoxy putty, on the other hand, is ideal for filling holes and rebuilding damaged sections. It can be molded like clay and hardens to create a surface that can be sanded and painted.
Always work in well-ventilated areas when using these products, and wear appropriate protective gear such as gloves and a mask. After treatment, monitor the area regularly to ensure the solution remains effective and no new rot develops.
Preventing Future Rot
Moisture Control Strategies
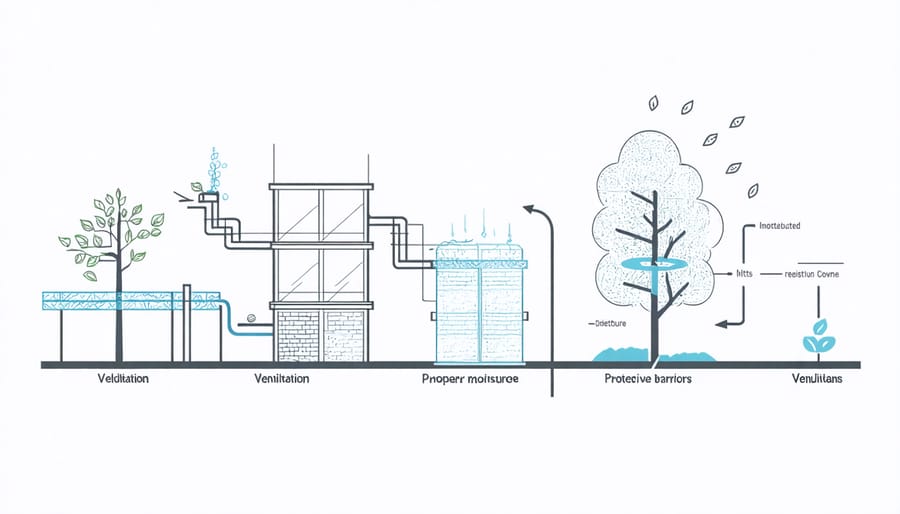
Effective moisture control is your first line of defense against wood rot. To keep your shed bone-dry, start by ensuring proper ventilation through strategically placed vents and gaps. Install gutters and downspouts to direct rainwater away from your structure, and maintain a minimum 6-inch clearance between the ground and any wooden components.
Create a protective barrier by applying quality water-repellent sealants to all exposed wood surfaces, paying special attention to joints and end grain areas where moisture tends to accumulate. Consider installing a vapor barrier beneath your shed’s flooring to prevent ground moisture from seeping upward.
Regular maintenance is crucial – inspect your shed’s exterior quarterly for signs of water infiltration. Clear debris from gutters, repair any damaged siding promptly, and ensure surrounding landscaping slopes away from the structure. During wet seasons, use a dehumidifier inside if necessary to maintain optimal moisture levels.
For areas prone to flooding or high humidity, consider elevating your shed on concrete blocks or a gravel bed. This simple step dramatically improves air circulation and prevents direct contact with damp ground. Remember to check weatherstripping around doors and windows annually, replacing any worn materials to maintain a tight seal against moisture intrusion.
Protective Treatments
Protecting your wood from future rot is just as important as treating existing damage. Regular essential shed maintenance can significantly extend the life of your wooden structures. Start by applying a high-quality wood preservative that contains fungicides and water-repelling agents. These treatments should be reapplied every 2-3 years, depending on your local climate and exposure to moisture.
For maximum protection, consider using protective paint solutions specifically designed for exterior wood. These specialized coatings create a durable barrier against moisture while allowing the wood to breathe. Before applying any protective treatment, ensure the wood surface is clean, dry, and free from debris.
Water-based sealants are excellent for most applications, offering good penetration and easy cleanup. For areas with high moisture exposure, oil-based preservatives provide superior protection but require more careful application. Don’t forget to pay special attention to end grain and joints, as these areas are particularly vulnerable to moisture absorption.
Remember to inspect your treated wood regularly, especially after severe weather events. Quick response to any signs of water damage or coating wear can prevent more serious issues from developing. Keep gutters clean and maintain proper drainage around wooden structures to minimize water exposure.
When to Call a Professional
While many wood rot issues can be handled as DIY projects, certain situations call for professional intervention. If you notice extensive rot affecting structural elements of your shed, such as support beams, floor joists, or wall frames, it’s time to contact a qualified contractor. These components are crucial for your shed’s stability and safety, and improper repairs could lead to more severe problems.
Consider professional help if the rot has spread to more than 10% of any major wooden component or if you discover multiple affected areas throughout the structure. Professionals have specialized tools and techniques to assess the full extent of the damage, which might not be visible to the untrained eye.
Another clear sign you need expert assistance is when the rot appears to be caused by underlying issues like poor drainage, foundation problems, or plumbing leaks. These root causes require specific expertise to address properly and prevent future rot from developing.
If your shed is historic or contains valuable items, professional treatment ensures proper preservation while maintaining the structure’s integrity. Additionally, if you’re unsure about the type of rot (dry rot versus wet rot) or the best treatment approach, a professional can provide accurate identification and appropriate solutions.
Time is also a factor to consider. While DIY treatments might save money initially, they could cost more in the long run if not done correctly. Professional contractors can usually complete the job more efficiently and provide warranties for their work.
Finally, if you notice any of these warning signs:
– Musty odors combined with visible fungal growth
– Spongy or soft wood that extends deep into the material
– Crumbling or powdery wood surfaces
– Structural sagging or warping
– Wood that seems wet without an apparent water source
It’s best to have a professional assessment to ensure your shed remains safe and functional for years to come.
Treating wood rot is not just about fixing an existing problem – it’s about protecting your investment and ensuring the longevity of your wooden structures. As we’ve explored throughout this guide, early detection and prompt action are absolutely crucial in preventing minor issues from becoming major structural concerns.
Remember that successful wood rot treatment involves a three-pronged approach: identifying the problem early, addressing the root cause of moisture, and applying appropriate treatment methods. By regularly inspecting your wooden structures, especially in high-risk areas like corners, joints, and ground contact points, you can catch rot before it spreads extensively.
Don’t underestimate the importance of prevention – proper ventilation, adequate drainage, and regular maintenance can save you significant time and money in the long run. While many wood rot issues can be handled as DIY projects, never hesitate to contact a professional when the damage appears extensive or affects structural elements.
Keep your wood treatment supplies handy and maintain a regular inspection schedule. A small investment in preventive measures today can prevent costly repairs tomorrow. With the knowledge and techniques covered in this guide, you’re now well-equipped to protect your wooden structures from rot and extend their lifespan for years to come.
Stay proactive, stay vigilant, and remember that when it comes to wood rot, prevention is always better than cure.