
Why Your Greenhouse Needs a Solid Foundation (And How to Build One Right)
Choose your greenhouse foundation based on three critical factors: your soil type, greenhouse size, and local climate conditions. Sandy or loose soil demands concrete footings or gravel bases for stability, while clay-heavy ground can accommodate simpler anchor systems for smaller structures. A 10×12 foot hobby greenhouse thrives on a gravel-and-timber foundation, but anything larger than 12×16 feet requires concrete piers or a full slab to prevent settling and structural damage.
Level your foundation site within one inch across the entire footprint before installation begins. Unlevel foundations create door alignment issues, gaps that let pests inside, and uneven water drainage that pools around your plants. Mark your perimeter with stakes and string, then excavate 4-6 inches deep for gravel bases or 12 inches for frost-line concrete footings in cold climates.
Your foundation choice directly impacts your greenhouse’s lifespan and growing success. Proper foundations prevent the frame twisting that cracks glazing panels, stop cold air infiltration that stresses plants, and eliminate the shifting that damages automatic vent openers and irrigation systems. Many gardeners discover foundation problems only after their first severe storm or winter freeze, when repair costs triple the original installation investment.
This guide walks you through five proven foundation types, from budget-friendly gravel beds to permanent concrete slabs, with step-by-step installation instructions matched to your specific situation. You’ll learn exact material quantities, essential tools, and the common mistakes that compromise stability and cost homeowners hundreds in preventable repairs.
What Happens When You Skip the Foundation
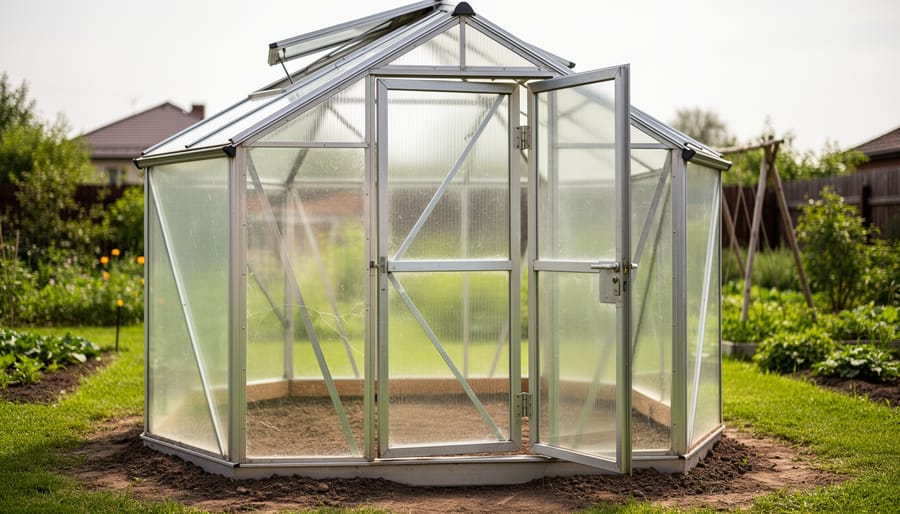
Picture this: Sarah spent months saving for her dream greenhouse, carefully selecting the perfect polycarbonate panels and ventilation system. She decided to save a few hundred dollars by skipping the foundation and setting it directly on her lawn. Six months later, her greenhouse doors wouldn’t close properly, water pooled in one corner after every rain, and the entire structure had shifted noticeably to one side.
Unfortunately, Sarah’s experience isn’t unique. Building a greenhouse without a proper foundation creates a cascade of frustrating problems that often cost more to fix than the foundation would have cost initially.
The most immediate issue is an unlevel floor. Even ground that looks flat to the eye can have subtle slopes that become glaringly obvious once your greenhouse is in place. When your structure isn’t level, doors and windows bind in their frames, making them difficult or impossible to open and close. Ventilation windows that won’t seal properly waste energy and create temperature fluctuations that stress your plants.
Water drainage becomes a nightmare without proper foundation grading. Instead of flowing away from your greenhouse, rainwater collects inside, creating muddy conditions, promoting mold growth, and potentially damaging your flooring materials. One homeowner reported spending entire afternoons after storms bailing water from his greenhouse because he’d built it in a slight depression without realizing it.
Structural stress is another serious concern. A greenhouse sitting unevenly places unequal pressure on the frame, leading to warped panels, cracked glazing, and weakened joints. Over time, this stress can compromise the entire structure’s integrity.
Perhaps most frustrating is discovering that skipping the foundation voids your manufacturer’s warranty. When problems arise, you’re on your own for repairs that could have been prevented with proper installation from the start.
Choosing the Right Foundation for Your Greenhouse
Gravel Base Foundation
If you’re working with a smaller greenhouse and want to keep costs down, a gravel base foundation might be your perfect match. This straightforward option has helped countless homeowners get their greenhouses up and running without breaking the bank or their backs in the process.
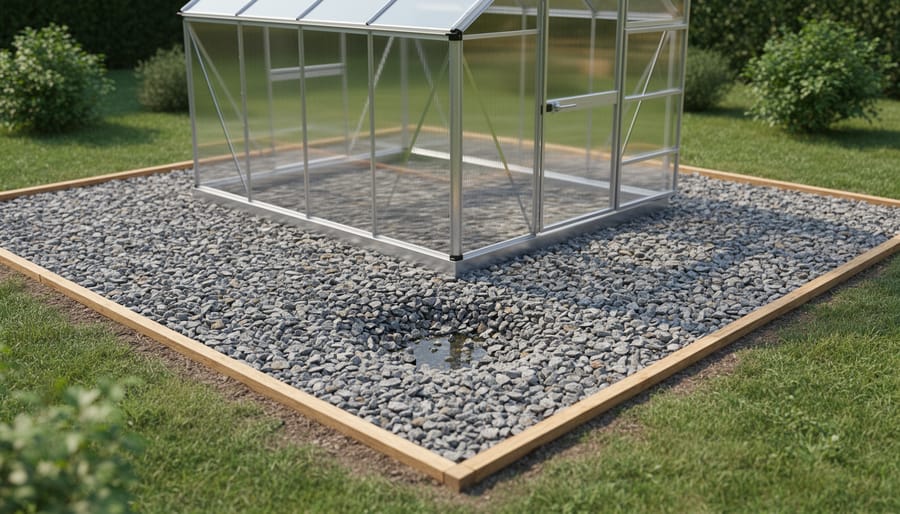
The beauty of a gravel base lies in its simplicity. You’ll excavate a shallow area about 4-6 inches deep, lay down landscape fabric to prevent weeds, and fill it with compacted gravel. That’s essentially it. The natural drainage is phenomenal—water flows right through the gravel instead of pooling around your plants or creating muddy messes. Sarah from Minnesota shared that her gravel base greenhouse stayed dry even during heavy spring rains, while her neighbor’s ground-level structure turned into a swamp.
This foundation works best for greenhouses up to 10×12 feet on relatively level ground. It’s also ideal if you’re renting or might want to relocate your greenhouse later, since it’s not a permanent installation. The cost typically ranges from $150-$400 depending on your greenhouse size, making it one of the most budget-friendly options available.
The difficulty level sits comfortably at beginner-friendly. Most homeowners complete installation in a weekend with basic tools—a shovel, rake, and tamper are your main requirements. You won’t need special skills or expensive equipment rentals.
Keep in mind that gravel bases aren’t suitable for very large greenhouses or sloped yards where you’ll need more structural support. They also require periodic releveling as the gravel settles over time.
Concrete Slab Foundation
If you’re planning a permanent greenhouse that’ll serve you for decades, a concrete slab foundation is the gold standard. This option transforms your greenhouse from a temporary garden feature into a lasting investment that can handle substantial structures and heavy equipment.
The beauty of concrete lies in its unmatched durability. Unlike wooden frames that eventually rot or gravel that shifts over time, a properly poured concrete slab can last 30 years or more with minimal maintenance. It creates a perfectly level surface that makes installing benches, shelving, and automated watering systems straightforward and stable.
Beyond longevity, concrete offers excellent thermal benefits. The slab acts as a thermal mass, absorbing heat during sunny days and releasing it gradually at night. This natural temperature regulation can reduce your heating costs and create a more stable growing environment for temperature-sensitive plants. Many gardeners report fewer temperature swings compared to greenhouses on other foundation types.
The investment typically ranges from $6 to $12 per square foot for a basic slab, meaning a 10×12 foot greenhouse foundation might cost $720 to $1,440. Professional installation adds labor costs, though confident DIYers can tackle smaller projects themselves with proper preparation.
This foundation makes most sense when you’re committed to serious year-round gardening, planning a greenhouse larger than 100 square feet, or installing heavy equipment like heating systems and water lines. One greenhouse enthusiast shared that her concrete foundation “paid for itself in peace of mind—no more worrying about frost heave or settling issues.”
The main considerations are upfront cost and installation complexity, which requires excavation, proper drainage planning, and often professional expertise.
Concrete Pier Foundation
Concrete pier foundations offer a smart middle-ground solution that balances stability with budget-friendliness. Think of them as sturdy pillars strategically placed around your greenhouse’s perimeter, lifting the structure off the ground while allowing for excellent drainage and air circulation underneath.
Here’s what makes piers appealing: you’ll typically space them 4 to 6 feet apart along the edges of your greenhouse, creating anchor points that support the frame without the expense of a full concrete slab. The installation process involves digging holes below your local frost line (usually 12 to 36 inches deep depending on your region), setting sonotube forms, and pouring concrete. Once cured, these piers provide rock-solid support that won’t shift or settle over time.
This foundation type really shines in yards with slopes or uneven terrain. Rather than extensive grading work, you can adjust pier heights to level your greenhouse perfectly. One homeowner in Vermont shared how piers saved her project when she discovered her backyard had a 3-foot drop across the greenhouse footprint. The adjustable height feature meant she didn’t need expensive excavation.
Cost-wise, expect to spend between $300 and $800 for an average-sized greenhouse, making it considerably more affordable than a full slab while still delivering professional-grade stability. Piers work beautifully for mid-sized greenhouses (8×12 feet or larger) and excel in areas with good drainage. Just remember you’ll need to add a floor material inside, like gravel or pavers, since piers leave the ground exposed beneath your growing space.
Timber Frame Foundation
If you’re handy with basic tools and want a budget-friendly foundation that you can install over a weekend, a timber frame might be your perfect match. This popular DIY option works beautifully for both wood and metal greenhouses, offering a solid base without the complexity of concrete work.
The key to success with timber frames is starting with pressure-treated lumber rated for ground contact. Look for wood treated to a minimum of .40 retention level, which protects against rot and insect damage when sitting directly on soil. Many homeowners choose 4×4 or 6×6 timbers for the frame perimeter, providing excellent stability for structures up to 12×16 feet.
Installation is refreshingly straightforward. After leveling your site, arrange the timbers in a rectangle, securing corners with galvanized brackets or half-lap joints. Some DIYers place the frame directly on compacted gravel, while others set it on concrete pier blocks for extra protection from ground moisture. Sarah from Michigan shares her experience: “I built my 8×10 greenhouse on a timber frame in two days. Five years later, it’s still perfectly level and the wood looks great.”
Drainage deserves attention with timber foundations. Create a slight slope away from the frame and consider laying landscape fabric beneath a gravel base to prevent water pooling. This simple step dramatically extends your foundation’s lifespan.
Expect a well-constructed timber frame to last 15-25 years, depending on your climate and maintenance routine. While not as permanent as concrete, the combination of affordability, ease of installation, and respectable longevity makes timber frames an excellent choice for most backyard greenhouses.
Concrete Block (Cinder Block) Foundation
Concrete blocks offer an excellent middle ground between temporary and permanent foundation solutions for greenhouses. Also known as cinder blocks, these sturdy building materials provide a solid, level base that can support greenhouses ranging from small hobby structures to larger 10×12 foot models and beyond.
The installation process is refreshingly straightforward. Start by marking out your greenhouse dimensions and excavating 2-4 inches of soil where the blocks will sit. Lay down landscape fabric to prevent weed growth, then add a 2-inch layer of gravel for drainage. Position your concrete blocks around the perimeter, spacing them approximately 2-3 feet apart to adequately support the greenhouse frame’s weight.
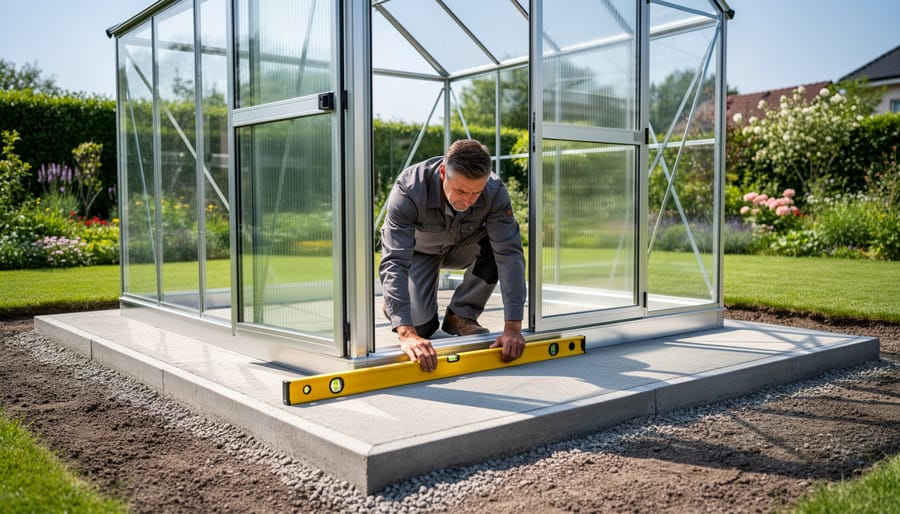
Here’s where attention to detail pays off: leveling is absolutely critical. Use a long, quality level to ensure each block sits perfectly level both individually and in relation to its neighbors. Even minor variations can cause your greenhouse frame to twist or prevent doors from closing properly. Many experienced DIYers share that taking extra time at this stage saves countless headaches later. Adding sand beneath blocks allows for fine-tuning adjustments.
One satisfied greenhouse owner mentioned how her concrete block foundation has lasted over eight years with zero maintenance, supporting her 8×10 greenhouse through harsh winters and summer storms. The blocks can be stacked two high for additional elevation in flood-prone areas or regions with heavy snowfall. Best of all, this foundation style remains semi-permanent, allowing you to reconfigure or relocate your greenhouse if your gardening needs change down the road.
Step-by-Step Installation Guide
Planning and Preparation
Before you break ground, investing time in proper planning will save you headaches down the road. Think of this stage as laying the groundwork for success—literally!
Start by choosing the right spot for your greenhouse. Look for level ground with good sun exposure, ideally facing south for maximum light. Avoid low-lying areas where water tends to pool, as drainage issues can undermine even the best foundation. Walk your property after a heavy rain to see where water naturally flows and settles.
Next, check your local building codes and permit requirements. Many communities require permits for structures over a certain size, and some have specific setback requirements from property lines. A quick call to your local building department can prevent costly mistakes. One homeowner shared how they had to relocate their entire greenhouse foundation because they didn’t verify setback rules first—an expensive lesson in the importance of doing homework upfront.
Once you’ve got the green light, carefully mark your layout using stakes and string. This is where the old carpenter’s wisdom really applies: measure twice, cut once. Double-check that your corners form perfect right angles using the 3-4-5 triangle method.
Plan your drainage strategy now, not later. Consider how rainwater will flow away from your greenhouse and whether you need to grade the surrounding area or install drainage channels.
Gather all necessary tools and materials before starting. Having everything on hand keeps your project moving smoothly and prevents multiple trips to the hardware store.
Site Excavation and Leveling
Before you can build a solid greenhouse foundation, you’ll need to prepare the ground properly. Think of this step as creating a blank canvas – it’s where many DIY enthusiasts either set themselves up for success or create headaches down the road.
Start by marking your greenhouse perimeter with stakes and string, adding an extra 6-12 inches on all sides for working room. For most small to medium greenhouses, you’ll want to excavate 4-6 inches deep. This depth accommodates your foundation material while removing grass, roots, and organic matter that could settle unevenly over time. If you’re working with particularly soft or clay-heavy soil, consider going deeper – around 8 inches – to create a more stable base.
A basic flat shovel and garden rake are your best friends here. Remove the topsoil in sections, checking your level frequently as you go. Here’s a pro tip from experienced greenhouse builders: use a long, straight 2×4 board with a carpenter’s level on top to check for evenness across the entire area. This simple technique catches high and low spots before they become problems.
The leveling process requires patience. Add or remove soil in small amounts, compacting as you go by tamping with the back of your shovel or a hand tamper. For areas larger than 10×12 feet, you might find the work gets physically demanding quickly.
When should you call in professionals? If you’re dealing with steep slopes requiring more than 12 inches of excavation, rocky soil that’s difficult to dig, or drainage issues with standing water, it’s worth getting expert help. Similarly, if your project timeline is tight or physical limitations make extensive digging challenging, professional excavation equipment can complete in hours what might take you days.
Building Your Foundation
Getting started with your greenhouse foundation doesn’t have to feel overwhelming. Let’s walk through the essential steps that apply to nearly every foundation type, so you can build with confidence.
First things first: preparing your site properly makes all the difference. Clear away grass, rocks, and debris from your chosen area, then extend about 6 inches beyond where your greenhouse will sit. This extra space gives you room to work comfortably and ensures proper drainage around the perimeter.
Next up is creating a level base, which honestly can’t be stressed enough. Even a slight slope can cause doors to swing open, create water pooling issues, and put unnecessary stress on your greenhouse frame. Use a long level and stakes with string to check in multiple directions. For concrete slab and gravel bed foundations, you’ll need to excavate to your desired depth, while concrete pier foundations require marking precise spots for each support point.
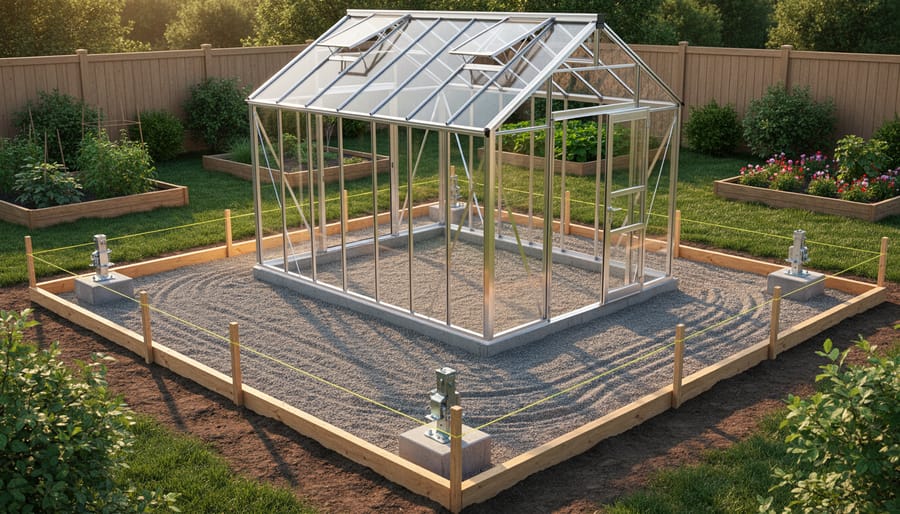
Here’s where many DIYers run into trouble: forgetting to check for square corners. Use the 3-4-5 triangle method by measuring 3 feet along one side, 4 feet along the adjacent side, and confirming the diagonal measures exactly 5 feet. This simple geometry trick ensures your greenhouse fits together perfectly.
When it comes to anchoring, don’t cut corners. Ground anchors, concrete piers, or embedded J-bolts (depending on your foundation type) prevent your greenhouse from shifting during storms or high winds. One homeowner shared how her initially unanchored greenhouse shifted 6 inches during a windstorm, cracking several panels in the process.
Common mistakes to avoid include rushing the leveling process, skipping the compacting step for gravel foundations, and installing without checking local frost line requirements. Taking time now prevents headaches later.
Anchoring Your Greenhouse
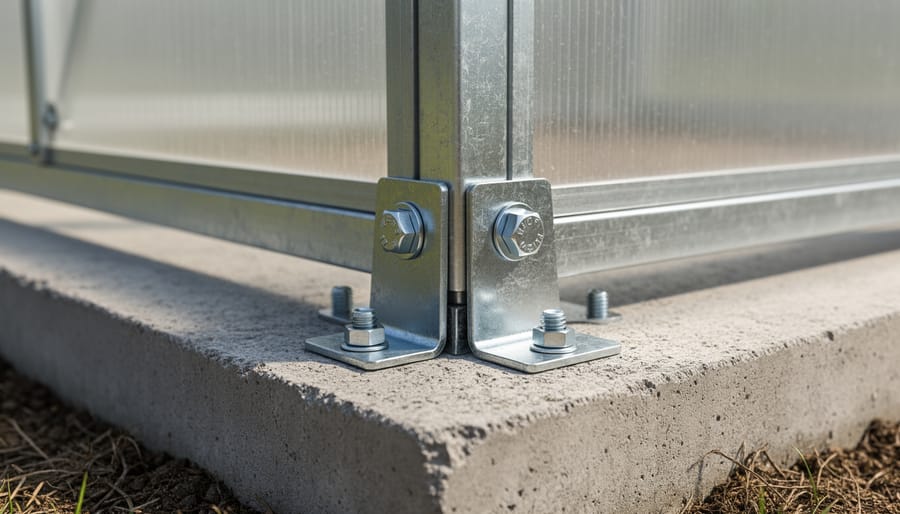
Even the best foundation won’t protect your greenhouse if it’s not properly secured. Think of anchoring as the critical connection that keeps everything in place when Mother Nature decides to test your handiwork with strong winds or storms.
The anchoring method you’ll need depends on your foundation type. For concrete slab foundations, anchor bolts embedded directly into the wet concrete provide exceptional holding power. These J-bolts or L-bolts should be positioned every 4-6 feet around the perimeter, perfectly aligned with your greenhouse frame’s pre-drilled holes. If you’re working with an existing slab, concrete wedge anchors or expansion bolts work beautifully as alternatives.
Wood frame foundations require galvanized brackets or L-brackets to connect the greenhouse base to the timber. These brackets prevent uplift and lateral movement, which is especially important in areas prone to high winds. Don’t skimp on hardware quality here – outdoor-rated, rust-resistant materials will serve you for years.
Pier and block foundations need ground anchors or auger-style anchors that screw deep into the soil, connecting to the greenhouse frame with adjustable cables or straps. These provide flexibility while maintaining secure hold.
Here’s a real-world tip from experienced greenhouse owners: always use stainless steel or hot-dipped galvanized hardware. Regular hardware might save a few dollars initially, but rust and corrosion will compromise your anchoring within a season or two. One homeowner learned this lesson after replacing corroded bolts following a moderate windstorm that nearly lifted their entire structure.
Remember, proper anchoring isn’t just about preventing your greenhouse from blowing away – it’s insurance for protecting your investment and the plants inside.
Tools and Materials You’ll Need
The tools you’ll need depend largely on which foundation type you choose, but let’s break this down so you’re not buying things you won’t use.
For most foundation types, you’ll want these basics on hand: a quality spirit level (at least 24 inches long), measuring tape, rubber mallet, stakes and string for layout, work gloves, and safety glasses. A wheelbarrow will save your back when moving materials around. These are items many DIYers already have in their garage, so check before you shop.
If you’re tackling a concrete slab or pier foundation, you’ll need additional equipment. A mixing drill with paddle attachment works great for small batches of concrete, though renting a concrete mixer (around $50-75 per day) makes sense for larger projects. You’ll also need concrete finishing tools like a screed board, bull float, and edger. Here’s a money-saving tip: many hardware stores offer tool lending libraries or low-cost rentals for weekend projects.
For gravel pad foundations, keep it simple. A sturdy rake, tamping tool, and shovel are your main players. You can rent a plate compactor for about $40-60 per day, which gives far better results than hand-tamping and speeds up the job considerably.
Working with timber foundations? Add a circular saw or miter saw, drill/driver, carpenter’s square, and post hole digger to your list. One homeowner recently shared that borrowing a neighbor’s auger saved him hours of manual digging and cost nothing but offering to help with their next project.
Consider renting specialized equipment rather than purchasing items you’ll rarely use again. It keeps costs manageable while ensuring professional-quality results.
Common Mistakes and How to Avoid Them
Even experienced DIYers can run into trouble with greenhouse foundations, but the good news is that most problems are completely preventable when you know what to watch for.
One of the biggest mistakes is ignoring drainage. Sarah from Michigan learned this the hard way when her beautiful greenhouse developed standing water after heavy spring rains. “I thought the slight slope in my yard would handle it,” she shared, “but water pooled around the foundation and weakened everything.” The solution? Always create a drainage plan before you build. Add a 4-6 inch gravel base, ensure your site slopes away from the foundation, and consider installing French drains if you’re in a particularly wet area.
Skipping leveling checks is another common pitfall. A foundation that’s off by even an inch can cause doors to stick, create gaps in your glazing, and put uneven stress on your greenhouse frame. Take the time to check level every few feet as you work, and don’t rush this step. A basic spirit level and some patience will save you hours of frustration later.
Choosing the wrong foundation for your soil type can spell disaster too. Sandy soil needs deeper anchoring, while clay soil expands and contracts with moisture. Before you commit to a foundation type, do a simple soil test or chat with neighbors about what works in your area.
Finally, inadequate anchoring is surprisingly common. Wind can lift an unanchored greenhouse like a kite, even when it seems secure. Use proper ground anchors, concrete footings, or earth screws rated for your greenhouse size and local wind conditions. It’s always better to over-anchor than under-anchor.
Remember, taking time to avoid these mistakes upfront means years of worry-free gardening ahead.
Choosing the right foundation for your greenhouse might seem like a big undertaking, but it’s absolutely worth every bit of effort you invest. A properly installed foundation protects your investment, keeps your plants thriving in a stable environment, and saves you from headaches down the road. Whether you’ve decided on a simple gravel base, sturdy concrete blocks, or a permanent poured concrete slab, you’re making a smart choice that will pay dividends for years to come.
Remember, there’s no one-size-fits-all solution here. Your perfect foundation depends on your greenhouse size, local climate, soil conditions, and budget. Take time to assess your specific needs before diving in.
For many greenhouse projects, DIY installation is completely achievable with patience and the right preparation. However, don’t hesitate to call in professional help for larger structures or challenging site conditions. There’s wisdom in knowing when expert assistance makes sense.
Once your foundation is complete and your greenhouse is standing strong, you’ll enjoy peace of mind knowing your growing space is built to last. Here’s to many seasons of successful gardening in your stable, well-founded greenhouse!