


How to Anchor a Metal Shed to the Ground in 6 Simple Steps

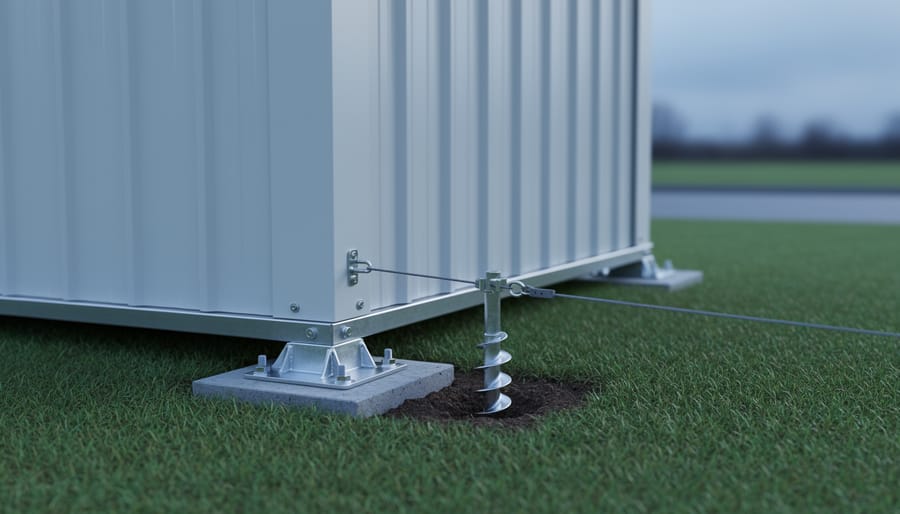
Anchoring your metal shed to the ground takes about two to three hours using concrete anchors, auger anchors, or a combination of both. The right method depends on your shed size, local wind conditions, and ground type. Most homeowners choose either concrete pad anchors for permanent installations or auger-style ground anchors for softer soil, with each anchor point capable of handling winds up to 70 mph when properly installed.
Key Takeaway: Anchoring prevents costly damage from high winds and keeps your warranty valid. Install anchors immediately after assembly, before loading the shed. Budget two to three hours for a standard 10×12 shed with four to eight anchor points.
Skipping this step is the number one mistake new shed owners make. A loose shed can shift during storms, damaging both the structure and anything stored inside. Insurance claims for unsecured sheds are rarely covered, and manufacturers often void warranties if you don’t anchor properly. The good news is that securing your shed is straightforward with the right supplies and a clear plan.
Metal sheds need anchoring because why metal lasts depends partly on keeping the frame stable and preventing stress on bolted joints. Wind can create uplift forces that pull a shed right off its foundation. Even a moderate 40 mph gust generates enough pressure to shift an unanchored 8×10 shed several inches.
This guide walks you through choosing anchors, gathering tools, and completing the installation safely. You’ll learn how to verify your work and troubleshoot common problems, whether you’re working with concrete, compacted soil, or grass.
Why Your Metal Shed Needs Proper Anchoring
Without proper anchoring, your metal shed becomes vulnerable to forces that most homeowners underestimate until damage occurs. A moderate windstorm that wouldn’t affect an anchored structure can lift an unsecured shed several inches off its base, causing immediate structural damage and long-term problems that compound over time.
The consequences go beyond obvious wind damage. When a shed shifts even slightly from its original position, doors and windows fall out of alignment, making them difficult or impossible to operate. Water can seep through gaps created by movement, leading to rust and interior damage to whatever you’re storing. The frame itself experiences stress from repeated shifting, weakening joints and fasteners that were designed to remain stationary.
Here’s what typically happens with unanchored sheds:
- Wind can lift and move the entire structure, causing frame damage or complete displacement
- Doors stick or won’t close properly as the frame shifts and corners become uneven
- Water infiltrates through gaps between the shed and its foundation, rusting the floor panels
- Manufacturer warranties become void when installation doesn’t meet specified anchoring requirements
That last point catches many homeowners off guard. Major manufacturers like Arrow, Suncast, and Rubbermaid explicitly state in their warranties that proper anchoring is mandatory. If your shed suffers damage and the adjuster finds it wasn’t anchored according to specifications, you’ll pay for repairs yourself.
Even if you have a solid shed foundation the structure itself needs independent anchoring to resist uplift forces. Wind doesn’t just push horizontally, it creates suction that pulls upward on roof panels and can lift an entire lightweight metal shed like a kite. Proper anchoring solves this problem permanently with minimal effort and cost.
Choosing the Right Anchor Type for Your Ground Conditions
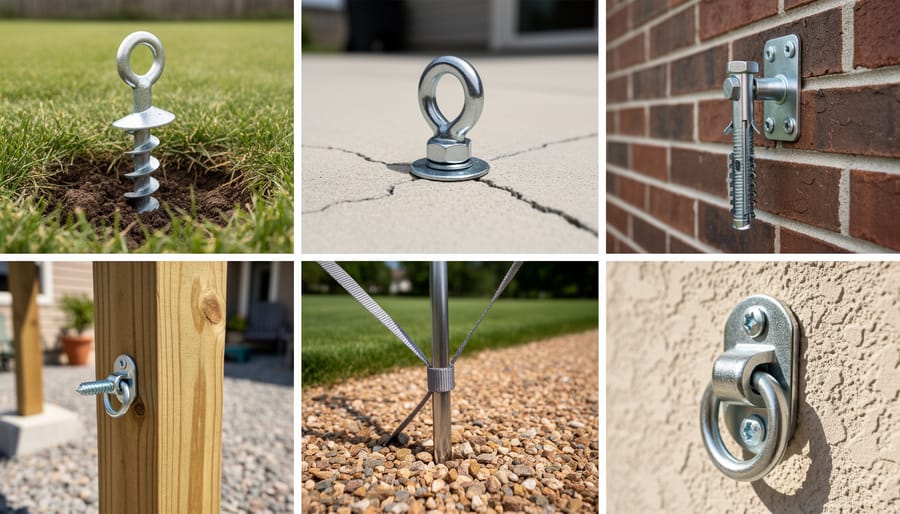
Picking the wrong anchor type is one of the fastest ways to waste money and time on a shed project that won’t hold up. The anchor you need depends entirely on what’s under your shed and the conditions it’ll face. Let’s break down the four main options so you can shop with confidence.
Auger anchors look like giant corkscrews that twist deep into the ground. They’re your best choice for soft to medium soil, think typical garden dirt, clay, or sandy ground. These anchors work by creating resistance as you screw them 12 to 24 inches down, and they’re excellent in areas with moderate wind. They handle sheds up to 12×16 feet without breaking a sweat. The catch? Rocky soil will stop them cold, and you’ll need a breaker bar or power drill attachment to install them properly.
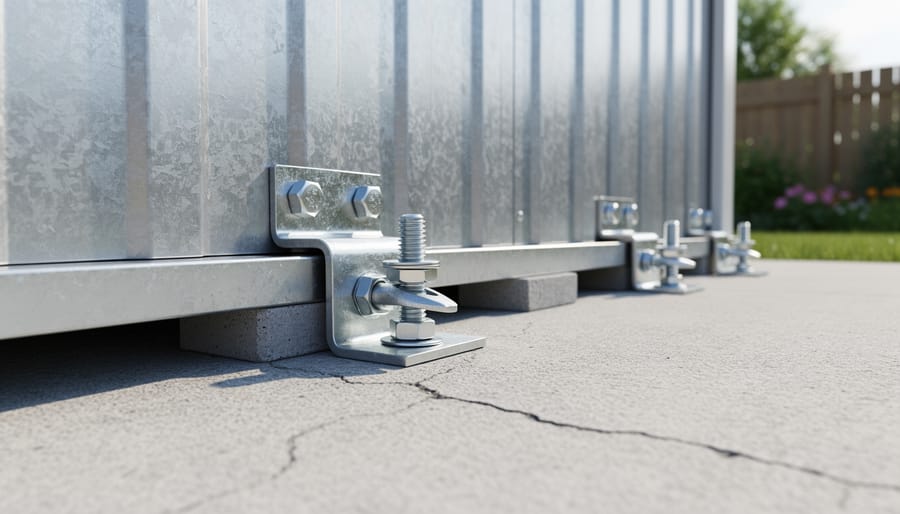
Concrete anchors (also called wedge anchors or expansion bolts) drill directly into an existing concrete pad or footer. If you’ve already poured a slab or concrete foundation, these are your only real option. They create an incredibly strong hold by expanding inside the drilled hole. You’ll need a hammer drill with a masonry bit, but the installation is straightforward. These work for any shed size and are the most permanent solution, removing them later will leave holes in your concrete.
Ground stakes are simple metal spikes that drive straight down into the soil. They’re the budget-friendly option for small sheds (8×10 or smaller) in areas with low wind exposure. You pound them in with a sledgehammer through brackets attached to the shed frame. They work best in softer soils but don’t provide the same holding power as augers. Think of these as the minimum viable anchor, they’ll keep a lightweight shed in place during normal conditions, but a severe storm might test their limits.
Concrete slab bolts combine the best of both worlds when you’re building new. You embed J-bolts or anchor bolts directly into wet concrete as you pour your foundation, leaving the threaded end sticking up to bolt through your shed frame later. This creates the strongest possible connection and is worth the extra planning if you’re starting from scratch.
What You’ll Need: Tools and Materials Checklist
Having the right tools and materials ready before you start makes the anchoring process smoother and helps you avoid mid-project trips to the hardware store. What you need depends primarily on which anchor type you’ve chosen based on your ground conditions, but some items are universal regardless of method.
Essential Tools and Materials
Every anchoring job requires these basics:
- Cordless drill with adjustable clutch and fresh battery
- Socket wrench set or adjustable wrench (typically 1/2″ and 9/16″ sockets)
- Tape measure (25-foot minimum)
- Carpenter’s level (at least 24 inches long)
- Marker or chalk for marking ground positions
- Work gloves and safety glasses
- Helper (anchoring is genuinely a two-person job)
Anchor Hardware by Type
For auger anchors in soil: You’ll need four to six auger anchors (3/8-inch diameter, 15-30 inches long depending on wind exposure), metal anchor plates or brackets, and galvanized cable or straps. Budget around $40-60 for a complete kit.
For concrete anchors on slabs: Pick up four to six expansion bolts or wedge anchors (3/8-inch diameter, 3-inch length), a hammer drill with masonry bits (5/16-inch for 3/8-inch anchors), and metal washers. Expect to spend $25-40.
For ground stakes in firm soil: You’ll want eight to ten heavy-duty ground stakes (12-18 inches long), L-brackets to connect stakes to the shed frame, and a sledgehammer or fence post driver. Cost runs $30-50.
Optional Items That Make the Job Easier
A cordless impact driver speeds up tightening considerably. Shims or pavers help with leveling adjustments. A second level lets you check both directions simultaneously. Thread-locking compound prevents hardware from loosening over time.
For typical 8×10 sheds, plan on four anchors minimum (one per corner). A 10×12 shed should have six anchors, four corners plus one on each long side. High-wind areas may require additional mid-span anchors regardless of shed size.
Safety Precautions Before You Begin
Before you pick up a single tool, take these safety steps seriously. Skipping them can lead to serious injury, expensive damage, or even death.
Warning: Always call 811 at least two business days before you dig or drive anchors into the ground, hitting buried electrical lines, gas pipes, or fiber optic cables can be fatal and will cost you thousands in repair fees.
Wait for utility crews to mark your property. Even shallow auger anchors can strike buried lines, and you’re legally responsible for damage if you don’t call first.
Check the weather forecast and postpone the work if rain, high winds, or storms are expected. Wet conditions make the shed slippery and harder to level, while wind can catch the empty shed like a sail before you anchor it. Metal conducts electricity, so never work during lightning risk.
Wear sturdy work gloves to protect your hands from sharp metal edges, and use safety glasses when drilling or hammering. Steel-toed boots are smart if you’re handling heavy anchors or tools.
Don’t attempt this alone. Metal sheds are awkward and top-heavy when empty. You need at least one helper to hold the shed steady while you check level and position anchors. Trying to muscle a shifting shed by yourself is how people end up with crushed fingers or pulled backs.
If you’re working on a concrete slab and need to drill, wear a dust mask and hearing protection. Concrete drilling creates fine silica dust that damages your lungs over time.
Step-by-Step: How to Anchor Your Metal Shed
Step 1: Position and Level Your Shed
Place your assembled shed in its final location before making any permanent anchoring decisions, moving it later wastes time and can bend the frame. Start by checking level side-to-side and front-to-back using a 4-foot carpenter’s level placed along the base rails. If you find high or low corners, add pressure-treated wood shims under the low points or redistribute gravel in your leveling base until you achieve level in both directions. Open and close the door several times, it should swing smoothly without binding or gaps at the latch. A shed that’s off-level by more than half an inch will fight you during anchoring and may never close properly afterward.
Step 2: Mark Your Anchor Points
Start at each corner of your shed’s base frame. Most metal shed kits have pre-drilled holes in the corner brackets, these are your guides. Drop a nail or pencil through each hole and mark the ground directly beneath it with spray paint or a wooden stake.
For sheds larger than 8×10, add midpoint anchors along the longer walls. Measure the distance between corners and divide by two to find center. Mark these spots even with the base frame.
Double-check your marks by measuring diagonally corner to corner. Both diagonal measurements should match exactly, confirming the shed hasn’t shifted and your marks are accurate.
Step 3: Prepare Anchor Points
With your anchor points clearly marked, the next step depends entirely on which anchor type you’re using. Each requires a different preparation technique to ensure a secure hold.
For auger anchorsuse a cordless drill with a hex bit adapter to drive the auger into the soil. Start at a slight angle (about 15 degrees) to get the threads engaged, then straighten to vertical as you drill. Stop when 2-3 inches of the anchor shaft remains above ground, you’ll need this clearance to attach the shed bracket.
For concrete anchors or ground stakesdrill pilot holes using a masonry bit matched to your anchor diameter. Drill straight down to the depth specified on your anchor package, typically 3-4 inches. Clear debris from holes using a shop vacuum or compressed air before inserting anchors.
For existing concrete slabsuse a hammer drill with a carbide-tipped masonry bit. Drill holes 1/2 inch deeper than your anchor bolt length to allow for concrete dust. Mark your bit with tape at the target depth so you don’t drill too deep.
Step 4: Install the Anchors
Now you’ll actually drive those anchors into the ground, and proper technique here makes the difference between a secure shed and one that pulls loose in the first storm. For auger anchors, use a steel rod or ratchet wrench through the eye and twist clockwise, keeping steady downward pressure to prevent the anchor from walking sideways. Stop when the eye sits 1-2 inches above ground, you need clearance for cable attachment.
Ground stakes require firm, controlled hammer blows straight down. Use a dead-blow hammer or place a wood block on top to protect the stake head. Drive until only the mounting hole shows above ground. If you hit rock and the stake bends, pull it out and reposition slightly.
For concrete anchors, thread the bolt through your marked hole into the pre-drilled pilot. Tighten with a socket wrench until snug but not fully torqued yet. Check that each anchor stands perpendicular to the ground, leaning anchors create weak points and uneven stress on your shed frame.
Step 5: Attach the Shed to Anchors
With your anchors firmly in place, it’s time to connect your shed to them. The connection method depends on your anchor type, but the principle remains the same: secure attachment without forcing or over-tightening.
For auger anchors and ground stakes, thread the provided cable or strap through the anchor eye and loop it over your shed’s base frame. Most metal sheds have pre-drilled holes or designated attachment points along the bottom rail, use these rather than drilling new ones, which could compromise the frame’s integrity. Secure the cable with the included clamp or bracket, ensuring the connection sits flat against the frame.
If you’re using concrete anchors or slab bolts, align the shed’s mounting holes with your installed anchors. Insert the bolt through the shed frame and thread it into the anchor by hand. For L-brackets, position the bracket so one leg bolts to the anchor while the other attaches to the shed’s vertical corner post.
Hand-tighten all connections initially, just snug enough to hold without play. You’ll do the final tightening in the next step after verifying everything is aligned correctly.
Step 6: Final Tightening and Adjustment
Now comes the critical step that determines whether your shed stays put or gradually works loose. Start at one corner and tighten the anchor bolt or nut until snug, not torqued down yet. Move diagonally to the opposite corner and do the same. This crisscross pattern prevents the frame from warping or shifting to one side as you apply pressure.
After hand-tightening all anchors in this diagonal sequence, go back to the first corner and tighten each connection to firm resistance. You want secure contact between the bracket and shed frame without crushing the metal or stripping threads. Check your shed’s level again in both directions, anchoring sometimes pulls a frame slightly off-kilter. If it’s shifted, loosen the anchors on one side, make minor adjustments with shims, then re-tighten.
Finally, test your door alignment by opening and closing it fully. The door should swing freely without binding or gaps. If it sticks or won’t latch properly, you’ve likely over-tightened one side and twisted the frame, back off those anchors slightly until operation is smooth.
How to Verify Your Shed Is Securely Anchored
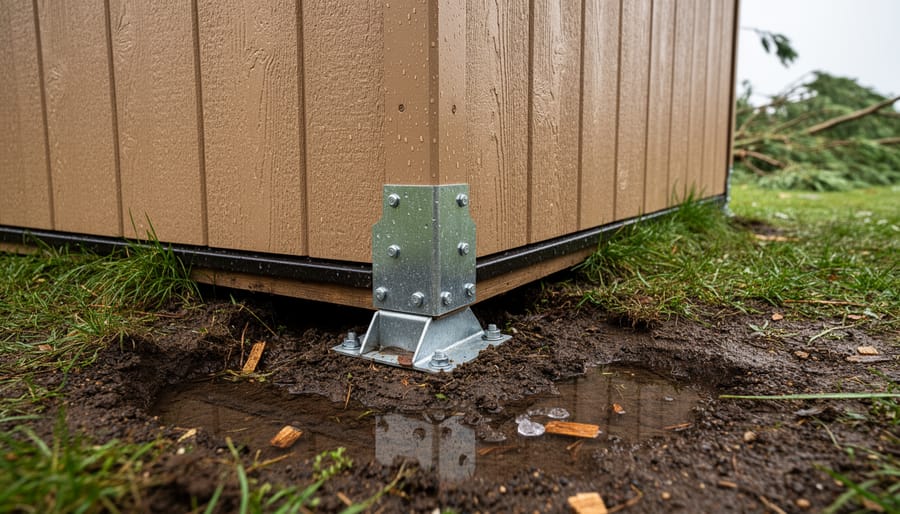
After you’ve tightened the last bolt, don’t just walk away and assume everything is secure. Spending five minutes to verify your installation now can save you from discovering problems during the next windstorm. Here’s how to confirm your shed is properly anchored and ready to withstand whatever weather comes its way.
Start with a physical stress test. Stand at one corner of your shed and push firmly against the wall at shoulder height, you shouldn’t be able to shift the structure at all. Move to each corner and repeat. Any movement, rocking, or flexing indicates either loose hardware or insufficient anchors. If you detect movement, identify which anchors feel loose and re-tighten them before proceeding.
Run through this complete verification checklist to ensure nothing was missed:
- Push/pull test at all four corners, zero movement should occur
- Check that auger anchors sit at least 18 inches deep and ground stakes are flush with soil surface
- Inspect every bolt, bracket, and connection point for proper tightness (snug but not crushing the frame)
- Recheck level in both directions, anchoring sometimes shifts position slightly
- Open and close the door fully, it should operate smoothly without binding or scraping
Examine the gap between the shed floor and ground around the perimeter. You should see consistent spacing with no lifted corners or edges pressing into the soil unevenly. Check that anchor cables or straps have no slack, they should be taut but not so tight they’re bowing the shed frame.
If you find any issues during verification, address them immediately. Loose anchors need re-tightening, bent frames require loosening and repositioning, and insufficient anchorage means adding more anchor points. The goal is a shed that feels rock-solid when you push it and shows no visual signs of stress or movement.
Common Mistakes to Avoid
Even experienced DIYers make critical mistakes when anchoring their metal sheds. Here are the errors I see most often, and how to avoid them:
Using too few anchors is a recipe for disaster. Many homeowners think four corner anchors are sufficient, but most 8×10 sheds need at least six anchors, and 10×12 sheds require eight or more. High-wind areas demand even more. The solution: follow your manufacturer’s anchor specifications exactly, and when in doubt, add one or two extra anchors along the longest walls.
Tip: The most common mistake is rushing to anchor before the shed is perfectly level, always verify level in both directions before driving a single anchor.
Over-tightening anchors warps the shed frame and makes doors stick or refuse to close. Metal sheds need to be secured firmly but not torqued down like you’re assembling an engine. Tighten anchors until snug, then add just a quarter-turn more. Test your door operation after each anchor is tightened.
Choosing the wrong anchor type for your soil wastes time and money. Auger anchors don’t work in rocky soil, ground stakes fail in loose sand, and concrete anchors are overkill for temporary placements. Match your anchor type to your actual ground conditions, not just what’s cheapest or easiest.
Skipping the utility locate call can lead to hitting underground power, gas, or water lines, a dangerous and expensive mistake. Always dial 811 at least two business days before you start digging or driving anchors. It’s free, required by law in most areas, and could save your life.
Maintaining Your Anchors Over Time
Your anchoring job isn’t done once the shed is secured, anchors need periodic checks to stay effective. Ground conditions shift with seasons, hardware loosens from temperature cycles, and weather gradually takes its toll.
First-Year Schedule
Check your anchors every six months during the first year. New installations settle as the ground compacts and the shed adjusts to its environment. Walk around the shed and hand-tighten any bolts or brackets that have loosened. This takes about 15 minutes and prevents small issues from becoming bigger problems.
After the first year, switch to annual inspections each spring. Make it part of your regular shed maintenance routine alongside gutter cleaning and door lubrication.
What to Check
Look for rust or corrosion on metal anchors and hardware, especially if you’re in a humid climate or near saltwater. Surface rust on galvanized anchors is normal, but flaking or deep pitting means replacement is needed. Apply a rust-preventative spray to exposed metal parts every other year.
Inspect the ground around each anchor. If you notice the soil has pulled away or the anchor sits higher than when installed, you’re seeing frost heave, common in cold climates where freezing and thawing cycles push anchors upward. Drive the anchor back to its original depth or add a concrete collar around it to resist movement.
Add extra anchors if your shed has shifted despite proper initial installation, or if you’ve added heavy equipment inside that increases wind resistance.
Frequently Asked Questions
How many anchors do I need for my metal shed?
Most 8×10 sheds need a minimum of four anchors (one per corner), while 10×12 and larger sheds should have six to eight anchors with additional mid-point anchoring along the sides. High-wind areas may require anchors every 3-4 feet around the perimeter for maximum security.
Can I anchor my metal shed to a wood deck?
Anchoring to a deck is not recommended because wood lacks the stability and weight-bearing capacity needed to resist wind uplift forces. If you must use a deck, consult a structural engineer and use through-bolts that penetrate the deck and connect to the underlying frame, but understand this compromises both the shed’s and deck’s integrity.
What should I do if I hit rock while installing anchors?
If you encounter rock at shallow depths, switch to concrete anchors with expansion bolts drilled directly into the rock, which actually provides superior holding strength. For scattered rocks in soil, reposition your anchor point a few inches away or use a longer auger anchor that can work around obstacles.
Do I need a building permit to anchor my shed?
Permit requirements vary by municipality, most areas don’t require permits for sheds under 120 square feet that aren’t permanently anchored to a concrete foundation, but some jurisdictions consider any anchoring system as permanent installation. Check with your local building department before starting work.
How deep should my anchors go into the ground?
Auger anchors and ground stakes should penetrate at least 24 inches deep for small sheds and 30-36 inches for larger structures or high-wind zones. Concrete anchors need to extend into solid ground below the frost line in cold climates to prevent heaving.
Properly anchoring your shed isn’t just about meeting installation requirements, it’s a critical step to extend shed life and protect your investment from weather damage. While the specific anchoring method depends on your ground conditions and shed size, following manufacturer guidelines and local building codes ensures your structure stays secure for years. If you’re working with unusual conditions like steep slopes, extremely sandy soil, or areas with severe weather patterns, consulting a local contractor familiar with regional challenges can save you from costly reinstallation later.