


How to Build a Quonset Greenhouse Foundation: Pros, Cons, and Step-by-Step Installation

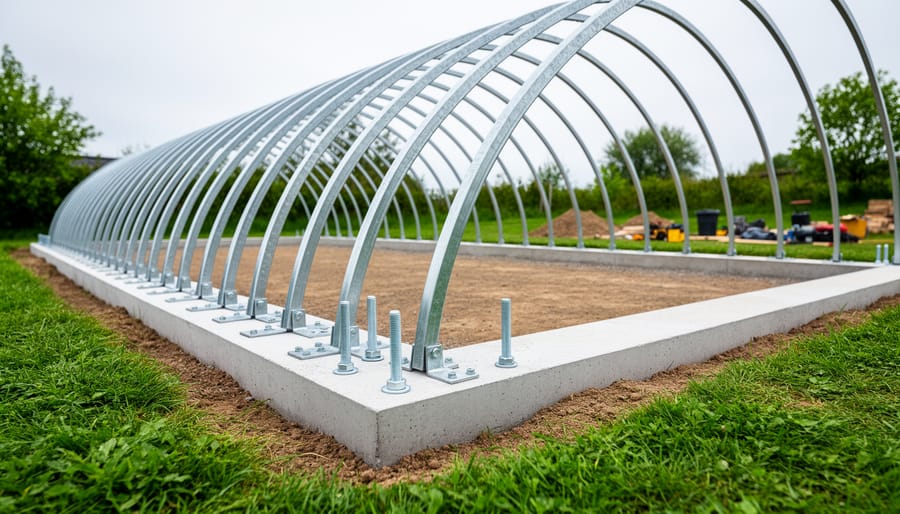
A quonset greenhouse combines the classic arched hoop-house design with modern materials to create a durable, affordable growing space that excels in snow shedding and wind resistance but requires careful foundation planning to maximize its strengths. These curved-roof structures offer more headroom than traditional A-frames along the sidewalls and cost 20-30% less than comparable rigid-frame designs, making them popular with both hobby gardeners and small-scale growers. But that efficient shape comes with trade-offs: limited vertical wall space for hanging plants, potential for heat buildup at the peak, and a foundation that must anchor the frame securely without obstructing the door sweep.
Whether you’re weighing a quonset against other greenhouse styles or ready to install one on your property, understanding both the advantages and limitations helps you make the right choice and avoid costly mistakes during setup. The foundation you choose will directly impact ventilation, drainage, and how well your greenhouse weathers storms over the years. Getting it right from the start means better growing conditions and fewer headaches down the road.
Key Takeaway: Verify your foundation passes three non-negotiable tests before assembly: a level surface within 1/4 inch across the entire footprint, anchor bolts secure and properly aligned, and water draining away from the base rather than pooling.
What Makes Quonset Greenhouses Different
Quonset greenhouses get their name from the military-style Quonset hut shelters developed during World War II. The distinctive semicircular arch design sets them apart from traditional peak-roof greenhouses in ways that directly affect how you’ll build their foundation.
The structure consists of curved metal ribs or hoops that form a continuous arc from ground to ground, creating a tunnel-like shape. Unlike gable greenhouses with vertical walls and an angled roof, quonset designs have no separate wall and roof sections. This creates even stress distribution across the entire frame, which is why they handle snow loads and wind so well.
Here’s what makes their structure unique from a foundation standpoint:
- Ground-level attachment points instead of vertical wall bases
- Outward thrust forces at the arch base that require secure anchoring
- Wider footprint relative to height compared to peaked designs
- No corner posts or concentrated load points
- Continuous curve requiring level, evenly-supported ground contact
These characteristics mean your foundation needs to resist lateral spreading forces, not just vertical weight. Traditional greenhouses with four corner posts can work with pier foundations at each corner, but quonset arches need anchoring along the entire base perimeter to prevent the arches from flattening or shifting outward over time.
The arch shape also means you’re working with a lower profile structure overall. Most quonset greenhouses measure 10 to 12 feet tall at the center, while traditional peak-roof models often reach 14 feet or more. This affects wind exposure and the depth of foundation you’ll need, particularly in areas with high winds or freeze-thaw cycles.
Quonset Greenhouse Advantages
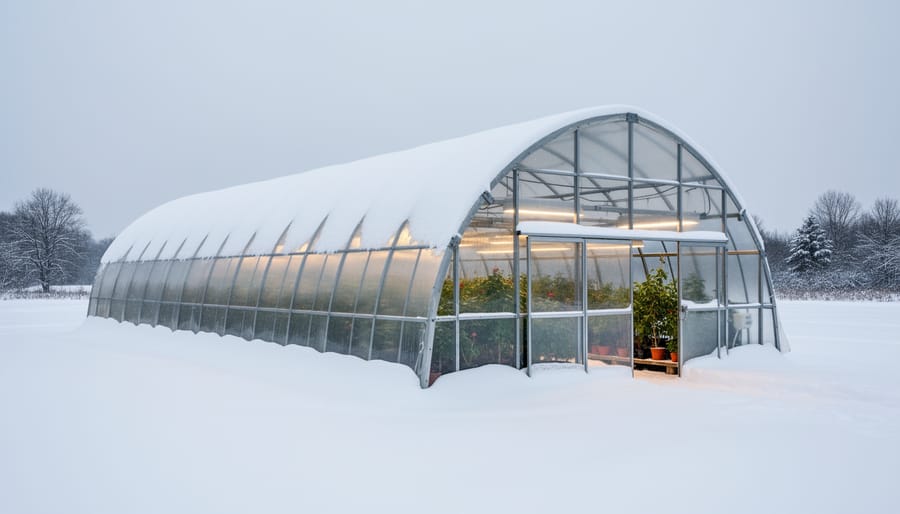
The arch design of a quonset greenhouse delivers practical benefits that matter when you’re growing plants year-round. These advantages explain why homeowners in varied climates choose this style over traditional peak-roof structures.
Snow slides off the curved roof naturally instead of piling up. A Michigan gardener shared that after a heavy February storm dumped eighteen inches, her quonset shed the load within hours while her neighbor’s A-frame greenhouse required manual clearing to prevent collapse. This structural advantage means less maintenance and lower risk of frame damage in snowbelt regions.
Light reaches plants from more angles throughout the day. The curved surface catches morning and afternoon sun that would miss vertical walls, extending productive growing hours. You’ll notice stronger plant growth near the edges compared to traditional greenhouses where corner spaces often underperform.
Wind flows over the rounded profile rather than catching flat surfaces. Quonset greenhouses routinely withstand gusts that would stress gable designs. Coastal growers report their structures handling sustained winds above forty miles per hour without requiring additional bracing.
You’ll spend less on both materials and labor. The simpler frame uses fewer connection points than conventional designs, cutting assembly time roughly in half. A Colorado homeowner built his twelve-by-twenty-four-foot quonset in one weekend with a helper, compared to the week-plus timeline friends spent on comparable peak-roof models.
The floor-to-ceiling space works harder for you. No attic area means vertical space goes directly to plant shelving or hanging baskets. Most growers fit three shelf levels along the walls while maintaining comfortable center aisle height.
These benefits compound when matched to the right foundation, which is why getting the base correct matters as much as choosing the greenhouse style itself.
Quonset Greenhouse Drawbacks to Consider
While quonset greenhouses offer impressive benefits, they aren’t the right fit for everyone. Understanding these limitations upfront helps you make a realistic decision.
The curved walls create usable headroom challenges along the edges. You’ll have plenty of vertical space down the center aisle, but the arched design means you can’t stand upright or place tall plants within about two feet of the sidewalls. This effectively reduces your usable growing area compared to a straight-walled greenhouse of the same footprint. If you plan to grow tomatoes, cucumbers, or other tall crops, you’ll need to position them strategically along the centerline.
Customization proves more difficult than with traditional framed greenhouses. Adding windows, doors, or roof vents requires cutting into the metal arching, which can compromise structural integrity if done incorrectly. Most quonset kits come with fixed door placements and limited ventilation options for high tunnels. Retrofitting side vents or installing automated systems often costs more than with conventional designs because you’re working around the curved structure rather than simple wall panels.
The aesthetic won’t appeal to everyone. Quonset greenhouses have an industrial, utilitarian appearance that some homeowners find jarring in a residential setting. If neighborhood aesthetics or HOA approval matter, this design might face resistance compared to more traditional greenhouse styles with peaked roofs and vertical walls.
Foundation requirements can surprise first-time buyers. While the lightweight frame seems simple, the curved structure transfers wind loads differently than peaked greenhouses. On soft or unstable soil, you may need more extensive anchoring than initially anticipated. Clay soils prone to heaving or sandy soils lacking lateral stability sometimes require concrete piers where you might have used simpler ground anchors with another greenhouse type.
Foundation Options for Quonset Greenhouses
Ground Anchors and Gravel Base
Ground anchors with a gravel base offer the simplest, most budget-friendly foundation for quonset greenhouses you plan to use seasonally or relocate eventually. This approach works well if you’re testing out greenhouse gardening before committing to a permanent structure, or if you need flexibility to move your growing space in a few years.
The installation process takes just a weekend. You’ll clear and roughly level the site, lay down landscape fabric to prevent weed growth, then spread 4-6 inches of crushed gravel or pea stone. The gravel provides excellent drainage while creating a stable, permeable surface that won’t pool water during heavy rains. You anchor the greenhouse frame using either auger-style ground screws that twist into the soil or rebar stakes driven through the base rails at each arch connection point.
This foundation type costs roughly 60-70% less than concrete options since you’re skipping cement, forms, and curing time. It drains naturally, preventing the moisture buildup that can rust metal frames. The trade-off? It won’t handle extreme wind loads as securely as concrete, and over time the gravel may settle unevenly, requiring occasional releveling. Best suited for regions with moderate weather and gardeners who value quick setup over maximum permanence.
Concrete Pier Foundation
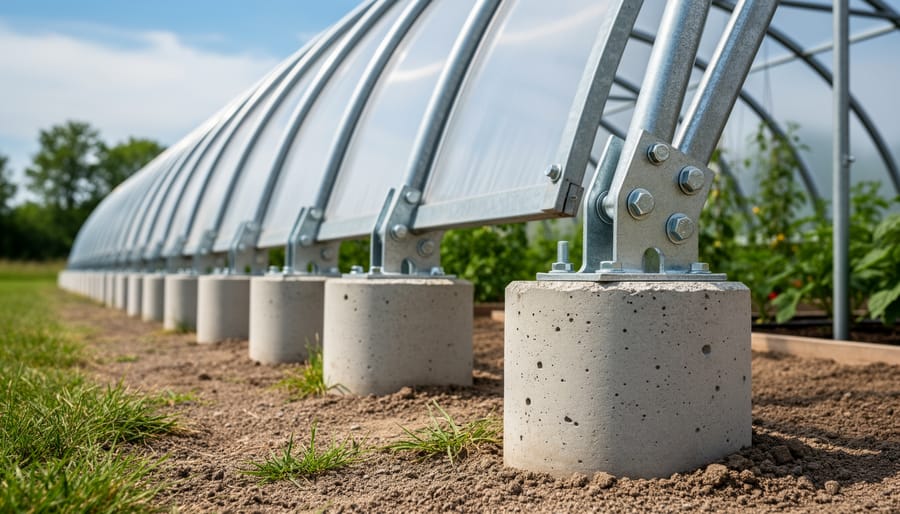
Concrete pier foundations offer the sweet spot between affordability and long-term durability for most quonset greenhouses. This method uses individual concrete footings placed at strategic points around the perimeter, typically spaced 4 to 6 feet apart depending on your greenhouse size and local building codes.
The piers extend below the frost line, usually 18 to 48 inches deep depending on your climate, which prevents seasonal heaving that could crack your foundation or misalign your greenhouse frame. You’ll dig holes at each anchor point, pour concrete, and embed J-bolts or anchor plates while the concrete is still wet. Once cured, these piers create rock-solid attachment points for your base rails.
This foundation type works best on relatively stable, well-draining soil. If you’re dealing with clay-heavy ground or areas with poor drainage, you’ll need to add gravel at the bottom of each pier hole to prevent water pooling and frost damage.
The main advantage is cost savings compared to a full slab, you’re only pouring concrete where you need structural support. Installation typically takes a weekend for a standard 12×20-foot greenhouse, and the piers will last decades with minimal maintenance.
Full Concrete Slab
A full concrete slab delivers the most stable foundation for serious greenhouse gardeners committed to year-round growing. This premium option creates a perfectly level surface that makes installing shelving, benches, and automated systems straightforward. The thermal mass of concrete helps moderate temperature swings, keeping your greenhouse warmer on cold nights and cooler during summer heat spikes.
Expect to invest $8-$12 per square foot for professional installation, though DIY approaches can cut costs in half. The slab must extend at least 6 inches beyond your greenhouse footprint and include rebar reinforcement to prevent cracking. Install a vapor barrier underneath and ensure proper drainage with a slight slope. While expensive upfront, a concrete slab eliminates settling issues and provides decades of maintenance-free service, making it ideal for permanent installations in regions with freeze-thaw cycles.
Treated Wood Frame Foundation
A treated wood frame foundation offers an accessible entry point for DIYers without concrete mixing skills. Build a rectangular perimeter using 4×6 or 6×6 pressure-treated timbers anchored with rebar stakes driven through pre-drilled holes. This approach works well in moderate climates where frost heave isn’t severe, and it naturally integrates with raised bed gardening since the frame edges double as planting borders.
The wood frame elevates your greenhouse slightly, improving drainage and reducing ground moisture contact with metal components. Expect this foundation to last 10-15 years with proper treatment, making it ideal for gardeners who want permanence without the commitment of concrete. Fill the interior with compacted gravel for a stable floor that prevents weed growth while allowing water to drain freely.
Tools and Materials You’ll Need
Gathering the right tools and materials before you start will save you time and frustration. Your exact needs depend on which foundation type you choose, but here’s what you’ll likely need organized by category.
For All Foundation Types:
- Measuring tape (100-foot recommended for layout)
- Stakes and string line for marking corners and perimeter
- Level (4-foot carpenter’s level plus laser level for larger greenhouses)
- Shovel and post-hole digger
- Safety glasses, work gloves, and steel-toed boots
- Wheelbarrow for moving materials
Concrete Pier or Slab Foundations:
You’ll need bags of concrete mix (typically 80-pound bags, quantity varies by size), mixing tub or cement mixer, anchor bolts sized for your greenhouse frame, and a trowel for finishing. Budget around $200-400 for concrete materials on a 10×12-foot greenhouse.
Ground Anchor and Gravel Base:
Pick up spiral ground anchors rated for your greenhouse weight, landscape fabric to prevent weed growth, and crushed gravel or pea stone (calculate 4 inches deep across your footprint). This option runs $100-200 for materials.
Treated Wood Frame:
You’ll want pressure-treated 4×4 or 6×6 lumber rated for ground contact, galvanized lag screws and brackets, and wood preservative for cut ends. Add corner braces for extra stability. Expect $150-300 depending on greenhouse size.
Having extra stakes, a carpenter’s square for checking corners, and a rubber mallet for adjustments will make the job smoother regardless of which foundation you choose.
Safety Precautions Before You Start
Before breaking ground, call 811 at least two business days in advance to have underground utilities marked. This free service locates electric, gas, water, and communication lines to prevent dangerous strikes and costly repairs.
Warning: Failing to check for utilities can result in serious injury, service disruptions, and fines. Always verify local building codes and permit requirements before starting foundation work.
Check the weather forecast and avoid working during rain, high winds, or extreme temperatures. Wet conditions make digging difficult and compromise concrete curing, while frozen ground prevents proper excavation.
Test your soil type to determine drainage and load-bearing capacity. Sandy soil drains well but may need deeper anchors, while clay retains water and requires gravel bases to prevent settling. You can perform a simple percolation test by digging a small hole, filling it with water, and timing how long drainage takes.
Use proper lifting techniques when moving bags of concrete, lumber, and greenhouse frame components. Bend at the knees, keep your back straight, and get help with anything over 50 pounds. Wear work gloves to prevent blisters and steel-toed boots for foot protection.
Know when to call professionals. If you encounter unexpected rock layers, unstable soil, or need excavation deeper than three feet, hire an experienced contractor. Complex sites with slopes or poor drainage often require engineering expertise to ensure a stable, long-lasting foundation.
Step-by-Step Foundation Installation
Prepare and Mark Your Site
Start by removing all vegetation, rocks, and debris from your installation area, extending at least 2 feet beyond your greenhouse footprint on all sides. This buffer zone prevents root intrusion and provides workspace during assembly.
Use a measuring tape to mark your greenhouse’s exact length and width based on the manufacturer’s specifications. Drive stakes at each corner, then run string between them to create your perimeter. Measure both diagonals, they should match within 1 inch to confirm your layout is square. If they don’t match, adjust the stakes until they do.
Orient your greenhouse with the long axis running east to west. This positioning maximizes southern sun exposure throughout the day and minimizes shaded areas inside. Check your site with a compass or smartphone app, adjusting for any obstacles like trees or buildings that might cast shadows during winter months when the sun sits lower.
Mark the locations for your foundation piers or footers along the string lines, spacing them according to your greenhouse’s arch spacing requirements, typically every 4 to 6 feet. Use spray paint or flour to mark these spots clearly before removing the strings for excavation.
Level the Ground and Dig Footer Holes
Start at the corners you marked and use a level to check grade in all directions. For a quonset greenhouse, even a two-inch slope can throw off the arch assembly and create drainage problems. Remove high spots with a shovel and fill low areas with compacted gravel rather than loose soil.
Measure and mark footer hole locations along your base perimeter, spacing them every 4 to 6 feet depending on your greenhouse size and manufacturer specs. Dig each hole to your local frost line depth, typically 12 inches in mild climates, 24 to 36 inches in freeze-prone regions, and up to 48 inches in northern areas. Check your county building department if you’re unsure about frost depth requirements.
Make holes 12 inches in diameter to allow room for concrete and anchor bolts. Keep the bottom of each hole flat and level. If you hit rock or heavy clay, widen the hole slightly rather than forcing it deeper. Tamp down loose soil at the bottom to prevent settling.
Set aside the excavated soil on tarps for easier cleanup and reuse around the foundation perimeter after the concrete cures.
Pour Concrete and Set Anchors
With your holes prepared, you’re ready for the most critical foundation step. Mix concrete according to the bag instructions, typically one 80-pound bag per hole for standard 12-inch diameter footers. For best results, aim for a thick, oatmeal-like consistency that holds its shape but still pours smoothly.
Pour concrete slowly into each hole, filling to about 2 inches below ground level. As you fill, use a length of rebar or a stick to poke the mixture repeatedly, eliminating air pockets that weaken the foundation. This “puddling” technique ensures solid, void-free footers.
Insert J-bolts or anchor bolts while the concrete is still wet, positioning them precisely where your quonset base rails will attach. Use a torpedo level to verify each bolt stands perfectly vertical, tilted anchors make frame installation frustrating. The threaded portion should extend 2-3 inches above the finished surface.
Allow concrete to cure for at least 48 hours before attaching any framework, though 7 days provides maximum strength. Cover fresh concrete with plastic sheeting if rain threatens, and avoid working the foundation during freezing temperatures. Patient curing now prevents settling problems later.
Install Base Rails and Frame Supports
With your concrete fully cured and anchor bolts set, you’re ready to attach the base rails that will support your greenhouse arches. Start by sliding the base rail channels over the anchor bolts, working from one end to the other. Don’t tighten the nuts yet, you’ll need adjustment room to square everything up.
Check for square by measuring diagonally from corner to corner. Both measurements should match exactly. If they’re off by more than half an inch, loosen the rails and shift them until the diagonals are equal. This step prevents wobbling arches and door alignment problems later.
Once square, hand-tighten all nuts, then use a wrench to snug them down in a star pattern, alternating sides to maintain even pressure. Avoid overtightening, which can warp the metal channels.
Finally, lay out your arch supports according to the manufacturer’s spacing requirements, typically every four feet. Mark these positions on the base rails with a pencil. Double-check that your end-wall positions align with your door opening plans before moving forward with arch assembly.
How to Verify Your Foundation Is Ready
Before you bolt down the first arch, run through these essential checks. A solid foundation means easier assembly and a greenhouse that stays put through every season.
Start with a long straightedge or builder’s level spanning the entire foundation. Set it across multiple directions, checking for dips or high spots. Any variation beyond 1/4 inch will twist your frame during assembly and create stress points where the arches meet the base. If you find uneven areas, add gravel beneath piers or shim wood frames before proceeding.
Test every anchor bolt by hand. Each one should sit firm without wobbling, protruding 2-3 inches above the surface with threads clean and undamaged. Measure the spacing between bolts against your greenhouse kit specifications, even half an inch off can prevent proper frame attachment. If an anchor shifted during concrete curing, you’ll need to drill a new hole or use adjustable base plates to compensate.
Check drainage by pouring a bucket of water at several spots along the foundation perimeter. Water should flow away from the base within minutes, not sit in puddles. Standing water signals you need to regrade the surrounding soil or add drainage channels. For concrete slabs, confirm the slight slope you built in actually directs water toward the designated runoff area.
If your foundation is on questionable soil, push hard against the anchors from different angles. Any movement means insufficient depth or loose backfill that needs tamping and compacting again.
Next Steps After Foundation Installation
With your foundation set, resist the urge to start building immediately. Concrete needs a full 7 days to cure before you bolt on the frame, walking on it after 24 hours is fine, but wait the full week for maximum strength. Use this time productively.
Lay out your greenhouse frame components in order. Count all parts against the manufacturer’s list, check arch sections for damage during shipping, and locate hardware bags. Pre-drilling pilot holes for base rail bolts now saves frustration later when you’re working overhead.
Plan your interior layout while the concrete cures. Sketch where beds, center paths, and water sources will go. Most growers run a 3-foot center aisle with 2 to 4-foot beds on each side. Mark water line entry points and decide on drip irrigation versus hand watering before you erect walls.
Consider timing if you’re building in fall or winter. You can install the frame year-round, but delay interior soil work until spring thaw. Conversely, summer installations let you plant immediately after frame assembly, just add shade cloth for the first two weeks to prevent heat stress on transplants.
Common Questions About Quonset Greenhouse Foundations
Do I need a building permit for a quonset greenhouse foundation?
Requirements vary widely by location. Most municipalities require permits for permanent foundations, especially concrete slabs or structures over a certain square footage (often 120-200 square feet). Temporary installations with ground anchors may be exempt, but always check with your local building department before starting work. Some areas also have setback requirements from property lines that affect placement.
How deep should foundation footers go for a quonset greenhouse?
Footer depth depends on your climate’s frost line, which determines how deep the ground freezes in winter. In northern regions, this can be 36-48 inches, while southern areas may only require 12-18 inches. Dig below the frost line to prevent heaving that can crack concrete and misalign your structure. If you are using a gravel base without concrete, create a 4-6 inch compacted layer for drainage and stability.
Can I retrofit a foundation under an existing quonset greenhouse?
Retrofitting is challenging but possible for lighter structures on ground anchors. You would need to temporarily support the frame with jacks while installing pier footings or a perimeter foundation beneath. For larger greenhouses or those already showing stress from inadequate foundations, it is usually safer and more cost-effective to disassemble, build a proper foundation, and reassemble. Trying to work around an installed frame risks damaging the structure.
What’s the best time of year to install a greenhouse foundation?
Late spring through early fall offers the best conditions in most climates. Concrete cures properly in temperatures above 50°F, and dry soil is easier to dig and level. Avoid winter installation in freeze-prone areas, as frozen ground complicates excavation and concrete won’t cure correctly in freezing temperatures.
How much does a quonset greenhouse foundation typically cost?
Gravel and ground anchor systems run $200-500 for a 12×24 foot greenhouse. Concrete pier foundations cost $600-1,200 depending on the number of piers and local concrete prices. Full slabs range from $1,500-3,500 for the same size, with costs varying by thickness, reinforcement, and regional labor rates.
Do I need to level the entire site or just the foundation points?
Level the entire footprint for best results. While only the foundation anchor points bear structural load, an uneven interior makes installing beds, paths, and irrigation difficult later. A level site also improves drainage patterns and prevents water pooling.
Will my quonset greenhouse foundation work on a slope?
Mild slopes (under 5 degrees) can be managed by building up the low side with compacted fill or stepped pier foundations. Steeper slopes require terracing or a retaining wall system, which adds significant cost and complexity, consider a different site if possible.
Foundation questions often lead to concerns about long-term durability. A properly installed foundation matching your soil type and climate will outlast the greenhouse covering itself, which typically needs replacement every 4-6 years. Investing in the right foundation now prevents costly repairs and adjustments later, making it one of the most important decisions in your greenhouse project.
Quonset greenhouses offer compelling advantages, excellent snow handling, superior light distribution, and cost-effectiveness, but they’re not perfect for everyone. The reduced headroom and ventilation challenges matter if you’re growing tall crops or live in hot climates. What matters most, though, is getting the foundation right. A properly installed foundation matched to your soil type and climate transforms these structures from temporary shelters into decade-long growing spaces.
Your choice between ground anchors, concrete piers, or a full slab depends on your budget, permanence goals, and local conditions. Don’t rush the foundation phase. Taking time to level properly, account for frost lines, and verify drainage pays off every season. Whether you’re extending your growing period or creating year-round production space, a quonset greenhouse on a solid foundation gives you reliable results without the premium price tag of traditional structures.