
Outdoor Structure Maintenance and Ownership, Site Preparation for Outdoor Structures, Structure Assembly and Installation
Why Your Custom Canopy Tent Keeps Blowing Away (And How to Anchor It Properly)
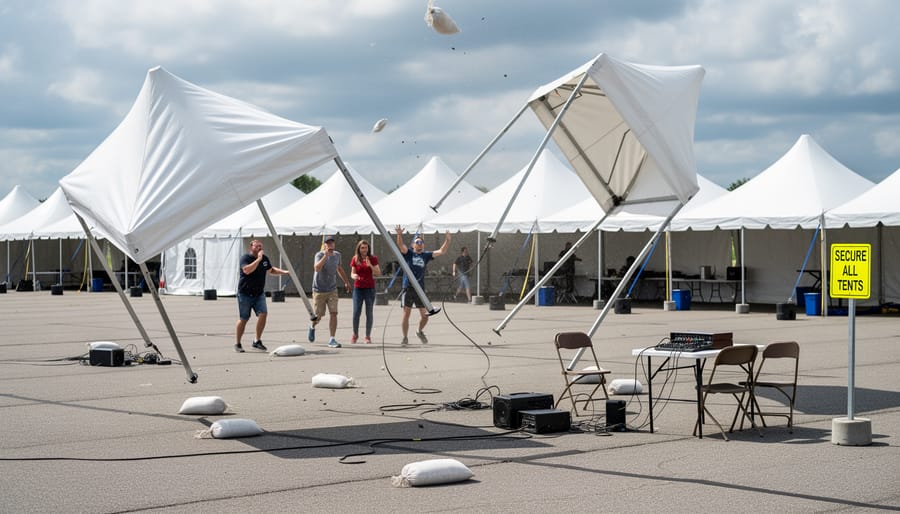
Picture this: a sudden gust of wind sends your canopy tent tumbling across the parking lot, crashing into vehicles and scattering merchandise everywhere. It’s every vendor’s nightmare, yet it happens more often than you’d think. The good news? This disaster is completely preventable with proper anchoring and site preparation.
Whether you’re setting up for a weekend craft fair, hosting a backyard graduation party, or running a seasonal farmer’s market booth, your tent’s stability depends on two critical factors that most people overlook until it’s too late. First, the ground beneath your tent matters just as much as the anchors you choose. Second, “one-size-fits-all” anchoring simply doesn’t work—what holds firm in grass will fail miserably on asphalt.
The consequences of inadequate anchoring go beyond embarrassment. Flying tents cause injuries, damage property, and can result in liability claims that far exceed the cost of your equipment. Even light winds can generate surprising lift forces on canopy surfaces, turning a seemingly stable setup into a dangerous projectile.
This guide walks you through the essential steps of preparing your site and selecting the right anchoring methods for every surface type. You’ll learn how to assess ground conditions, calculate proper weight requirements, and execute professional-grade installations that keep your custom canopy tent firmly planted, no matter what Mother Nature throws your way. Let’s ensure your next event stays grounded—literally.
Why Do Canopy Tents Fail in the Wind?
Picture this: a beautiful sunny day, gentle breeze, your custom printed canopy tent proudly displaying your business or family name. Then, in seconds, a gust of wind transforms that tent into a dangerous projectile tumbling across the parking lot. Unfortunately, this scenario happens more often than you’d think, and understanding why makes all the difference in preventing it.
The problem isn’t your canopy tent itself. It’s basic physics. Your custom printed canopy acts like a giant sail, catching wind from above and below. When wind hits the fabric top, it doesn’t just push down—it creates lift, similar to how an airplane wing works. Air moving over and under the canopy creates pressure differences that want to lift the entire structure off the ground. A 10×10 canopy can catch enough wind to generate hundreds of pounds of lifting force in moderate conditions.
Here’s where many people get surprised: even a 15 mph breeze can create significant lift. By 25 mph, an improperly anchored tent becomes genuinely dangerous. Real-world examples include tents lifting off and striking vehicles, causing thousands in damage, or worse, injuring bystanders. One vendor at a local festival watched their brand-new custom tent cartwheel into a parked car because they relied only on the basic leg weights that came with it.
| Wind Speed | What’s Happening | Recommended Action |
|---|---|---|
| Under 15 mph | Minimal lift force | Standard anchoring is sufficient |
| 15–20 mph | Noticeable lift begins | Tension the fabric fully, add backup weights |
| 20–25 mph | Significant uplift forces | Lower canopy by 1–2 notches, double-check anchors |
| Over 25 mph | Genuinely dangerous | Take the tent down completely |
The larger the printed area on your canopy, the more surface area wind can grab. That beautiful custom design that makes your tent stand out also makes it more vulnerable to wind forces.
The good news? These failures are entirely preventable with proven wind protection methods. The issue isn’t tent quality—it’s anchoring preparation. Understanding these forces means you can take proper precautions before setup, ensuring your investment stays grounded and your event stays safe, no matter what Mother Nature brings.
Site Preparation: The Foundation of Canopy Stability
Choosing the Right Spot for Your Canopy
Finding the perfect spot for your custom printed canopy tent sets you up for success before you even unpack it. Think of this as the foundation for everything else you’ll do during site preparation.
Start by walking your space with a critical eye toward levelness. A sloped surface creates uneven stress on your frame and makes anchoring much trickier. If you’re dealing with a slight grade, position your tent so the slope runs from side to side rather than front to back, which helps maintain stability.
Look up before you commit to a location. Overhead power lines are a serious safety hazard, especially during setup and takedown when poles extend upward. Keep at least 10 feet of clearance from any electrical lines. Similarly, check for low-hanging tree branches that could tear your canopy fabric or create puncture risks during windy conditions.
Wind patterns matter more than you might think. Notice where natural windbreaks exist, like buildings, fencing, or dense landscaping. Positioning your tent with protection on the prevailing wind side dramatically reduces stress on anchors and framework. One event organizer I spoke with shared how relocating her booth just 15 feet closer to a building wall eliminated her recurring tent collapse issues.
Don’t forget what’s beneath your feet. Before driving stakes or drilling, contact your local utility notification service to mark underground lines. It’s a free service that prevents costly and dangerous accidents. Finally, consider sun positioning throughout your event timeframe to keep guests comfortable and protect displayed merchandise from fading.
What Surface Are You Setting Up On?
Before you even unpack your custom printed canopy tent, take a good look at what’s beneath your feet. The surface you’re setting up on isn’t just a detail—it’s the foundation of your entire anchoring strategy, and choosing the wrong method for your surface can turn a successful event into a disaster.
| Surface | Best Anchor Type | Minimum Specification | Key Notes |
|---|---|---|---|
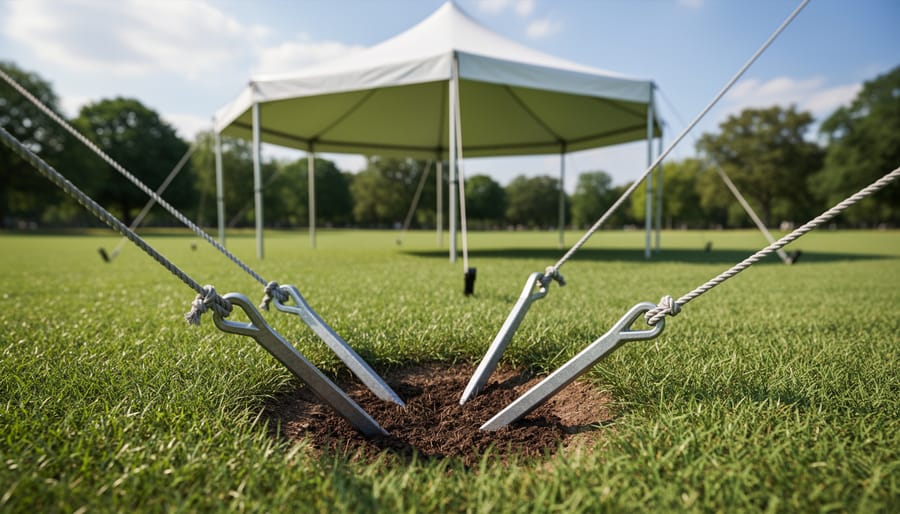
| Grass / Dirt | Stakes (or auger anchors) | 12″ for backyard / 18–24″ for wind | Firm, moist soil holds best; dry soil needs longer stakes |
| Concrete / Asphalt | Weight plates or sandbags | 40–50 lbs per leg | No stakes possible — weight is your only option |
| Gravel | Short stakes + supplemental weights | Combined system required | Stakes often slip or pull out of loose material |
| Sand | Auger anchors + weights | Roughly double normal weight | Anchors loosen quickly — recheck regularly |
| Indoor / delicate surfaces | Water weights | 40–50 lbs per leg | Fill on-site, empty for easy transport |
Grass and dirt surfaces offer the most anchoring flexibility. You can use stakes, auger anchors, or weight systems depending on soil conditions. Firm, moist soil provides excellent holding power, while dry or sandy soil may require longer stakes or combined methods. Much like proper foundation drainage prevents water issues, understanding your ground composition prevents tent failures.
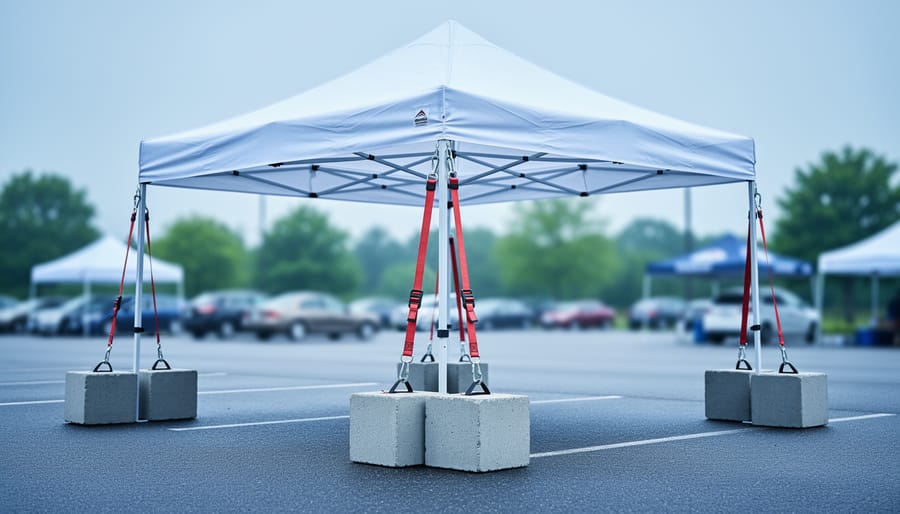
Concrete and asphalt present different challenges since you can’t drive stakes into these hard surfaces. Weight-based systems become your primary option—think sandbags, weight plates, or water barrels. Plan on 40-50 pounds per leg for optimal stability on these unforgiving surfaces.
Gravel creates a tricky middle ground. While technically penetrable, stakes often slip or pull out easily. Your best bet combines shorter stakes with supplemental weights to handle the loose material.
Sand requires special attention and typically the most weight—sometimes double what you’d use elsewhere. The shifty nature of sand means anchors can work loose quickly, so check and adjust them regularly.
Knowing your surface type before event day lets you pack the right equipment, avoid last-minute scrambles, and ensure your tent stays put when conditions get challenging.
Pre-Setup Checklist
Before you even think about pounding in your first stake, a little prep work goes a long way toward ensuring your custom printed canopy tent stays put. Trust me, taking fifteen minutes now beats chasing your tent across the lawn later! Run through this list every time:
- Clear the area: Walk the setup zone and remove debris, rocks, or branches that could damage the tent floor or create tripping hazards.
- Mark the footprint: Use string or chalk to outline the tent’s footprint so you’re not setting up over sprinkler heads or utility covers.
- Check the forecast: Look at weather for the entire event duration, not just setup day. Winds above 20 mph require extra anchoring; approaching storms may mean rescheduling.
- Gather your tools: Rubber mallet, surface-appropriate stakes, measuring tape, level, and weight bags or anchor plates — all laid out before you start.
- Call 811: Locate underground utilities before driving any stakes. One quick call prevents costly accidents.
- Bring a helper: A second person makes the job easier and safer, especially when raising the canopy frame.
With these boxes checked, you’re ready for a smooth, frustration-free setup that keeps your investment secure.
Anchoring Methods That Actually Work
How to Use Ground Stakes Properly
Ground stakes are the go-to anchoring method for most canopy tent setups, but here’s the thing: those lightweight stakes that come in your tent package are rarely sufficient for real-world conditions. Think of them as the bare minimum, not the complete solution.
For effective anchoring, you’ll want stakes that are at least 12 inches long for casual backyard events. If you’re dealing with soft soil or expect moderate winds, upgrade to 18-24 inch heavy-duty stakes. The longer length provides significantly more holding power, similar to how longer wind anchors secure permanent structures.
The angle matters more than most people realize. Drive your stakes at a 45-degree angle away from the tent, not straight down. This creates resistance against the pulling force when wind catches your canopy. One homeowner shared how switching to angled staking prevented her tent from lifting during a backyard graduation party, even when unexpected gusts rolled through.
When driving stakes, don’t just push them in by hand. Use a rubber mallet or stake driver to ensure they’re seated firmly into the ground. You should only see about 2-3 inches above the surface when you’re done.
Upgrade to spiral or auger-style stakes for particularly challenging conditions. These screw into the ground and offer three times the holding power of standard stakes. They’re worth every penny when your event depends on a tent that stays put, especially in sandy or loose soil conditions.
Weight Plates and Sandbags for Hard Surfaces
When setting up your custom printed canopy tent on hard surfaces like concrete, asphalt, or pavement, proper weighting is your best friend. The general rule of thumb is 40-50 pounds per leg minimum, though you’ll want to increase this to 60-75 pounds in windier conditions. Think of it this way: a 10×10 tent needs at least 160-200 pounds total to stay put safely.
Commercial weight plates designed specifically for canopy tents offer convenience and a professional look, typically running $15-30 per weight. However, budget-conscious setups can be just as effective with DIY solutions. Many vendors swear by sandbags, which cost just a few dollars to make yourself using heavy-duty bags and playground sand from your local hardware store. One homeowner shared how she used decorative garden blocks wrapped in weather-resistant fabric, doubling as both functional weights and attractive displays around her booth.
Regardless of which option you choose, proper weight distribution is critical. Attach weights directly to each leg using straps or clips rather than simply placing them on top of the foot plates. This prevents weights from sliding away when wind catches the canopy. For sandbags, drape them over the horizontal support bars and secure with bungee cords for extra stability.
A pro tip from experienced event vendors: keep extra weights in your vehicle. Weather can change quickly, and it’s far easier to add weight than deal with a collapsed tent. Many find that mixing weight types, like pairing commercial plates with sandbags, offers both stability and flexibility while staying within budget.

Combination Systems for Maximum Security
For high-stakes events where tent failure simply isn’t an option, combining multiple anchoring methods gives you an essential safety net. Think of it as the belt-and-suspenders approach to tent security. The most effective combination pairs ground stakes with weighted bases, creating redundancy that protects against different failure scenarios.
Start by driving stakes at all available anchor points, then add sandbags or weight plates to each leg. This dual-layer system means that if ground conditions deteriorate from rain or loosening soil, your weights provide backup support. Similarly, if wind creates uplift forces that challenge your weights alone, the stakes prevent the tent from shifting.
“We learned this lesson the hard way,” shares Maria Chen, a farmers market coordinator in Portland. “After a close call with unexpected winds, we now require all vendors to use both stakes and 40-pound weights minimum. We haven’t had a single incident since making this mandatory.”
For concrete or asphalt surfaces where staking isn’t possible, combine multiple weight types. Use barrel weights on legs plus sandbags draped over the frame’s crossbars to lower the center of gravity. Event planner James Rodriguez adds, “At our annual street festival, we use 50 pounds per leg plus sandbags, and we’ve weathered storms that sent unanchored tents tumbling.” This investment in redundant anchoring protects both your equipment and everyone around it.
Specialty Anchoring for Challenging Conditions
When facing tricky ground conditions, standard stakes won’t always cut it. Sandy soil, for instance, lacks the grip needed for traditional anchoring methods. That’s where auger anchors shine—these screw-style anchors twist deep into loose soil, creating a secure hold that won’t pull out when winds pick up. Think of them as heavy-duty corkscrews designed specifically for challenging terrain.
For semi-permanent installations on concrete or asphalt, concrete anchors offer unmatched stability. These bolt directly into hard surfaces and work beautifully for recurring farmers markets or seasonal vendor setups. They’re similar in concept to U-anchor systems used for shed foundations, providing that rock-solid connection you need.
Water weights provide an excellent temporary solution when penetrating the surface isn’t an option. Fill them on-site to avoid heavy lifting, then empty them for easy transport. They’re perfect for indoor events or delicate surfaces you can’t damage.
For high-stakes events or particularly challenging conditions, don’t hesitate to call in professionals. Complex installations involving multiple tents, extreme weather concerns, or valuable equipment underneath often justify the investment in expert setup.
Step-by-Step Setup for Maximum Stability
The Right Order Makes All the Difference
Here’s a setup mistake that catches even experienced tent owners off guard: fully extending your custom printed canopy tent before anchoring it. Think of it like trying to hold onto a giant kite in a breeze—suddenly your beautiful branded tent becomes a wind sail that’s fighting against you.
The smart approach? Anchor first, extend second. Start with your tent frame in its most compact position, place it exactly where you want it, and secure at least two diagonal corners with your chosen anchors. This gives you control from the start, preventing the frame from shifting or catching wind while you’re still setting up.
Once anchored, extend your tent legs gradually and evenly. Raise all four corners to the same height incrementally rather than fully extending one leg at a time. This keeps the frame balanced and prevents stress on the joints. After the legs reach your desired height, lock each leg adjustment mechanism firmly—give them a gentle tug to confirm they’re secure.
Here’s where a second person becomes your best friend. While one person stabilizes the frame and monitors the canopy fabric, the other can focus on adjusting legs and ensuring anchors stay tight. Two sets of hands mean you can catch problems before they happen, especially on uneven ground where one corner might need extra attention.
This methodical approach takes just a few extra minutes but saves you from the frustration of repositioning a fully extended tent or worse, watching it topple over.
How to Tension a Canopy for Wind Resistance
Once your canopy is anchored, proper tensioning makes all the difference in wind resistance. Think of it like pitching a camping tent—loose fabric catches wind like a sail, while taut material allows air to flow around it more smoothly.
Start by extending your canopy frame to its full height and pulling the canopy fabric tight across the top. Walk around the tent and adjust each leg to ensure even tension on all sides. You’ll know it’s right when the fabric has a drum-like tightness without any sagging pockets where wind can catch. Many event vendors who’ve dealt with unexpected gusts will tell you that proper tension prevented their canopy from becoming a kite.
If you’re using sidewalls, secure them from the bottom up, attaching each zipper or Velcro connection point completely. Never leave sidewalls partially attached or flapping loose, as this creates dangerous sail-like conditions. In moderate wind, consider leaving one or two walls open to allow air to flow through rather than building pressure inside.
Check every connection point—leg locks, corner fittings, and frame joints. Give each a gentle shake to ensure nothing’s loose. These small checks take just a few minutes but can save you from expensive repairs.
Here’s the most important tip: if winds pick up beyond 15-20 mph, don’t try to tough it out. Lower your canopy height by one or two notches to reduce its profile, or take it down completely if conditions worsen. A damaged canopy costs far more than the inconvenience of temporary shutdown. Your safety and investment are worth protecting.
Protecting Your Custom Printed Investment
Your custom printed canopy tent represents more than just a shelter—it’s a mobile billboard for your business or organization. These branded investments can cost anywhere from several hundred to several thousand dollars, making proper care essential to protect both your graphics and your wallet.
When it comes to protecting your custom printing, proper anchoring is your first line of defense. A poorly anchored tent that catches wind becomes a tumbling hazard, and nothing damages expensive graphics faster than your tent cartwheeling across a parking lot. Those beautiful logos and brand messages won’t survive repeated scrapes against concrete or violent flapping that stretches and tears the fabric. By following proper anchoring techniques, you’re preventing the kind of damage that can render a tent unpresentable in a single event.
Site preparation plays an equally important role in preservation. Always clear your setup area of sharp debris, rocks, or rough surfaces that could abrade the canopy fabric when it’s being positioned. Think of it like protecting your car’s paint job—prevention is far easier than repair. One vendor we spoke with learned this the hard way after setting up on a gravel lot without a tarp underneath, resulting in dozens of small tears in their custom-printed valances.
A handful of habits will dramatically extend the life of your custom print:
- Inspect after every use: Look for stress points around anchoring areas, check for fabric wear, and clean off dirt or moisture that could cause mildew.
- Never pack it away wet: Store the tent in a cool, dry place. Fifteen minutes of cleaning, drying, and folding after each event extends lifespan by years.
- Use a carrying case: If your tent didn’t come with one, a protective case prevents scratches and tears during transport.
- Mind the ground: Avoid setting up directly on gravel or rough surfaces without a tarp underneath the canopy floor.
Proper anchoring and thorough site preparation aren’t just recommended steps you can skip when you’re in a hurry—they’re absolutely essential for keeping everyone safe and protecting your investment. Think of it this way: your custom printed canopy tent is only as secure as the foundation you give it. Without proper anchoring, even the sturdiest tent becomes a liability in unpredictable weather.
The good news? While these steps might seem time-consuming at first, they quickly become second nature with practice. Many event organizers tell us that after just a few setups, their preparation routine becomes almost automatic. You’ll develop your own system, learn to read sites quickly, and know exactly which anchoring method works best for each situation.
Before your next event, take a few extra minutes to assess your site, gather the right equipment, and anchor your tent properly. Your future self will thank you when your canopy stays firmly in place while others are chasing theirs across the parking lot. Remember, a successful event starts with a solid foundation—literally. Prepare properly, anchor securely, and enjoy peace of mind knowing your tent is ready for whatever comes your way.