
Transform Your Bare Shed Into a Finished Space That Actually Works
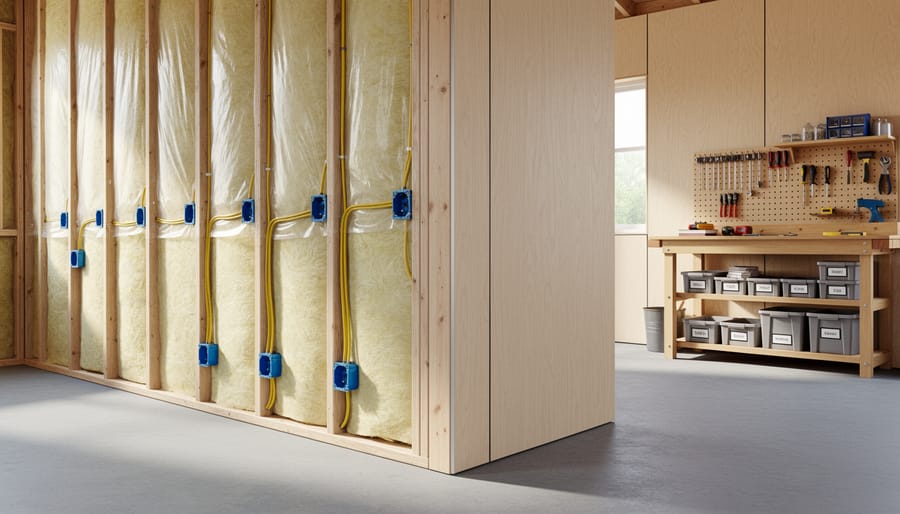
Transform that empty shell into a functional space by starting with moisture control—install a vapor barrier on walls and floors before anything else to prevent mold and warping. Insulate between wall studs using fiberglass batts or rigid foam boards, ensuring no gaps remain that could compromise temperature control or create pest entry points. Cover insulation immediately with plywood, OSB, or drywall to create smooth, protective surfaces that also make your shed feel finished and professional. Run electrical lines before closing up walls if you plan to add lighting or outlets, positioning boxes where you’ll need them most for tools, workbenches, or storage areas.
Your shed’s interior doesn’t need to feel like an afterthought or construction zone. Whether you’re converting it into a workshop, hobby space, or organized storage haven, the finishing process follows a logical sequence that prevents costly do-overs. Many homeowners skip critical early steps like waterproofing or proper framing reinforcement, only to discover moisture damage or sagging walls months later. The key is understanding which tasks must happen first and which can wait.
This guide walks you through each phase methodically, from addressing structural concerns to adding those final touches that make the space truly yours. You’ll learn the interior finishing secrets that separate amateur projects from professional-looking results, complete with practical troubleshooting tips for common obstacles. By following this roadmap, you’ll avoid the typical pitfalls and create a shed interior that’s both beautiful and built to last.
Why the Order Matters: Getting Your Finishing Sequence Right
Getting your shed interior finishing sequence right isn’t just about being organized—it’s about protecting your investment and avoiding costly mistakes that could set your project back weeks or even months. Many enthusiastic DIYers learn this lesson the hard way when they jump ahead or skip what seem like unnecessary steps.
Think about it this way: installing beautiful wall panels before addressing moisture issues is like painting over a leaky roof. You might have a gorgeous finish for a few weeks, but moisture will eventually seep through, causing mold, warping, and buckling. One homeowner shared how skipping proper vapor barrier installation led to condensation problems that ruined $400 worth of drywall and insulation within six months.
The most common mistake is rushing to the fun, visible parts—painting walls or installing shelving—before completing the foundational work. This creates several frustrating scenarios. You might need to tear out new installations to run electrical wiring you forgot about, or discover your flooring is uneven only after you’ve built permanent workbenches. Some DIYers have even painted walls before realizing their insulation wasn’t adequate, forcing them to remove finished surfaces and start over.
Following the correct sequence means tackling structural repairs first, then weatherproofing and moisture control, followed by utilities, insulation, wall coverings, flooring, and finally trim and fixtures. This approach ensures each layer properly supports the next. It protects earlier work from damage during later steps and eliminates the need for do-overs.
The bottom line? A patient, methodical approach saves you time, materials, and the frustration of fixing preventable problems. Your shed interior will look better and last longer when you resist the temptation to skip ahead.
Step 1: Assess and Address Structural Issues First
Check for Leaks and Moisture Problems
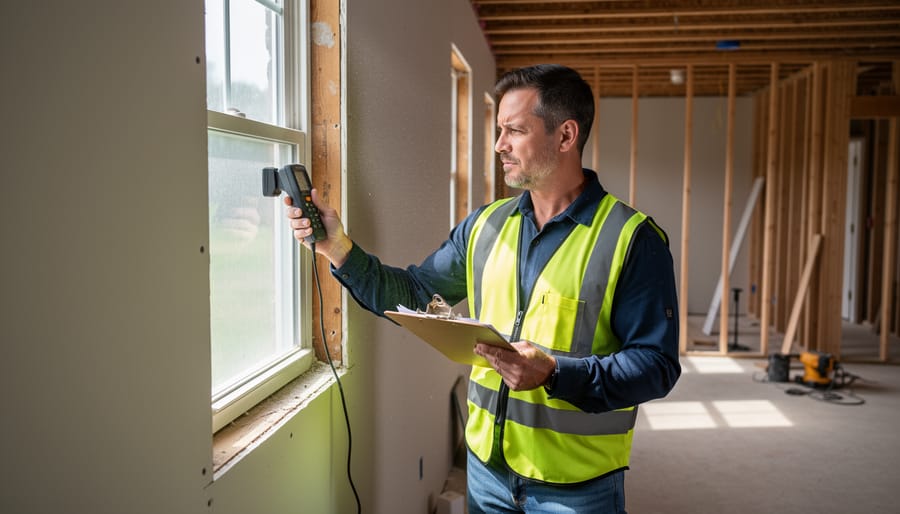
Before you invest time and money finishing your shed’s interior, take a critical look at its weatherproofing. Water intrusion can quickly ruin beautiful interior work, so this step is absolutely essential.
Start by inspecting your shed during or immediately after rainfall. Look for active leaks, water stains, or damp spots on walls and ceilings. Pay special attention to corners and seams where water often finds its way in. Check the roof carefully, both inside and out, for missing shingles, gaps around vents, or deteriorated flashing. Even small leaks can cause major damage once walls are finished.
Next, examine the foundation and floor for moisture problems. Standing water, musty odors, or visible mold indicate drainage issues that must be addressed first. Feel along the bottom edges of walls for dampness, which suggests water is wicking up from the ground.
Don’t skip checking door and window seals. Run your hand around frames to feel for air movement, and look for daylight peeking through gaps. These openings let in both water and humid air.
One homeowner shared how she discovered a small roof leak only after installing drywall, resulting in costly repairs. Learn from that experience and fix all weatherproofing issues now. Seal gaps with appropriate caulk, repair roof damage, and improve drainage around your shed’s perimeter before moving forward.
Reinforce Weak Framing and Flooring
Before you hang drywall or lay down flooring, take time to inspect and strengthen your shed’s structure. Start by examining the floor joists from underneath if accessible, or walk across the floor and note any soft spots or excessive bounce. These are telltale signs of weak or damaged joists that need attention now, not later.
Check wall studs next by pressing firmly against them at various heights. Any wobbling or flexing indicates studs that aren’t properly secured or may have warped over time. Use a level to verify walls are plumb, as even minor deviations become obvious once you start adding finishes.
For floor repairs, sister weak joists by attaching new lumber alongside damaged ones with construction adhesive and screws. If you discover rotted sections, cut them out and replace them entirely. Add blocking between joists for extra support in areas where you’ll place heavy equipment or workbenches.
Wall studs that have pulled away from plates can usually be reattached with structural screws. Replace any seriously warped studs before moving forward. One homeowner shared how ignoring a bowed stud led to a wavy wall that haunted him through the entire project.
Taking these preventative steps ensures your finished interior looks professional and lasts for years without sagging or cracking.
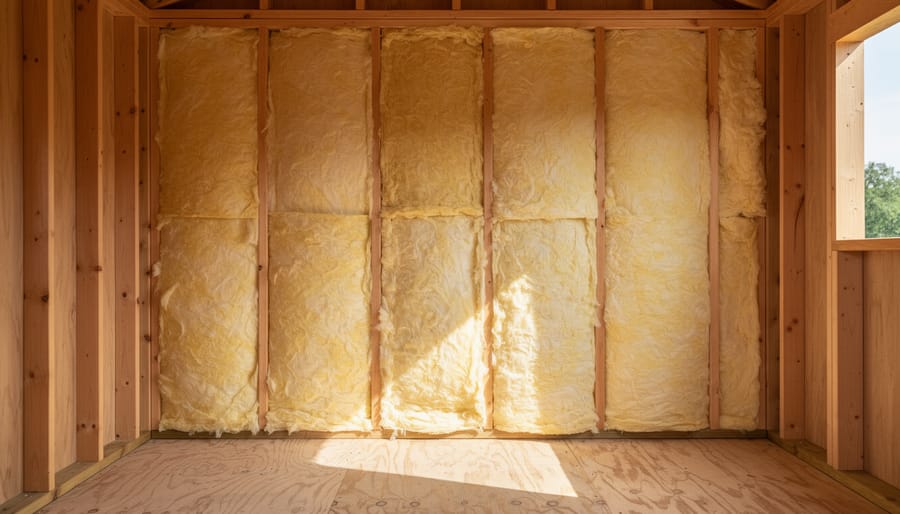
Step 2: Install Insulation for Comfort and Protection
Insulation transforms a basic shed into a comfortable, protected space you’ll actually want to use year-round. Before selecting materials, consider how you’ll use your shed. A simple storage space needs less insulation than a workshop where you’ll spend hours on projects.
Start by choosing the right insulation type for your needs and budget. Fiberglass batts are the most economical option and work well for standard stud spacing in walls and ceiling joists. They’re easy to cut and fit between framing members, making them perfect for DIY installers. However, they require careful handling and a dust mask during installation.
Foam board insulation offers excellent moisture resistance and higher insulation value per inch. It’s ideal for shed floors and walls where you need a slim profile. Simply cut panels to size and secure them between studs with construction adhesive or fasteners. The rigid structure also adds some structural support to your walls.
For the best performance and air sealing, spray foam insulation can’t be beaten. While more expensive, it fills every gap and creates an airtight barrier that prevents drafts and moisture intrusion. Many homeowners use spray foam for hard-to-reach areas like rim joists and corners, then switch to batts or boards for larger wall sections to balance cost and performance.
Don’t skip the moisture barrier. Install a vapor barrier on the warm side of your insulation, typically the interior wall in most climates. This plastic sheeting prevents humid indoor air from reaching cold surfaces where it would condense and cause mold or rot. Overlap seams by at least six inches and seal with contractor tape for complete protection.
For floor insulation, consider whether your shed sits on a concrete slab, wooden floor, or directly on the ground. Raised wooden floors benefit from batts installed between floor joists, while concrete slabs need foam board topped with plywood subflooring. This extra step makes an enormous difference in comfort, especially if you’ll be standing for extended periods.
Step 3: Run Your Electrical and Lighting
Before you close up those walls, it’s time to tackle the electrical work—one of the most important steps in finishing your shed interior. Even if you’re planning a simple setup, thinking through your power needs now will save you major headaches later.
Start by mapping out where you’ll need outlets and light switches. Consider how you’ll actually use the space. If you’re creating a workshop, you’ll want outlets near your workbench and plenty of overhead lighting. For a hobby room or office, plan for outlets where computers or equipment will sit, plus task lighting for detail work. A good rule of thumb is to install more outlets than you think you’ll need—it’s far easier now than fishing wires through finished walls later.
Now here’s the important safety talk: electrical work can be dangerous if you’re not experienced. While running basic wiring might seem straightforward, local building codes have specific requirements about wire gauge, circuit capacity, and proper grounding. Many homeowners feel comfortable handling simple outlet installation, but if you’re uncertain about anything—especially connecting to your main power source—call a licensed electrician. It’s worth the investment for peace of mind and safety.
If you’re doing the work yourself, use a detailed plan and follow code requirements for your area. Mark stud locations where you’ll mount boxes, drill holes for running wire, and label everything clearly. Consider dedicated circuits for power-hungry tools or equipment rather than overloading a single circuit.
Remember, this rough-in phase happens before insulation and drywall go up, so take your time getting it right. Double-check your layout, test connections, and don’t rush through this critical foundation of your finished shed.
Step 4: Install Wall and Ceiling Coverings
Choosing Your Material: Plywood, Drywall, or Paneling
Selecting the right wall covering transforms your shed from bare studs to a finished workspace, and three materials dominate the DIY landscape: plywood, drywall, and paneling.
Plywood offers exceptional durability and moisture resistance, making it perfect for workshops or garden sheds where you’ll hang heavy tools. Half-inch or three-quarter-inch sheets provide solid backing for shelving and pegboards. The downside? The raw wood look requires painting or sealing, and it’s pricier than alternatives. One homeowner shared how marine-grade plywood in his potting shed has weathered five years of humidity without warping.
Drywall delivers the smoothest, most home-like finish and accepts paint beautifully. It’s budget-friendly and widely available. However, standard drywall struggles in damp conditions unless you opt for moisture-resistant varieties. It’s ideal for climate-controlled sheds used as offices or studios but less suitable for unheated storage spaces.
Paneling splits the difference, offering quick installation with tongue-and-groove systems that hide imperfections. Modern options include beadboard, shiplap, and decorative panels that instantly add character. While not as robust as plywood for heavy-duty use, paneling works wonderfully for shed interior ideas focused on aesthetics.
Consider your shed’s purpose, local humidity levels, and whether you’ll mount heavy equipment when making your choice. Each material succeeds in the right application.
Installation Tips That Save Time
Measure twice, cut once—this old carpenter’s wisdom will save you plenty of headaches and wasted material. Before making any cuts, lay out your wall panels dry (without fastening) to see how they’ll fit together. This helps you plan which pieces go where and identify any problem areas before they become permanent mistakes.
Start installing panels from one corner and work your way around the room systematically. Use a level frequently to ensure everything stays plumb and square. For corners, cut your first piece flush to the corner edge, then overlap it with the adjacent wall’s panel. This creates a cleaner look than trying to perfectly align two cut edges.
When working around windows and doors, measure from your last installed panel to the opening rather than from the corner. Errors compound as you go, and this approach keeps things accurate. Mark your cutouts clearly on the back of the panel, then use a circular saw or jigsaw for straight cuts.
Here’s a time-saver many DIYers discover too late: pre-drill nail or screw holes near panel edges to prevent splitting. Keep fasteners about every 12 inches along studs for secure attachment. If a panel doesn’t fit quite right, don’t force it—investigate why first. Usually, a stud is slightly out of place or your previous panel needs minor adjustment. Taking five minutes to fix the root cause beats reworking an entire wall later.
Step 5: Add Flooring That Stands Up to Shed Life
Your floor takes a beating in a shed—tracked-in dirt, moisture from stored items, dropped tools, and temperature swings—so choosing the right flooring isn’t just about looks. The good news? Several budget-friendly options deliver both durability and easy maintenance.
Plywood subflooring provides an excellent foundation. For sheds, 3/4-inch tongue-and-groove plywood works beautifully, offering a solid base that won’t sag under weight. Many homeowners stop here for basic storage sheds, adding a coat or two of porch and floor paint for protection against moisture and wear. It’s economical and surprisingly resilient.
If you want something more polished, vinyl plank flooring offers the perfect balance of practicality and aesthetics. These click-together planks install directly over plywood without adhesive, making them DIY-friendly. They handle temperature fluctuations better than hardwood and resist moisture exceptionally well. One homeowner shared that her vinyl plank floor in her craft shed still looks brand new after three years, despite regular foot traffic and occasional spills.
For workshop sheds, rubber mats or interlocking rubber tiles provide cushioning underfoot and excellent resistance to oil, chemicals, and impacts. They’re forgiving on dropped items and easy on your knees during long projects.
Epoxy coating transforms concrete shed floors into showroom-quality surfaces. While installation requires careful prep work—cleaning, etching, and applying multiple coats—the result is a seamless, chemical-resistant floor that’s incredibly easy to sweep and mop. It’s ideal for sheds doubling as workshops or hobby spaces.
Install flooring after walls are insulated and finished but before adding trim or shelving. This sequence prevents damage to your floor during wall work while allowing baseboards to neatly cover edges. Whatever you choose, prioritize moisture resistance and cleanability—future you will appreciate the thoughtful decision.
Step 6: Paint and Seal for a Polished Look
Once your walls and ceiling are installed, painting transforms your shed from utilitarian to inviting. Start by applying a quality primer designed for wood or drywall, depending on your surface. This crucial first step seals the material, prevents moisture absorption, and helps your topcoat adhere properly.
For shed environments, choose paint formulated to handle temperature fluctuations and humidity. Semi-gloss or satin-finish paints work wonderfully because they’re easy to wipe clean and resist mildew better than flat finishes. If your shed lacks climate control, look for exterior-grade paints that handle these conditions beautifully.
Color selection makes a significant difference in how spacious your shed feels. Light colors like white, cream, or soft gray reflect natural light and make compact spaces feel open and airy. One homeowner shared how painting her 8×10 shed bright white made it feel twice as large, giving her the perfect craft studio she’d envisioned.
Consider painting the ceiling a shade lighter than the walls to add visual height. If you’re planning to add smart shelving systems or implement various shed organization ideas, stick with neutral backgrounds that won’t compete visually with your storage solutions.
Don’t forget to seal any exposed wood surfaces like workbenches or shelving with polyurethane or specialized wood sealer. This protection prevents warping, staining, and wear from daily use. Apply two coats for maximum durability, allowing proper drying time between applications. Your finished space will look polished and withstand years of use.
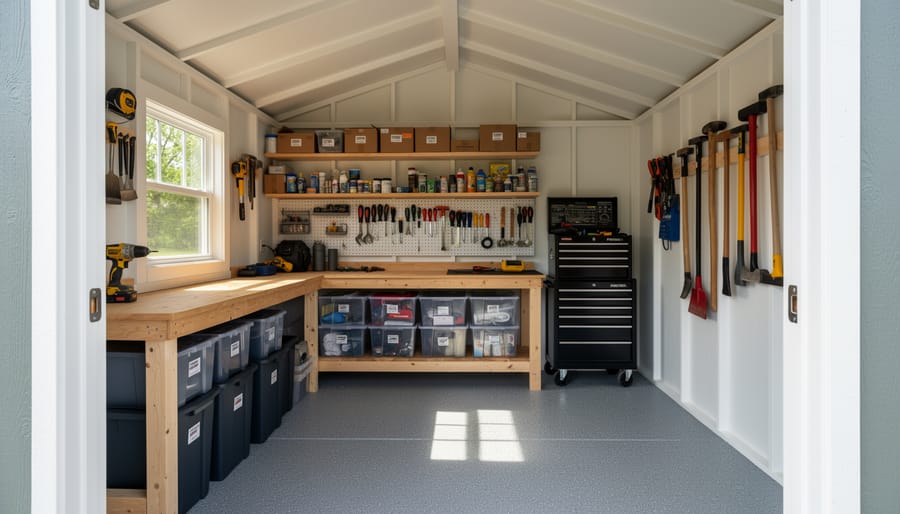
Step 7: Install Trim, Shelving, and Final Touches
Now comes the fun part where your shed truly transforms from a basic structure into a customized, organized space. Installing trim and finishing touches not only protects your walls and floors but also gives your shed that polished, professional appearance you’re aiming for.
Start with baseboard trim along the bottom edge where walls meet the floor. This serves a dual purpose: it covers any gaps or uneven edges from your wall installation while protecting the lower portion of walls from kicks, moisture, and general wear. Quarter-round molding works great for corners and provides a clean transition. Pre-paint or stain your trim before installation to save time and achieve better coverage.
Corner molding is your next priority. Inside and outside corner pieces create crisp, finished edges that hide seams and add visual appeal. Many homeowners skip this step to save money, but the difference is immediately noticeable. Simple pine molding is budget-friendly and easy to work with, requiring only a miter saw and finishing nails.
Now customize based on how you’ll actually use your shed. For garden tool storage, pegboard walls with hooks offer incredible flexibility. You can rearrange tools as your needs change throughout the seasons. Workshop sheds benefit from sturdy built-in shelving using 2×4 frames with plywood shelves, capable of handling heavy equipment.
Consider adding a small workbench if space allows, or install fold-down surfaces that maximize floor space when not in use. Overhead storage racks utilize often-wasted ceiling space for seasonal items or rarely-used equipment.
Sarah, a weekend gardener from Ohio, shared: “Adding simple floating shelves and a pegboard wall completely changed how I use my shed. Everything has a designated spot now, and I’m not digging through piles anymore.”
Take measurements carefully, think about workflow, and install organizational elements that match your specific needs rather than generic solutions.
Common Mistakes That Derail Your Shed Finishing Project
Even experienced DIYers can stumble when finishing a shed interior. Understanding these common pitfalls will save you time, money, and frustration.
Skipping moisture barriers is the number one mistake. One homeowner in Oregon learned this the hard way when beautiful new drywall developed mold within six months. Without proper vapor barriers installed before insulation, moisture became trapped in the walls. Always address moisture control first, even if it seems like an unnecessary step.
Installing insulation incorrectly ranks second on the mistake list. Compressing insulation reduces its effectiveness by up to 50 percent. A Wisconsin shed owner noticed his heated workshop stayed cold despite adding insulation because he packed it too tightly. Remember that insulation works by trapping air, so gentle placement matters.
Working out of sequence creates expensive do-overs. One enthusiastic builder installed wall panels before running electrical wiring, then had to remove everything to add outlets for his custom workspace. Plan your electrical, plumbing, and HVAC routes before covering walls.
Using inappropriate materials for outdoor structures causes problems down the line. Interior-grade drywall absorbs moisture, while standard paint peels in temperature fluctuations. Select products rated for garages or unheated spaces.
Inadequate ventilation leads to condensation issues. Without proper air circulation, even waterproofed sheds can develop dampness problems. Install vents at both high and low points for optimal airflow.
The good news? Most mistakes are fixable. If you’ve already encountered issues, don’t panic. Remove affected materials, address the root cause, and restart with proper techniques. Your shed finishing project can still succeed with patience and the right approach.
Finishing your shed interior might seem overwhelming at first glance, but following the proper step-by-step sequence transforms this from a daunting task into a manageable weekend project. By tackling each phase methodically—from addressing moisture concerns and insulation through electrical work, wall finishing, and final touches—you’ll avoid costly mistakes and rework that come from jumping ahead or skipping critical steps.
The beauty of this approach is that each completed stage builds confidence for the next. Homeowners who’ve successfully finished their shed interiors often share that breaking the project into distinct phases made all the difference. One DIY enthusiast recently told us that taking time to properly prep and insulate first saved hours of frustration later when installing shelving and organizing tools.
Remember, a well-finished interior isn’t just about aesthetics—it maximizes your investment in quality storage solutions by protecting your belongings from moisture, temperature extremes, and wear. Whether you’re storing garden equipment, creating a workshop space, or setting up a hobby area, that finished interior ensures everything stays organized and accessible for years to come. You’ve got this—one step at a time, your shed will become the functional space you envisioned.