
Why Your Shed Assembly Failed (And How to Get It Right the First Time)
Gather every tool on your assembly manual’s list before you open a single box—missing a Phillips head screwdriver or level mid-project turns a four-hour job into a two-day ordeal. Check the weather forecast for a three-day window of dry conditions, since moisture can warp panels and make hardware difficult to install properly. Clear and level your installation site completely, removing rocks, roots, and debris within a two-foot perimeter of your shed’s footprint to prevent foundation settling and structural problems down the line.
Most shed assembly failures happen in the first thirty minutes, not because the instructions are complicated, but because homeowners skip critical preparation steps. You’re excited to see your new storage solution take shape, and that enthusiasm can tempt you to rush past the boring preliminary work. But experienced DIYers know that pre-assembly preparation determines whether you’ll finish confidently in an afternoon or struggle through a frustrating weekend of do-overs.
The difference between a smooth assembly and a problematic one often comes down to three fundamental areas: having the right tools readily accessible, enlisting appropriate help for the job, and preparing your site properly. When you invest time upfront to address these elements systematically, you transform what seems like an intimidating project into a manageable, even enjoyable experience. This checklist walks you through exactly what you need to verify, gather, and prepare before you break the seal on your shed packaging.
The Real Cost of Skipping Pre-Assembly Planning
We’ve all been there—excitement takes over, and you’re ready to dive right in. But when it comes to shed assembly, skipping the pre-assembly planning stage can turn an enjoyable weekend project into a costly headache.
Without proper preparation, you’re setting yourself up for a cascade of problems. Damaged parts top the list. When you’re working on uneven ground or trying to assemble components in cramped spaces, pieces can crack, scratch, or warp. That pristine door panel? One wrong move on rocky terrain and you’ve got a permanent dent. Missing hardware becomes another common issue—you’re halfway through assembly when you realize you need a specific drill bit, forcing you to pause and make an emergency hardware store run.
Safety concerns multiply when you haven’t thought things through. Lifting heavy roof panels without adequate help or proper positioning can lead to serious injuries. Unstable ground means wobbly structures during assembly, increasing the risk of accidents. Then there’s the frustration factor—what should take a Saturday can stretch into multiple weekends of troubleshooting.
Consider Sarah from Ohio, who shared her experience: “I was so eager to get started that I didn’t check if my yard was level. Three hours in, we realized the foundation was off by two inches. We had to disassemble everything and start over. What I thought would save time ended up costing me an entire extra day and some choice words with my husband.”
The reality is simple: fifteen minutes of planning saves hours of problem-solving. A quick checklist review ensures you have the right tools, adequate help, and a properly prepared site before you ever open that first box.

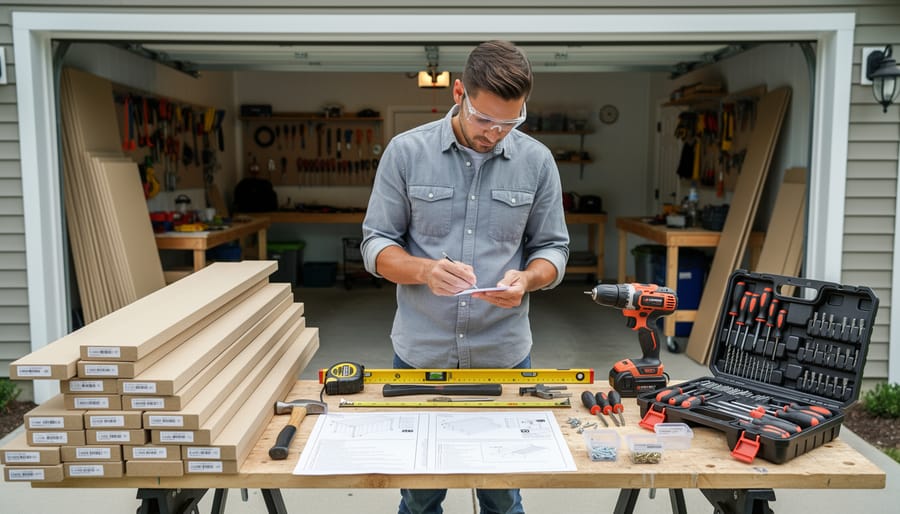
Essential Tools You Need Before Opening That Box
Basic Hand Tools Every Assembly Needs
You don’t need a workshop full of expensive equipment to assemble your shed successfully. Most pre-assembled sheds come together beautifully with just a handful of basic hand tools you likely already own.
Start with a quality hammer for securing panels and tapping pieces into place. A rubber mallet is equally valuable since it won’t damage pre-finished surfaces when you need to gently persuade parts to fit together. You’ll definitely want both Phillips-head and flathead screwdrivers in various sizes, though a cordless drill with driver bits will save you considerable time and effort.
A good adjustable wrench or socket set handles the nuts and bolts that hold your shed’s frame together. Don’t skimp on this one—stripped bolts create headaches that delay your project. An 8-foot measuring tape ensures accurate placement and helps you verify that everything aligns properly during assembly.
Here’s where many first-time shed builders overlook something crucial: a carpenter’s level. This simple tool prevents a world of problems. Sarah from Minnesota learned this the hard way: “I thought my foundation looked level, but after assembling three walls, I realized everything was tilted. I had to start over!” A 4-foot level catches these issues before they become disasters.
Round out your toolkit with a utility knife for opening packages and trimming materials, plus a pair of work gloves to protect your hands. A step ladder helps when securing roof panels or upper sections. These fundamental tools handle approximately 90 percent of typical shed assembly tasks, making your project smooth and enjoyable rather than frustrating.
Power Tools That Save Time and Effort
Power tools can dramatically speed up your shed assembly, but knowing when to use them makes all the difference. A cordless drill is practically essential for driving screws efficiently—what might take hours with a manual screwdriver becomes manageable in minutes. Look for one with adjustable torque settings to avoid stripping screws or damaging pre-drilled holes.
An impact driver is worth considering if you’re working with lag bolts or securing heavy framing components. It delivers extra rotational force without the wrist strain of a standard drill. However, for delicate trim work or areas where you need precise control, hand tools often give better results.
Circular saws come in handy if you need to trim panels or cut lumber for site modifications, though many shed kits require minimal cutting. One DIY enthusiast shared that his circular saw saved the day when foundation adjustments meant trimming door trim by half an inch.
The general rule? Use power tools for repetitive tasks like driving dozens of screws, but switch to hand tools when precision matters more than speed. This balanced approach prevents both fatigue and costly mistakes during assembly.
The Often-Forgotten Items That Save the Day
Beyond the standard toolkit, certain extras can transform your assembly experience from frustrating to smooth. Work gloves protect your hands from splinters and sharp edges while giving you better grip on panels—you’ll be glad you wore them by panel three. Safety glasses aren’t optional when you’re drilling overhead or cutting materials; flying debris doesn’t discriminate. A sturdy ladder becomes essential for upper wall sections and roof assembly, so borrow or rent one if you don’t own a reliable model.
Extension cords deserve special mention because your ideal shed location is rarely near an outlet. Measure the distance and add twenty feet to avoid constant unplugging and repositioning. Keep a permanent marker handy for labeling parts as you unpack them—future you will be grateful when identifying left from right panels. A roll of painter’s tape works wonders for temporarily holding pieces in position before final securing.
One homeowner shared that her shop vacuum became the hero of the day, quickly clearing sawdust and packaging debris that would have caused endless interruptions. These small items collectively prevent the kind of mid-project trips to the hardware store that derail momentum and add hours to your timeline.
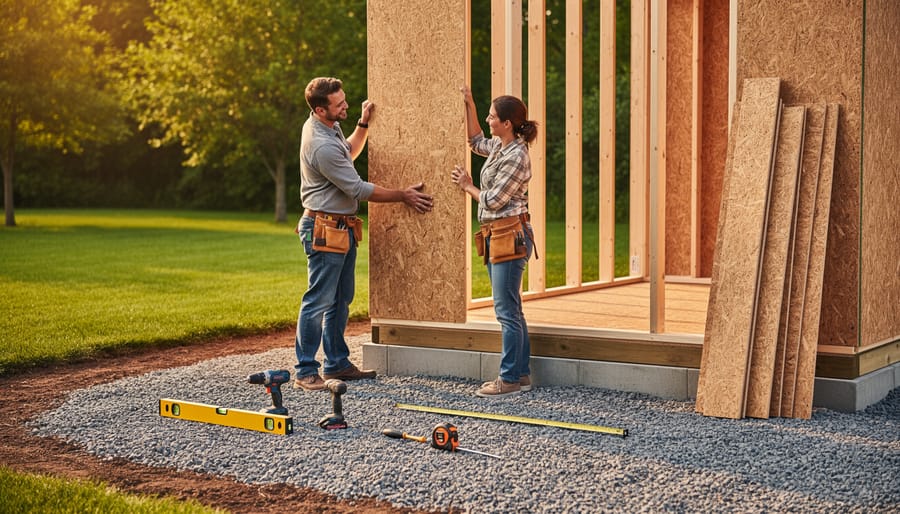
Why You Shouldn’t Assemble Your Shed Alone
How Many Helpers Do You Actually Need?
The number of helpers you need depends largely on your shed’s size and the weight of its components. Here’s a practical breakdown to help you plan ahead.
For small sheds (6×8 feet or smaller), one capable helper is typically sufficient. These structures have lighter panels and roof sections that two people can manage comfortably. You’ll mostly need an extra set of hands to hold wall sections steady while you secure them, making the job safer and more efficient.
Medium-sized sheds (8×10 to 10×12 feet) work best with two helpers. The panels become heavier and more awkward to maneuver, especially when lifting roof trusses or positioning longer wall sections. Having three people total means two can lift and position while the third person stabilizes and fastens components.
Large sheds (12×16 feet and up) really benefit from a team of three helpers, giving you four people total. The roof sections alone can weigh over 100 pounds, and you’ll face longer wall panels that require multiple people to prevent warping during installation.
Here’s a real-world tip from experienced builders: It’s better to have one extra person who stands around occasionally than to struggle with too few hands. An extra helper means more frequent breaks without stopping work completely, keeping everyone fresh and reducing mistakes caused by fatigue. Consider inviting a neighbor or friend—many are happy to help knowing they can call on you when they need assistance with their own projects.
What to Tell Your Helpers Before Assembly Day
Good communication with your helpers makes all the difference between a smooth assembly day and a frustrating one. Start by giving everyone a realistic timeframe. Most shed assemblies take 4-8 hours depending on size and complexity, so let your helpers know to block out at least half a day, preferably a full day to avoid feeling rushed.
Send a quick message or make a call a few days before assembly to confirm the date, start time, and expected duration. Morning starts work best since you’ll have natural light for the entire project and can tackle any unexpected issues before darkness sets in.
Be clear about what you’re providing versus what helpers should bring. Let them know you’ll have all necessary tools ready, but they should wear closed-toe shoes, bring work gloves if they prefer their own, and dress in clothes they don’t mind getting dirty. Mention that you’ll provide water and snacks, or arrange for lunch if the project will extend past midday.
Share a brief overview of the assembly process so helpers know what to expect. You might say something like, “We’ll be building the floor frame first, then the walls, and finally the roof. There will be some heavy lifting when we raise the wall panels.”
Consider your helpers’ physical abilities honestly. If someone has back problems or limited strength, assign them tasks like organizing hardware, reading instructions, or managing tools. This keeps everyone involved without risking injury and ensures the day stays positive for all.
Site Preparation: The Foundation of Success
Choosing the Perfect Spot for Your Shed
Finding the right location for your shed is one of the most important pre-assembly decisions you’ll make, and it’s worth taking the time to get it right. A poorly placed shed can lead to drainage problems, difficult access, or even costly foundation repairs down the road.
Start by checking your local zoning requirements and property setbacks. Most municipalities require sheds to be a specific distance from property lines, typically 3-10 feet. It’s much easier to verify these rules now than to relocate your shed later. While you’re at it, call 811 to have underground utility lines marked before you break ground.
Consider sun exposure carefully. If you’re storing temperature-sensitive items or plan to work inside, positioning your shed to avoid afternoon sun can keep the interior cooler. Conversely, morning sun can help dry out moisture and prevent mildew.
Drainage is crucial for shed longevity. Avoid low spots where water pools after rain. Your shed should sit on higher ground with a slight slope away from the structure. One homeowner shared how ignoring drainage led to a rotted floor within two years—an expensive lesson learned.
Think about accessibility too. You’ll want enough clearance to open doors fully and maneuver lawn equipment or other large items. Leave at least three feet of space on all sides if possible. Also consider the path from your house or driveway. Will you be trudging through mud during spring rains, or do you have a clear route year-round? Planning these details now saves countless headaches during assembly and beyond.
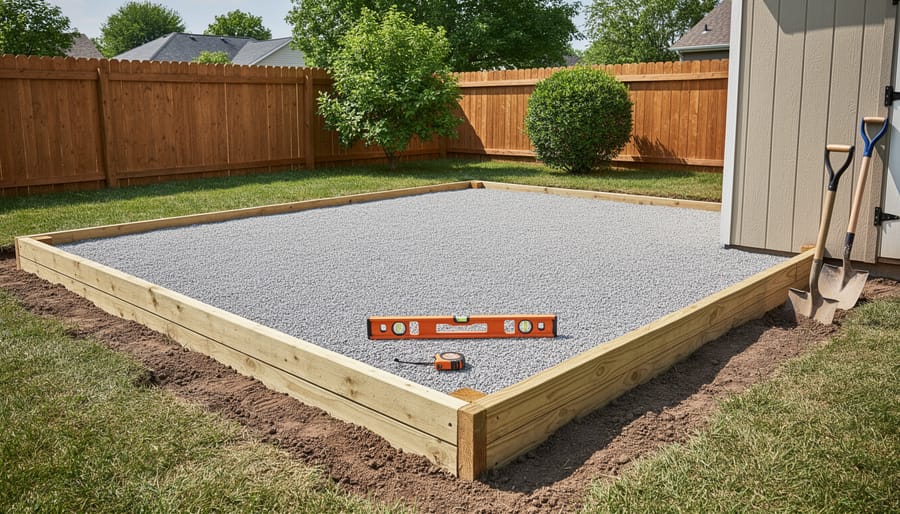
Creating a Level, Stable Foundation
A solid, level foundation is absolutely essential for your shed’s longevity and functionality. Without it, doors won’t close properly, floors can warp, and the entire structure may settle unevenly over time. The good news? You have several foundation options that work beautifully depending on your budget and shed size.
Concrete slabs offer the most permanent solution and work especially well for larger sheds or those storing heavy equipment. While they require more investment upfront, they provide excellent stability and won’t shift over time. You’ll want to ensure the slab is perfectly level before assembly begins.
Gravel foundations are popular among DIY enthusiasts because they’re affordable and relatively simple to install. Create a level bed at least four inches deep, extending slightly beyond your shed’s footprint. Use crushed stone rather than pea gravel for better compaction and stability. A tamper will become your best friend here.
Concrete pavers or deck blocks provide a middle-ground option that balances cost and durability. Arrange them in a grid pattern to support your shed’s floor frame, ensuring each paver sits perfectly level with the others. This method works great for smaller sheds and allows for easier relocation if needed.
Regardless of which foundation you choose, take time to check level in multiple directions using a long carpenter’s level. Even small variations can cause big headaches during assembly. Remember, investing extra effort in your foundation now prevents frustrating adjustments later.
Clearing Access and Working Space
Imagine trying to assemble furniture in a cramped hallway—frustrating, right? The same principle applies to shed assembly, only on a much larger scale. You’ll need adequate clearance around your assembly site to make the process smooth and safe.
Plan for at least 6-8 feet of open space on all sides of where your shed will stand. This breathing room serves multiple purposes. First, it gives you a staging area for organizing panels, hardware, and tools as you unpack them. There’s nothing worse than hunting for parts scattered across your yard mid-assembly! Second, it allows your helpers to move freely around the structure without stumbling over materials or each other.
Consider the path from your driveway or delivery point to the assembly site too. Can you easily carry or wheel large panels without navigating tight corners or obstacles? One homeowner shared how trimming back overgrown shrubs along their side yard saved hours of frustration during assembly day.
Don’t forget vertical clearance if you’re working near trees or power lines. You’ll be lifting panels overhead, and safety comes first. Take a few minutes now to move patio furniture, kids’ toys, garden hoses, and other yard items out of the work zone. A clear, organized workspace transforms assembly from a chaotic scramble into a manageable project.
Your Pre-Assembly Day Checklist
The night before assembly day deserves just as much attention as the big day itself. Taking time now to verify you have everything in order will save you from frustrating mid-project runs to the hardware store or unnecessary delays.
Start by confirming your delivery schedule and ensuring someone will be available to receive the shed package. Most deliveries require a signature, and you’ll want to inspect the shipment immediately for any visible damage or missing components. Take photos of the packaging before opening, just in case you need documentation later.
Next, gather and organize all your tools in one easily accessible location. Check batteries on cordless drills, locate extra drill bits, and make sure your level actually works. One homeowner shared that discovering their level was broken halfway through assembly meant rechecking every panel they’d already installed—an avoidable setback with proper preparation.
Review the manufacturer’s instructions completely. Yes, the entire manual. This might seem tedious, but it helps you understand the assembly sequence and identify any special tools or additional materials you might need. Some sheds require caulking, shims, or specific fasteners not included in the package.
Verify your helpers’ availability and confirm the start time. Share the instruction manual with them if possible, so everyone arrives with a basic understanding of the project scope. Assembly goes much smoother when everyone knows the game plan.
Check the weather forecast one final time. If rain looks likely, have tarps ready to protect materials, or consider rescheduling. Most shed materials can handle brief moisture exposure, but why take chances when a dry assembly day is just a few days away?
Finally, prepare your site one last time. Walk the foundation, checking for level and stability. Clear the surrounding area of any obstacles, garden hoses, or toys that might create trip hazards. Set up a small station nearby with water, snacks, and a first-aid kit—your team will appreciate the thoughtfulness during breaks.
Taking the time to work through your pre-assembly checklist might seem like an extra step, but it’s truly the difference between a frustrating weekend and a rewarding project you’ll be proud of. When you’ve gathered your tools, recruited capable helpers, and prepared your site properly, the actual assembly process transforms from overwhelming to manageable. Many homeowners who’ve been through it report that the building itself becomes surprisingly enjoyable when you’re not constantly running back to the hardware store or struggling with uneven ground.
Think of preparation as your insurance policy against common assembly headaches. You’re setting yourself up to work efficiently, safely, and with confidence. That satisfying moment when you step back and admire your completed shed—knowing it’s properly positioned, securely anchored, and built to last—makes every minute of planning worthwhile. Your future self will thank you for the effort you put in today. With your checklist complete and everything in place, you’re ready to tackle assembly and create the functional storage solution your home needs.
Looking for a storage sheds?
Browse our full range of storage sheds from authorized dealer brands. Free shipping to the continental US.