


How to Install a Shed Foundation Kit for Your 10×12 Metal Shed

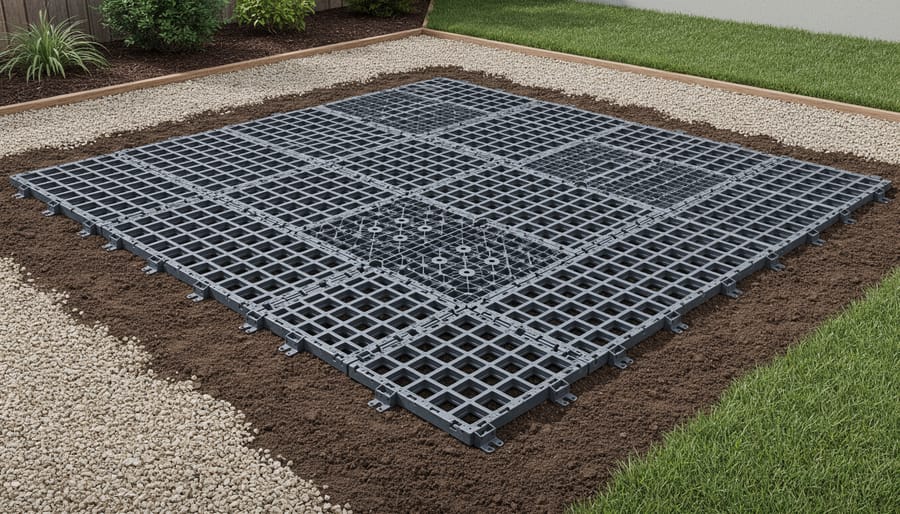
Installing a 10×12 shed foundation kit takes about 4 to 6 hours and transforms uneven ground into a stable, level base that protects your investment for decades. These modular systems, typically made from plastic grids or interlocking frames, eliminate the need for concrete mixing and heavy equipment while still providing the structural support your shed demands.
For most DIYers, the appeal is straightforward: you skip the messiest parts of traditional foundation work. No gravel compaction guesswork, no waiting for concrete to cure, and no renting a cement mixer. Instead, you’re working with manageable components that snap or bolt together on prepared ground. The 10×12 size is particularly popular because it fits most backyard layouts while offering enough storage space for lawn equipment, bikes, garden tools, and seasonal items without overwhelming your yard.
The catch? Success hinges entirely on proper ground preparation and precise leveling. Rush this step, and your shed will settle unevenly, doors won’t close properly, and water may pool underneath. Get it right, though, and you’ll have a foundation that outlasts many traditional methods with far less effort.
This guide walks you through every stage of the installation process, from site assessment and ground prep to final leveling checks and shed placement. You’ll learn which tools make the job easier, how to spot and fix common mistakes before they become problems, and what to verify at each stage so you’re confident the foundation is truly ready. Whether you’re installing your first shed or replacing an old foundation that’s finally given out, the step-by-step approach here keeps the project manageable and the results professional.
Key Takeaway: A level, well-drained site is non-negotiable for metal shed stability. Spend extra time on preparation rather than fighting foundation problems later, and always verify local setback requirements before clearing your site.
What You’ll Need: Tools, Materials, and Your Foundation Kit
Before you break ground, gathering everything you need saves frustration and multiple trips to the hardware store. A well-organized workspace with all tools and materials at hand makes the installation smoother and faster.
What’s Typically Included in Your 10×12 Foundation Kit
Most foundation kits come with the core structural components: interlocking grid panels or rail systems, corner brackets, connecting hardware, and sometimes ground stakes. However, what’s included varies significantly between manufacturers, some provide comprehensive systems while others offer just the framework. Always check your specific kit’s contents list before purchasing additional supplies.
Your Complete Shopping List
You’ll need items beyond what the kit provides:
- Essential Tools: 4-foot level, tape measure, rubber mallet, cordless drill with bits, work gloves, safety glasses
- Ground Preparation: Landscape fabric (12×14 feet minimum), crushed gravel or pea gravel (approximately 1-2 cubic yards), rake, shovel
- Assembly Hardware: Additional ground stakes or auger anchors (often needed beyond kit-supplied quantity), galvanized screws or bolts if not included
- Leveling Supplies: String line, wooden stakes for marking corners, carpenter’s square
- Optional but Helpful: Wheelbarrow for moving gravel, tamper or compactor for base preparation, spray paint for marking layout
Pro tip: Lay out all your kit components before starting to verify nothing’s missing and familiarize yourself with how pieces connect. Take a quick inventory photo on your phone, it’s helpful for reference during assembly. If you discover missing parts, contact the manufacturer immediately rather than improvising, as substitutions can compromise structural integrity.
Having a second person available, even if just for an hour during the initial layout and leveling stage, makes the job considerably easier and more accurate.
Safety First: Important Precautions Before You Begin
Before you move a single foundation component, take these safety steps seriously. They’ll protect you, your property, and everyone helping you.
Warning: Always call 811 at least two business days before digging to have underground utilities marked, hitting electric, gas, or water lines can cause serious injury or death.
Even shallow excavation for leveling can strike buried lines, so make that call your first priority.
Next, think about the physical demands. Foundation components, especially for a 10×12 shed, can weigh 30-50 pounds each. Lift with your legs, not your back, and keep the load close to your body. Better yet, recruit a partner for anything you can’t comfortably handle alone. Two people working together also catch leveling mistakes faster.
Wear work gloves to protect against splinters and sharp edges, steel-toed boots for dropped components, and safety glasses when cutting or hammering. If you’re spreading gravel, a dust mask helps on windy days.
Check the weather forecast too. Rain turns your site into a muddy mess and makes components slippery. High winds above 20 mph can lift lightweight panels or knock over partially assembled frames. Pick a calm, dry day with at least four hours of uninterrupted daylight.
If your site has a slope beyond what a spirit level can easily fix, or you discover rocky soil that resists hand tools, consider consulting a professional. Some conditions need equipment or expertise beyond typical DIY scope.
Preparing Your Site for the Foundation
Choosing the right spot for your 10×12 shed makes all the difference between a quick weekend project and a frustrating do-over. Start by walking your property with drainage in mind. Water should naturally flow away from your intended location, not toward it or pool around it. Look for spots on higher ground or areas where rainwater doesn’t linger after storms. A foundation that won’t sink starts with smart site selection that keeps moisture from undermining your work.
Next, think about accessibility. You’ll need to get your shed materials to this spot, and later you’ll be walking to and from your shed regularly. Consider pathways, proximity to where you’ll use the shed most, and whether delivery trucks or wheelbarrows can reach the area. Also check your local building codes and HOA rules before you commit. Many areas require setbacks from property lines, usually 3 to 5 feet, and some require permits even for smaller sheds.
Once you’ve picked your spot, mark out an area larger than 10×12. Add at least 12 to 18 inches on all sides, giving you a 12×14 or 13×14 work zone. This extra space lets you access all sides during installation and provides room for proper grading. Clear everything within this perimeter: grass, roots, rocks, debris. Cut back any overhanging branches that might drop leaves or sap onto your shed.
Now comes the critical part: leveling. Use a long straight board and a level to check the ground in multiple directions. Small slopes are manageable, but anything more than a 2-inch drop across your 10-foot span needs addressing. For minor unevenness, you can add gravel to low spots and compact it firmly. If you’re facing a significant slope or very soft soil, consider bringing in a professional to grade the site properly. Sometimes spending a few hundred dollars on expert grading saves you from a wobbly shed and repeated foundation repairs down the road.
Step-by-Step: Installing Your 10×12 Foundation Kit
Laying the Base Layer
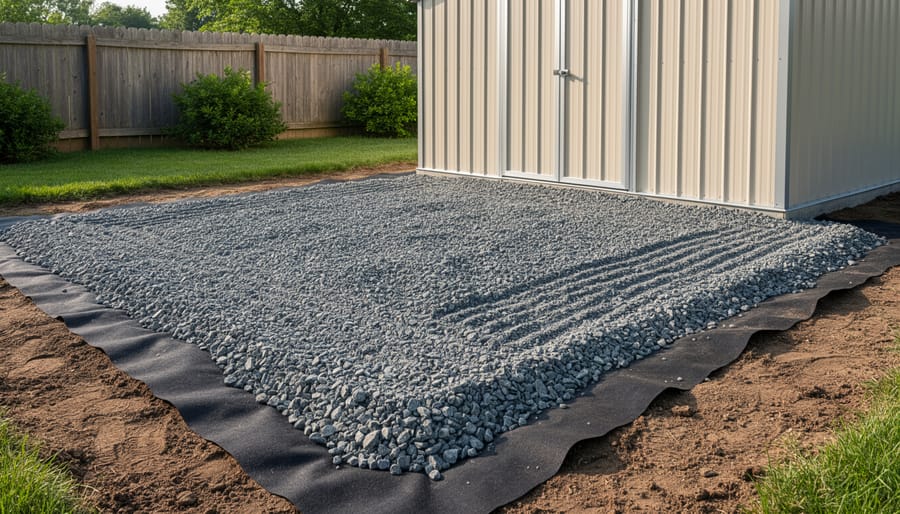
Start by rolling out landscape fabric across your entire 10×12 area plus about 6 inches beyond on all sides. This barrier stops weeds from pushing through and prevents ground moisture from wicking up into your foundation. Overlap any seams by at least 6 inches and secure the fabric edges with landscape staples every few feet so it doesn’t shift when you add gravel.
If your foundation kit requires a gravel base, most do, spread 3 to 4 inches of crushed stone or pea gravel evenly across the fabric. Use a rake to distribute it, then compact it thoroughly with a hand tamper or plate compactor. Work in passes, overlapping each section, and don’t skip this step. Loose gravel shifts and settles unevenly, which means your foundation won’t stay level and you’ll struggle to anchor a metal shed securely later.
After compacting, check level again with your 4-foot level in multiple directions. Add or remove gravel in low or high spots, then re-compact those areas. The goal is a firm, flat base that doesn’t give when you walk on it. If your foot sinks in anywhere, you haven’t compacted enough. This solid foundation bed is what keeps everything stable for years.
Assembling the Foundation Frame
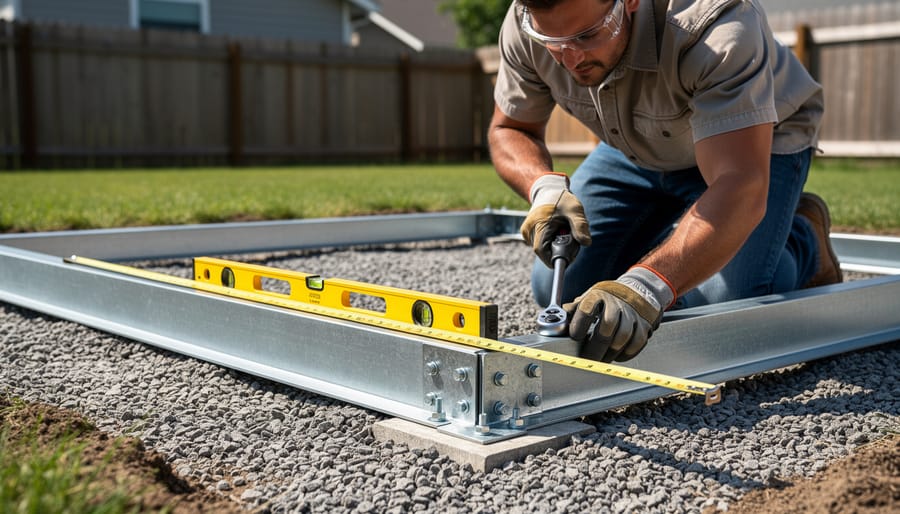
Start by laying out all your foundation components in the general footprint of your 10×12 shed. This gives you a clear picture of what goes where before you commit to any connections.
Position the perimeter rails or beams first, creating your outer rectangle. Most kits use interlocking corners or bracket connections, follow your manufacturer’s specific instructions here, but finger-tighten fasteners only at this stage. You’ll need wiggle room for adjustments.
Now comes the critical part: making sure your foundation is perfectly square. An out-of-square foundation means your shed walls won’t align properly later. Use the 3-4-5 triangle method to check. Measure 3 feet along one side from a corner, mark it. Measure 4 feet along the adjacent side, mark that. The diagonal between these two points should measure exactly 5 feet. If it doesn’t, adjust the frame until it does. Repeat this check at all four corners.
With the frame square, add any interior support beams or cross-members according to your kit design. These typically snap into place or bolt to the perimeter frame at predetermined intervals.
Check level continuously as you work. Place your level across different sections, front to back, side to side, and diagonally. If you spot high or low spots, loosen connections and add or remove small amounts of gravel underneath. A few handfuls can make a surprising difference.
Once everything sits level and square, tighten all fasteners firmly. Work in a pattern that prevents the frame from shifting, tighten opposite corners alternately rather than going around in sequence. Double-check square and level one final time after fully tightening everything.
Securing and Final Leveling
Once your foundation frame is assembled and squared, it’s time to lock it in place and perform your final leveling checks. This step ensures your foundation won’t shift when you start building your shed on top of it.
Start by driving ground stakes or anchors through the designated holes in your foundation kit. Most 10×12 kits include pre-drilled anchor points at each corner and along the perimeter rails. Push stakes through these openings and drive them into the ground with a rubber mallet, angling them slightly outward for better holding power. If you’re working with harder soil, you might need to pre-drill pilot holes with a steel spike first. In very soft or sandy ground, consider using longer auger-style anchors that screw deep into the earth for extra stability.
With anchors in place, grab your level and check the foundation in multiple directions. Start by placing your 4-foot level across the width at three points: front, center, and back. Then rotate 90 degrees and check the length in three spots. Finally, check both diagonal corners. Your foundation should be level in all directions within an eighth of an inch over the 10-foot span.
If you spot high or low spots now, don’t panic. Loosen the nearest anchors, lift or tap down the affected corner or rail, and add or remove small amounts of gravel beneath that section. Compact any added material, recheck level, and re-anchor when satisfied. This is your last chance for adjustments, so take your time. A foundation that’s slightly off-level now becomes a major headache when you’re halfway through shed assembly and doors won’t close properly.
Anchoring Your Metal Shed to the Foundation
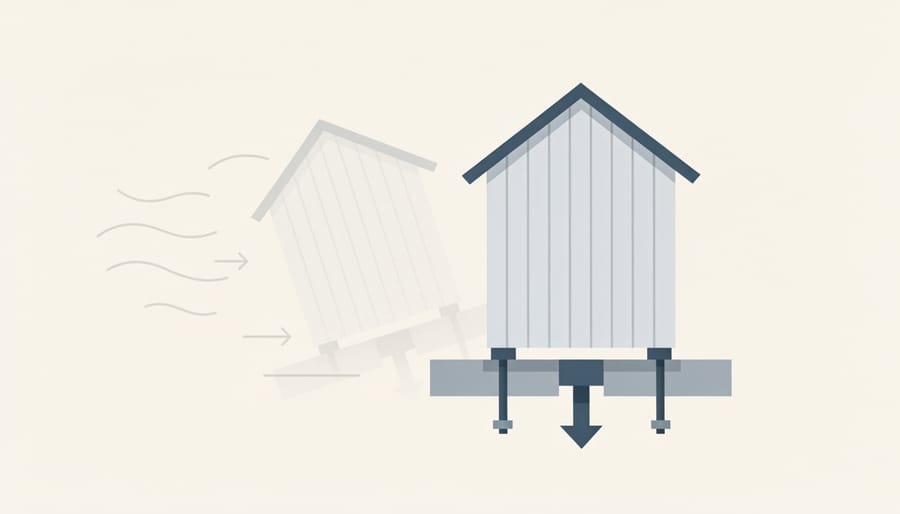
With your foundation level and stable, anchoring the metal shed properly is what transforms a well-built base into a truly secure structure. Metal sheds are lighter than wood, which makes them more vulnerable to wind uplift, proper anchoring isn’t optional, it’s essential for long-term stability.
Choose the Right Anchor Type for Your Foundation
Different foundation systems need different anchoring approaches. Auger anchors (also called earth anchors or corkscrew anchors) work brilliantly with grid or rail foundation kits. You screw these into the ground through pre-drilled holes in the shed’s base plate or frame, and they grip deep into the soil, typically 18 to 24 inches down. They’re your best choice for areas with moderate to high winds.
Concrete anchors come into play if you’ve built a concrete pad foundation or used concrete deck blocks. These require drilling into the concrete and setting expansion bolts or wedge anchors that create an incredibly strong hold. For plastic base panel systems, you’ll typically use ground stakes (similar to heavy-duty tent stakes) that pass through the shed floor and into the compacted gravel below.
Hurricane straps or tie-down straps add extra insurance in severe weather zones. These metal connectors link the shed’s roof trusses or top plates directly to the foundation anchors, creating a continuous load path that resists uplift forces.
Tip: Check your local building codes for specific anchoring requirements, many high-wind areas mandate a minimum number of anchors and prescribe approved types for structures over a certain size.
Installation Best Practices
Space your anchors evenly around the shed’s perimeter, not just at the corners. For a 10×12 shed, plan on six to eight anchor points minimum, one at each corner, plus one or two along each long side. Mark your anchor locations on the foundation before positioning the shed, which makes drilling or driving anchors much easier than working underneath an assembled structure.
When installing auger anchors, turn them slowly and steadily. If you hit a rock, back out slightly and try a spot six inches away rather than forcing it. Tighten all connections firmly but avoid overtightening, which can strip threads or crack metal shed components. The goal is snug contact without deforming the shed’s base.
Test your work by gently pushing against the shed walls from multiple angles. There should be no movement or flex at the base. A properly anchored 10×12 metal shed will feel rock-solid, ready to weather whatever your climate throws at it.
Checking Your Work: How to Verify a Successful Installation
Before you start building your metal shed, take twenty minutes to thoroughly verify your foundation work. This crucial checkpoint catches problems when they’re still easy to fix, not after you’ve assembled half the shed.
Walk around your foundation and perform these essential checks:
- Place your level on multiple points across the frame in both directions, no reading should exceed 1/4 inch variance
- Measure all four sides and both diagonals, they should match your kit specifications within 1/8 inch
- Push firmly on each corner and center point to test for movement or flex
- Inspect every anchor point to ensure stakes or anchors penetrate fully and sit flush
- Check that all connection points between frame components remain tight and properly seated
If your level shows discrepancies, now’s the time to loosen anchors and make adjustments using shims or additional gravel. A foundation that’s slightly off will compound into serious problems when you install metal roofing or hang doors later.
Test stability by standing on the foundation and shifting your weight. You shouldn’t feel any wobble, sinking, or tilting. Walk the entire perimeter and apply pressure, solid ground contact throughout means you’re ready to proceed.
A level, stable foundation is your insurance policy. It’ll help stop rust early by preventing water pooling and will maximize shed lifespan by eliminating stress points that lead to panel warping and door alignment issues. If something doesn’t check out, fix it now, your future self will thank you.
Common Installation Challenges and Quick Fixes
Even with careful planning, you’ll likely hit a snag or two during installation. The good news? Most challenges have straightforward fixes that don’t require starting from scratch.
Uneven ground is the most common headache. If you discover low spots after laying your base, add more gravel incrementally and tamp it down thoroughly. For high spots, scrape away excess material rather than trying to build up around them. A difference of more than two inches across your 10×12 area, however, means you’ll need to do more serious grading before proceeding.
Components that don’t quite align usually signal that your frame isn’t perfectly square. Before forcing anything, recheck your corners using the 3-4-5 triangle method. Often, loosening one connection point and shifting the frame slightly will bring everything into alignment. If panels or rails seem warped, lay them in the sun for 30 minutes, the heat can make plastic components more pliable and easier to work with.
Can I install a foundation kit on a slight slope?
Yes, if the slope is minimal (less than 2 inches across 10 feet). Build up the low side with additional gravel and compact it well, then verify level in all directions before proceeding.
What if my measurements are off by an inch?
An inch won’t affect stability, but make sure your frame is still square. Adjust the positioning of your shed when you install it to center it on the foundation.
When should I completely start over?
Start over if your foundation is more than one inch out of level after installation, if the frame is twisted rather than just misaligned, or if you’ve anchored everything before realizing it’s significantly off-square.
Minor measurement errors rarely doom a project. If your foundation ends up slightly larger or smaller than exactly 10×12, that’s fine as long as your shed will fit and the frame itself is level and square. The shed walls will hide small gaps, and a foundation that’s an inch too large on each side actually gives you wiggle room during shed assembly.
You’ve built something that’ll last. A properly installed 10×12 foundation kit gives your metal shed the stable, level base it needs to stand strong for decades. The work you’ve done today, getting the ground prepared, assembling the frame with care, and double-checking those levels, prevents the common problems that plague sheds built on weak foundations. No settling, no moisture creeping up from below, no doors that won’t close because everything’s gone crooked.
This is absolutely a project you can tackle yourself. Yes, it takes some physical effort and attention to detail, but nothing here requires specialized skills. With the right preparation and a willingness to pause and fix small issues as they come up, most DIYers complete their foundation in a weekend.
Now you’re ready for the fun part: assembling your metal shed on this rock-solid base. Once that’s done, think about adding gutters to direct water away from your foundation and checking the shed’s seals annually. These small maintenance steps keep everything working as it should.
Take a moment to appreciate what you’ve accomplished. That level foundation didn’t exist this morning, and now it’s ready to support your storage needs for years to come.