


How to Anchor a Greenhouse: Essential Steps for Anchoring a Greenhouse Safely

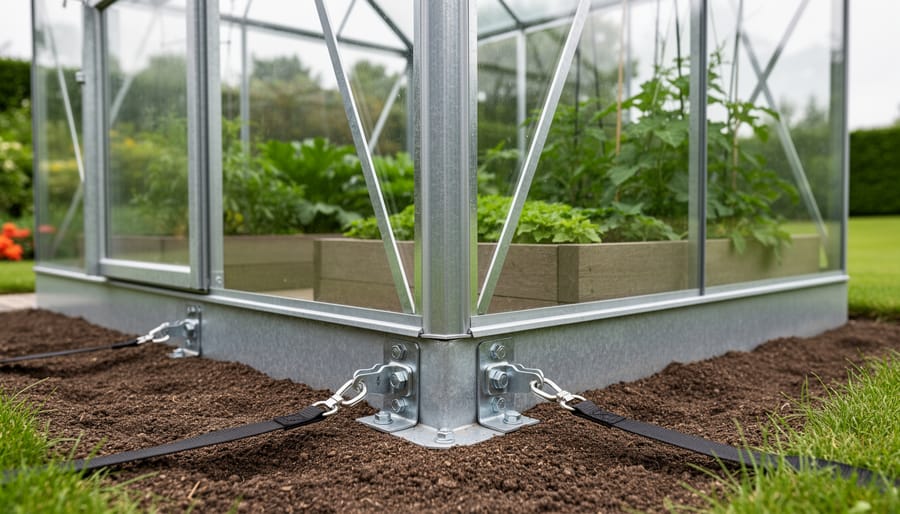
Anchoring a greenhouse properly to the ground takes about two to four hours and prevents costly wind damage that can destroy your entire structure in a single storm. The process involves selecting the right anchor type for your soil conditions, drilling or driving anchors at key stress points along the base frame, and tensioning them to create a stable foundation that can withstand gusts up to 70 mph or more.
Most greenhouse losses happen not because the structure itself fails, but because it wasn’t secured correctly during installation. A 10×12 foot greenhouse can act like a sail in high winds, generating enough lift to tear free from inadequate anchoring and tumble across your yard. I’ve heard from dozens of homeowners who learned this lesson the hard way, watching their greenhouses crumple or take flight during spring storms.
The good news? Anchoring is straightforward even for first-time DIYers, and you don’t need specialized skills or expensive equipment. Ground anchors, auger anchors, or concrete footings will work depending on whether you’re installing on soil, gravel, or an existing foundation. The key is matching your anchor system to both your greenhouse size and your local wind conditions.
This guide walks you through the complete anchoring process, from choosing the right hardware to testing your installation. You’ll learn exactly where to place anchors for maximum stability, how to avoid common mistakes that compromise holding power, and when additional reinforcement makes sense. Whether you’re setting up a new kit or retrofitting an existing greenhouse that feels unstable, proper anchoring gives you peace of mind that your investment will stay put through whatever weather comes your way.
Key Takeaway: Test your anchoring by applying firm pressure at multiple points around the frame, checking for zero movement. Schedule seasonal inspections every three months to catch loosening before it becomes a structural issue, and always re-tighten after major storms.
Why Proper Anchoring Matters for Your Greenhouse
A greenhouse without proper anchoring is essentially a wind sail waiting for the first strong gust. Wind uplift can tear an unsecured structure from its foundation, sending panels flying and turning your gardening investment into a hazard for your property and neighbors. Even moderate winds of 30-40 mph can lift a lightweight aluminum or polycarbonate greenhouse that lacks secure anchoring, while heavier glass structures may crack and shatter under lateral stress if the frame shifts on an unstable base.
Warning: Winds exceeding 25 mph can lift unanchored greenhouses weighing up to 200 pounds, creating dangerous projectiles and structural collapse risks.
The consequences extend beyond immediate storm damage. Poor anchoring allows gradual frame movement that creates stress cracks in glazing materials, bends structural supports, and throws doors out of alignment. Over time, this movement compromises the entire structure’s integrity. Your framing material matters too: aluminum frames require anchoring to prevent twisting, while steel frames can rust at connection points if movement allows water infiltration. Polycarbonate panels crack along edges when frames flex repeatedly, and glass panes simply shatter under stress.
Real-world failures tell the story clearly. A homeowner in Colorado lost a 10×12 greenhouse during a spring windstorm because they used only four ground stakes instead of the recommended eight anchors. The structure tumbled across the yard, destroying both the greenhouse and garden beds. Another case saw a coastal greenhouse’s frame separate from concrete footings during a nor’easter because the owner skipped installing expansion bolts, relying on gravity alone. The repair costs exceeded the original purchase price. These aren’t rare occurrences, they’re predictable outcomes when anchoring is treated as optional rather than essential.
Tools and Materials You’ll Need
Gathering your tools and materials before you start saves time and prevents mid-project trips to the hardware store. What you need depends on your greenhouse type and foundation, but most anchoring jobs require a core set of equipment plus anchor-specific items.
Essential tools and materials:
- Power drill with masonry and metal bits (if drilling into concrete or metal frame)
- Socket wrench or adjustable wrench for tightening bolts
- Spirit level (4-foot minimum) to ensure proper alignment
- Measuring tape and marking stakes for positioning anchor points
- Hammer or rubber mallet for driving ground stakes
- Safety glasses and work gloves
- Ground anchors (auger or corkscrew style for soil installations)
- Concrete anchors or expansion bolts (for slab foundations)
- Galvanized bolts, washers, and lock nuts matching your greenhouse frame holes
- Anchor plates or base plates (if required by your greenhouse model)
For concrete foundations, add a masonry drill bit set and a shop vacuum to clear debris from drilled holes. Auger anchors work best in loose or sandy soil and require a breaker bar or impact wrench for installation. Clay or rocky soil might need a sledgehammer and steel driving rod. Check your greenhouse manufacturer’s instructions, as some kits include proprietary anchors designed for their specific frame system.
Keep a bucket of water nearby if you’re working with concrete anchors that require setting compound. A cordless drill makes the job easier, but have extension cords ready if you’re using corded tools far from power outlets.
Safety Precautions Before You Begin
Before you start anchoring your greenhouse, take these safety measures seriously to prevent injury and property damage.
Warning: Always call 811 or your local utility locating service at least 48 hours before digging to mark underground gas, water, and electrical lines. Never anchor during high winds or storms.
Check the weather forecast and choose a calm, dry day for installation. Working in wet conditions makes the ground slippery and increases the risk of electrical hazards if you’re using power tools near damp soil.
Use proper lifting techniques when handling heavy greenhouse components and anchor materials. Bend at your knees, not your waist, and keep your back straight. Don’t attempt to lift sections that are too heavy alone, get a second person to help distribute the weight safely.
Stay aware of overhead power lines when positioning tall greenhouse frames or using extension ladders. Maintain at least ten feet of clearance from any electrical wires. If power lines cross your installation site, contact your utility company before proceeding.
Wear safety glasses when drilling into concrete or metal, and use work gloves to protect your hands from sharp edges on greenhouse framing. Steel-toed boots provide extra protection if you drop tools or heavy anchors.
If you encounter rock ledge while installing ground anchors, your soil is extremely unstable, or you’re uncertain about proper foundation work, hire a professional installer. Some situations require expertise beyond typical DIY skills.
Step-by-Step Greenhouse Anchoring Process
Preparing Your Site and Marking Anchor Points
Start by clearing debris, rocks, and vegetation from where your greenhouse will sit. Walk the entire area and remove anything that could interfere with a level foundation or anchor installation.
Next, level the ground as much as possible. Use a long board and a carpenter’s level to identify high and low spots. Fill low areas with compacted soil or gravel, and scrape down high points. Even small slopes can cause water pooling and uneven stress on your frame later.
Now measure and mark your greenhouse footprint. Grab your assembly instructions PDF and note the exact dimensions of the base frame. Use stakes and string to outline the perimeter, then measure diagonally corner to corner, both diagonals should match within half an inch to ensure the layout is square.
Mark each anchor point with spray paint or a small flag. Most greenhouses require anchors at each corner and at intervals along the base rails, typically every four to six feet. Double-check these locations against your instructions before drilling or driving anything into the ground. If you’re working over concrete, mark hole locations with chalk or a grease pencil.
Installing Ground Anchors or Foundation Bolts
For soil installations, drive auger-style anchors by hand or with a drill attachment, rotating clockwise while applying downward pressure. Sink each anchor at least 18 inches deep, 24 inches if your greenhouse exceeds 10×12 feet or you live in a high-wind area. Keep the anchor shaft perpendicular to the ground; angling reduces holding power by up to 40%. Once fully inserted, the anchor eye or bracket should sit flush with or just below ground level.
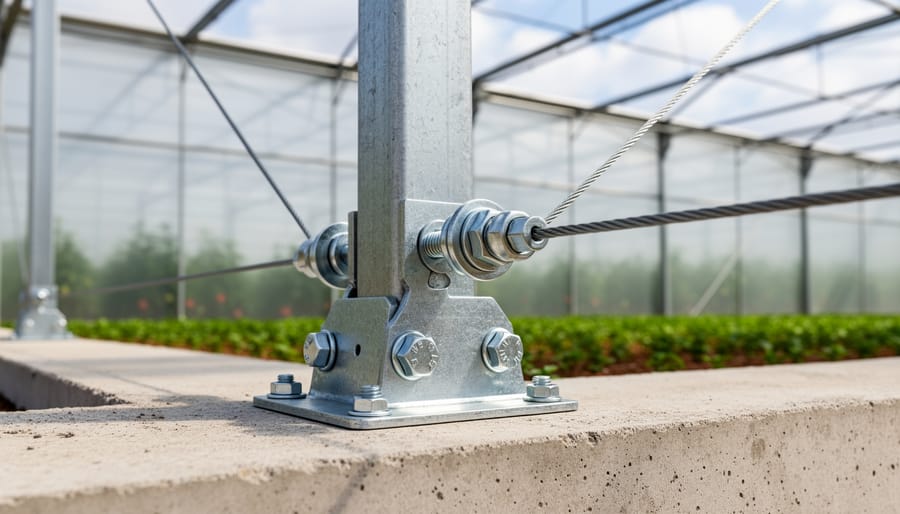
When anchoring to a concrete slab or footing, use a hammer drill with a masonry bit sized to match your concrete anchors. Drill holes 3 to 4 inches deep, keeping the drill perfectly vertical. Blow out dust with a shop vacuum or compressed air before inserting the anchor sleeve. Tap the sleeve in with a hammer until it’s flush, then thread in the bolt and tighten until you feel firm resistance, overtightening can crack the concrete.
For wooden decks or raised platforms, pre-drill pilot holes slightly smaller than your lag bolts to prevent splitting. Drive 4- to 6-inch galvanized or stainless-steel lag bolts through the greenhouse base rail and into the supporting joists, not just the decking boards. Space bolts no more than 4 feet apart around the perimeter.
After installing all anchors, tug firmly on each one. A properly set anchor won’t budge or rotate. Any movement means you need to reinstall it deeper or choose a heavier-duty anchor type for your conditions.
Attaching the Greenhouse Frame to Anchors
With your anchors securely installed, it’s time to connect your greenhouse frame. Start by positioning the base rails or frame over the anchors, aligning the pre-drilled holes in the frame with each anchor point. Don’t rush this step, proper alignment now prevents headaches later.
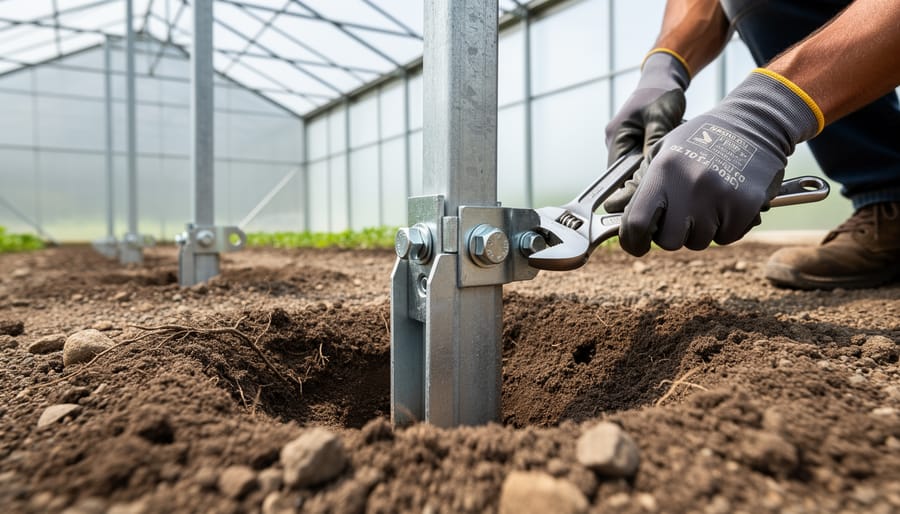
Thread a washer onto each anchor bolt before inserting it through the frame. The washer distributes pressure evenly and prevents the bolt from pulling through the frame material. Add a lock washer on top, followed by the nut. Lock washers are critical; they prevent vibration from loosening the connection over time.
Hand-tighten all nuts first, working around the perimeter systematically. This lets you make small alignment adjustments before final tightening. Once everything looks square, use a wrench or socket to tighten each nut. For most greenhouse frames, snug-tight is sufficient, typically 15-20 foot-pounds of torque if you’re using a torque wrench. Over-tightening can crack plastic components or strip threads in aluminum frames.
Tighten nuts in a crisscross pattern, similar to changing a car tire. This maintains even pressure and keeps the frame level as you work.
Leveling and Final Adjustments
Once your greenhouse frame sits on the anchors, grab a quality spirit level and check the base rails in every direction. Place the level along the front-to-back axis first, then the left-to-right axis. Even a slight tilt will cause doors to stick, panels to misalign, and water to pool incorrectly.
If you spot high or low corners, loosen the nearest anchor bolts just enough to adjust the frame height. Many anchor systems let you twist the anchor itself to raise or lower that point slightly. Add metal shims under the base rails for precision adjustments on hard surfaces, or compact soil beneath ground anchors for minor height changes.
Recheck with the level after each adjustment, small tweaks at one corner often shift alignment elsewhere. Once everything reads level, tighten all bolts in a star pattern to distribute pressure evenly and prevent the frame from warping as you secure it.
Finally, test the door by opening and closing it fully. It should swing freely without scraping or binding. If the door drags, you likely still have a levelness issue that needs correction before you finish tightening everything down permanently.
Choosing the Right Anchor Type for Your Situation
Matching the right anchor to your greenhouse and soil conditions prevents installation headaches and ensures long-term stability. Your choice depends on three factors: what’s underneath, how heavy your structure is, and whether you’re planning a permanent or seasonal setup.
For soft or sandy soil, auger-style ground anchors work best. These spiral steel stakes twist deep into the earth, typically 18 to 24 inches, creating strong holding power even when the ground shifts slightly. They’re ideal for lightweight aluminum-frame greenhouses and handle moderate wind exposure without pulling free. Install them at a slight angle pointing away from the greenhouse for maximum resistance.
If you’re anchoring to a concrete slab or existing patio, concrete wedge anchors or sleeve anchors are your go-to options. Pre-drill holes matching the anchor diameter, insert the anchor, and tighten the bolt to expand the sleeve against the concrete. These create rock-solid connections for heavier structures, especially those with significant glazing or a robust snow load rating that demands extra security.
Expansion bolts suit situations where you’re retrofitting anchors into cured concrete foundations. They’re adjustable and removable if you need to relocate your greenhouse later.
For temporary or seasonal greenhouses that you’ll disassemble each year, heavy-duty ground stakes or screw-in anchors provide adequate hold without permanent commitment. They’re quicker to install and remove but offer less wind resistance than permanent options.
Clay soil needs shorter, wider anchors that won’t twist out when wet. Rocky ground may require drilling pilot holes or switching to surface-mounted brackets with lag bolts into a timber base frame instead.
Testing Your Installation and What Comes Next
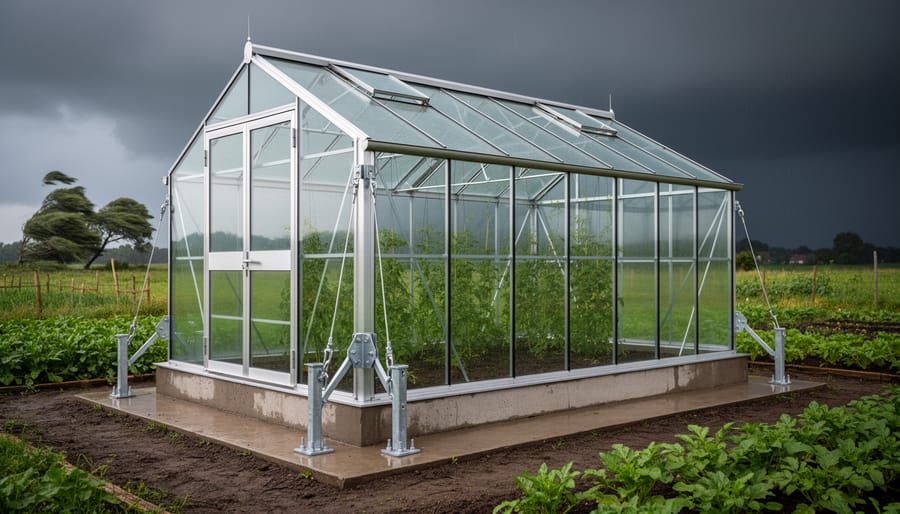
Once you’ve completed the anchoring process, walk around your greenhouse and firmly grasp the base frame at several points, applying steady outward and upward pressure. The structure should feel completely rigid with zero movement or flex at the anchor points. If you detect any give or shifting, locate the loose anchor immediately and retighten or reinstall it before proceeding.
Inspect every bolt, nut, and connection point to confirm they’re properly seated and torqued. Check that washers sit flat against the frame, lock washers have compressed, and no threads are stripped or cross-threaded. Run your hand along the base to verify the greenhouse sits level and flush with the foundation or ground surface.
Mark your calendar to inspect all anchors at the start of each season. Soil expands and contracts with freeze-thaw cycles, and vibrations from wind gradually loosen hardware over time. During these quarterly checks, use your wrench to verify each bolt maintains proper tension and look for rust, bent anchors, or cracked foundation material around anchor points.
Re-tighten any fasteners that have backed off even slightly. After severe storms with winds exceeding 40 mph, conduct an unscheduled inspection within a day or two. Replace anchors immediately if you notice bent shafts, stripped threads, significant rust that compromises metal integrity, or anchors pulling free from the soil or concrete. Catching these issues early prevents catastrophic failure when the next storm hits.
Common Questions About Anchoring Greenhouses
How many anchors does my greenhouse need?
Most greenhouses require one anchor at each corner, plus additional anchors every 4-6 feet along the sides for larger structures over 8 feet long. Check your manufacturer’s specifications, as heavier materials and high-wind areas may need more anchors for adequate stability.
Do I need to anchor a temporary greenhouse?
Yes, even lightweight temporary greenhouses need anchoring to prevent them from becoming airborne hazards during wind events. Use ground stakes or auger anchors that can be easily removed when you take down the structure, but never skip anchoring entirely.
What should I do if I hit rock while installing ground anchors?
If you encounter rock, switch to a different anchor type such as concrete anchors drilled into the rock, or pour small concrete footings at those locations and use foundation bolts instead. Don’t try to force auger anchors through rock, as this will damage both the anchor and the tool.
Can I anchor a greenhouse on uneven ground?
You’ll need to level the ground first or build up low spots with compacted gravel and sand before anchoring. Anchoring on uneven ground creates stress points in the frame, causes doors to bind, and makes the structure more vulnerable to wind damage.
How do I re-anchor a greenhouse if I need to move it?
Remove the old anchors carefully, move the greenhouse to the new location, and install fresh anchors following the same process as the initial installation. Reusing bent or corroded anchors compromises stability, so replace any damaged hardware rather than reinstalling it.
Beyond these common questions, you might wonder about specific soil conditions or unusual site challenges. Rocky soil, sandy ground, and clay each present different anchoring considerations. If your site has extremely soft or shifting soil, consider upgrading to larger auger anchors or pouring concrete footings for a more permanent solution.
Seasonal maintenance raises questions too. Check your anchors twice a year, tightening any bolts that have loosened due to ground movement or temperature changes. After major storms, inspect all connection points and look for any anchors that have shifted or pulled up slightly. Catching these issues early prevents them from becoming serious structural problems.
For greenhouses installed on wooden decks or platforms, the anchoring approach changes completely. You’ll secure the frame to the deck joists rather than the ground, using lag bolts long enough to penetrate through the decking into the structural supports below. This requires careful planning to align your greenhouse with the underlying framework.
If you’re working with an older greenhouse that’s never been properly anchored, the retrofitting process follows the same steps as a new installation. You may need to lift the structure slightly to position anchors correctly underneath the base rails. Having a helper makes this much safer and easier, especially with larger greenhouses.